Domestic Superhero

  • Recipes
  • DIY Projects
  • Travel
  • About Me
menu icon
go to homepage
  • Recipes
  • DIY Projects
  • Travel
  • About Me
search icon
Homepage link
  • Recipes
  • DIY Projects
  • Travel
  • About Me
×
Home » You searched for fall

Search Results for: fall

Guest Post: Gluten Free Blackberry Meringue Tartlets

Published Sep 24, 2014 by Allyson
This post may contain affiliate links. Read my disclosure policy.

I am so excited to have Anyonita guest blogging on Domestic Superhero today! I have followed her blog forever, and she has the best recipes AND tips for bloggers. If you are a blogger, you definitely need to go check out her how-to's, right now!
 

Even though Halloween's around the corner, there's nothing spooky about these gluten free blackberry meringue tartlets!

Hello! I'm Anyonita & I blog at Anyonita Nibbles where I like to focus on flavorful food for the whole family. A lot of my recipes are gluten free since I was diagnosed with Celiac Disease earlier this year. I'm happy to be blogging here for Allyson today; her blog is one of my favorites & I'm honored to have been asked to share this exclusive recipe with you all!

One of the biggest frustrations for me regarding Celiac Disease and being gluten free is having to give up foods that I love. I've made it my personal mission to recreate all my favorite dishes in a gluten free manner so that I can continue to enjoy them. That's where the basis of this blackberry tartlets recipe comes from.

Blackberries are on the verge of being out of season, and the last few crops are being sold. This is my favorite time of the year for blackberries. I much prefer them now,after they've had the sweetness of a long, hot summer with ample sunshine to ripen than at the beginning of the season, when they're unevenly sized and sometimes too tart. Late season blackberries always taste much sweeter to me than just-in-season ones. To celebrate them, here's an easy tart recipe that's perfect for fall. I used my favorite Golden Delicious apples, but you could use any native apples that are in season now.

These tartlets taste best when they've aged a few days. So make the blackberry curd and the pastry on the same day and refrigerate both overnight before filling and topping with the meringue. If you have a cook's blowtorch, you could burn the peaks of the meringue with it or you could pop it under a very hot grill/broiler and achieve the same burnished look.

Print
Gluten Free Blackberry Meringue Tartlets
Ingredients
  • Ingredients
  • For the pastry
  • 2 tablespoons cold water
  • 50 grams butter
  • 100 grams gluten free bread/strong flour
  • For the blackberry curd
  • 2 tablespoons lemon juice
  • 2 eggs
  • 40 grams sugar
  • 60 grams butter
  • 75 ml water
  • 150 grams apples peeled, cored and diced
  • 250 grams blackberries
  • For the Italian meringue
  • 3 egg whites
  • 15 grams liquid glucose
  • 180 grams caster/superfine sugar
Instructions
  1. For the blackberry curd
  2. Cook the blackberries and apples in a pan with enough water to just cover the fruit.
  3. Bring to the boil and reduce the heat to a simmer and cover. Simmer the fruit for 20 minutes or until soft.
  4. Remove the pan from the heat and pass the fruit through a fine sieve into a clean bowl.
  5. Melt the butter in the pan used to soften the fruit and mix in eggs, lemon juice, sugar and blackberry and apple puree.
  6. Whisk, while moderating the temperature for 15 to 20 minutes until the curd has thickened.
  7. Pour into a bowl, cover with plastic wrap so that the plastic actually touches the curd; and refrigerate while you prepare the pastry.
  8. For the pastry
  9. Combine the flour and the butter in a bowl. Use a fork to mash until the mix resembles breadcrumbs.
  10. Stir in water quickly and bring the dough together so that it forms a sticky ball. You may need to use more water than the recipe calls. If the dough isn't very sticky, add more water.
  11. Wrap dough in plastic wrap and let rest in the fridge for 30 minutes.
  12. Roll the dough out between two layers of greaseproof/baking paper.
  13. Grease the tart tins well and press the dough into the tart tins, being sure to press along the sides.
  14. Blind bake the cases at 340f/170c for 15 to 20 minutes or until starting to color.
  15. For the meringue
  16. Pour 40 ml of the water into a saucepan fitted with a food thermometer. Add the sugar and glucose and bring to the boil, stirring every now and then.
  17. Start beating the egg whites in a stand mixer, when the water, sugar and glucose, reaches 230f/110c on the thermometer. Beat the egg whites until they form soft peaks.
  18. Keep an eye on the sugar syrup and stop cooking it, the moment it reaches 250f/121c. Remove the saucepan from the heat and wait a few seconds while it stops bubbling.
  19. Pour the syrup into the stand mixer ever so slowly while the whisk continues to beat.
  20. Keep whisking the whites for 10 minutes after the all the syrup has been absorbed. When the outside of the bowl of the stand mixer is cool to the touch, the meringue is ready for use.
  21. Fill a piping bag with the mix and pipe onto the filled pastry cases.
  22. Burnish the peaks of meringue using either a cook's blowtorch or by letting the tarts stand under a hot grill/broiler for a few minutes.
Recipe Notes

The egg whites will be safe to eat because any bacteria in the egg whites gets cooked out with the addition of the hot sugar syrup.


About Anyonita from Anyonita-Nibbles.co.uk
 
Enjoyed this post? Check out some of my other stuff & stop by:
Grilled Chicken Thighs with Easy White Wine & Mushroom Sauce Recipe from www.anyonita-nibbles.co.uk Restaurant-quality sauce in less than 10 minutes
Grilled Chicken Thighs with Easy White Wine & Mushroom Sauce
 
Gluten Free Sticky Toffee Pudding Brownies with Toffee Sauce
 
Vegetarian Lemon & Chickpea Dukkah Burgers on Gluten Free Buns

Fresh Heirloom Tomato Bruschetta with Whipped Basil Feta Dip

Published Sep 22, 2014 by Allyson
This post may contain affiliate links. Read my disclosure policy.

Fresh Heirloom Tomato Bruschetta with Whipped Basil Feta Dip

This recipe is seriously the meaning of summer for me; Cool creamy basil feta dip, mixed with fresh garden heirloom tomatoes, fresh garden basil, and all the goodness of traditional bruschetta.  I love making this when friends come over or when I just need a bit of deliciousness. It’s also just great for using up those extra tomatoes and basil before they go bad! Now, I know we are into September, but my garden is still going strong so it's nice making this even in fall!

Fresh Heirloom Tomato Bruschetta with Whipped Basil Feta Dip

It only takes a few minutes to whip this up too, which is great because who wants to spend hours in the kitchen during the summer- not me! The longest part of this recipe is going to be toasting your little breads, which really only takes a few minutes as well.  You want to start off by making the Whipped Basil Feta Dip (click link or picture for recipe)– super easy, and it’s also good for any occasion.

Fresh Heirloom Tomato Bruschetta with Whipped Basil Feta Dip

I make this dip on the weekends for parties, when I have extra basil, or when I am just craving some tangy feta cheese! It lasts in the fridge for a long time (I think I have had it in my fridge for 3 weeks at the most and it was fine, would probably even last longer!), and you can randomly snack on it, or use it in other recipes. Sometimes I mix a little with my Tomato Basil One Pot Wonder Pasta and it adds a nice cheesy tang to it! 

Not a fan of feta cheese? Try this easy Whipped Ricotta appetizer!

Make sure you don’t miss a thing! Follow Domestic Superhero on:

Facebook | Instagram | Pinterest | TikTok | Email

For NEW RECIPES delivered straight to your inbox, signup for our email list! 

Print
Heirloom Tomato Bruschetta with Whipped Basil Feta Dip
Ingredients
  • ½ cup Whipped Basil Feta Dip
  • 3 medium heirloom tomatoes regular plum tomatoes will work too!, chopped
  • dash of salt and pepper
  • ¼ cup packed fresh basil chopped
  • 1 TBS extra virgin olive oil
  • 2 teaspoon balsamic vinegar
  • 1 TBS shredded parmesan cheese optional, but I like it
  • 1 French bread baguette sliced into small slices
Instructions
  1. 1. Preheat oven to 400 degrees F. Arrange your bread slices onto a baking sheet, and give a light spray of olive oil spray. Place into oven and toast breads for about 6-8 minutes, watching closely not to burn.
  2. 2. While cooking bread, toss tomatoes, basil, salt, pepper, oil, balsamic vinegar, and parmesan cheese in a medium bowl. Mix gently with a spatula or spoon, being careful not to smash up tomatoes. Set aside or in fridge.
  3. 3. Remove breads from oven. Top each slice of bread with a smear of whipped basil feta dip, and set bread on a tray lined up (see photo). Serve breads next to the bowl of bruschetta so people can top their own breads (this will prevent the breads from getting soggy)**
Recipe Notes

**You can also top the breads with the tomato mixture yourself, but I recommend only doing this if they will be eaten right away. Otherwise the oil/vinegar tends to drip onto the bread and make it soggy, and no one likes a soggy bread!

Fresh Heirloom Tomato Bruschetta with Whipped Basil Feta Dip

Heirloom Bruschetta with Feta Dip (5)

That’s all there is to it- told you it was easy!

Guest Post: DIY Succulent Garden

Published Sep 17, 2014 by Allyson
This post may contain affiliate links. Read my disclosure policy.

This is a guest post from Kelley who shares great recipes, crafts, and tips to improve your home and family at the blog Miss Information. 

Hi Domestic Superhero fans, I'm so excited to be visiting with you today. Allyson and I both live in Atlanta and belong to a local DIY blogging group. We both enjoy food and family. Allyson asked a few of us to help out while she is enjoying her new baby so today I want to share with all of you who are green thumb challenged a quick DIY project. Have you ever wondered how to make a succulent garden? They look so pretty but until you know just how easy it is they may look intimidating.

miss_information_succulent_garden_how_to  Succulent plants are available year round so this is a great indoor gardening project for fall and winter. Succulents require very little watering so for those of us you that are forgetful, this is a great project.  Here is what you will need:

  • flower-pot with drain holes
  • potting soil
  • sand
  • bark
  • small pebbles
  • succulent plants

Not to worry you should be able to find small bags of all these items or do like I did and find a neighbor with a sand box and borrow a cup or two from their bag. First I went to our local garden store. I played around with a few sizes and colors to find what I liked best. My favorite is the one in the middle that looks like bright green cabbage roses. succulent_garden_miss_information One of the secrets to succulent gardens is well-drained soil. First you need to start with a pot that has drain holes in the bottom. If your pot does not you can use a mortar drill bit to make a few holes and not break the pot. The perfect mix of soil for a succulent garden, in my opinion, is  a mixture of soil, sand and bark. Use equal parts of all 3 (does not have to be exact). soil_mix_succulent_garden_miss_information

Now if you have some little helpers on hand you can have them mix it all together.

kids_crafts_planting_succulent_garden_miss_information

Place your succulents in the soil mixture and add more soil if needed at the top. I placed the two plants with purple opposite each other and placed the tallest in the middle. This gave the garden more balance. Cover the soil with small pebbles. This is optional but it really adds a great finishing touch. succulent_garden_diy_miss_information

I placed my planter on a cork trivet in my entryway and every week or so I just spray it with a water bottle. Don't over water it or the roots may rot. It's so great to have real flowers in the house that don't need a lot of attention.

DIY_succulent_garden_miss_information

I would love it if you would come and visit me at Miss Information where I share recipes,crafts, tips for cooking, cleaning, and organization. You can also find me on Facebook, Twitter, Pinterest or Google+.

sidebar-image


Chocolate & Peanut Butter M&M Cheesecake Bars

Published Sep 13, 2014 by Allyson
This post may contain affiliate links. Read my disclosure policy.

Chocolate and PB M&M Cheesecake Bars

In case you haven’t noticed, my blog is called ‘Domestic Superhero’….one of the reasons is because I love superheroes…who doesn’t?!  So when I heard about Captain America: The Winter Soldier coming to DVD, I wanted to make a dessert that was Captain America themed.  We love M&M’s® at our house, so I thought what better than some M&M® Cheesecake bars?  Well, I will tell you what….Peanut butter and chocolate M&M cheesecake bars!  With a layer of peanut butter M&M’s on the bottom and then chocolate M&M’s on top of the cheesecake with a buttery graham cracker crust, these cheesecake bars are seriously so decadent and tasty.

Next, I started out by making a simple graham cracker crust.

Chocolate and Peanut Butter M&M Cheesecake Bars (3) 

While that was cooking I separated out all the red and blue M&M’s so it would be Captain America colors!

Chocolate and Peanut Butter M&M Cheesecake Bars (4)

After that I made the cheesecake filling, and set that aside.  After the crust cooled, I added a layer of Peanut Butter M&M’s, then poured the cheesecake filling on top of that, then added the Chocolate Mini M&M’s on the top, and then baked…voila! Super easy.

Chocolate and Peanut Butter M&M Cheesecake Bars (5)

They taste even more delicious than they look, too!

Chocolate and Peanut Butter M&M Cheesecake Bars (7)


Print
Chocolate & Peanut Butter M&M Cheesecake Bars
Ingredients
  • 2 cups graham cracker crumbs
  • ⅓ cup butter
  • ¼ cup brown sugar
  • 16 ounces cream cheese softened to room temperature (can use lower fat as well)
  • 1 large egg
  • ¼ cup granulated sugar
  • 2 teaspoon vanilla extract
  • 1 cup peanut butter M&M's coarsely chopped
  • 1 cup Mini M&M's
Instructions
  1. 1. Preheat oven to 325 degrees F. In a medium bowl combine graham cracker crumbs, butter, and brown sugar with a fork until it is a course crumble. Dump the mixture into a 8x8 baking dish (a 11x7 would also work but have a thinner crust), and press the mixture down into the dish until it's even and pressed together. Bake for 10 minutes, remove and cool (leaving in baking dish) for at least 30 minutes.
  2. 2. Increase oven temperature to 350 degrees F. Beat cream cheese, egg, sugar, and vanilla extract together with a hand or stand mixer until smooth and creamy, about 3 full minutes. Make sure there are no clumps.
  3. 3. Spread the Peanut Butter M&Ms in a layer over the crust. Pour the cream cheese filling over this layer and use a spatula to spread evenly. Bake for 30 minutes. Remove from oven and top with mini M&M's, then place back in the oven and cook for an additional 20-25 minutes or until set. Cool completely (at least 1 hour), and then refrigerate for at least 3 hours prior to serving.
  4. 4. Cut into bars and serve.
Recipe Notes

Any leftovers must be stored in the refrigerator.

Chocolate and Peanut Butter M&M Cheesecake Bars (9)

THINGS YOU MIGHT NEED FOR THIS RECIPE:

  • Pyrex Baking Dishes
  • Serving Platter

Like desserts? Check out these other delicious cheesecake based recipes

 Milky Way Simply Caramel Cheesecake Brownies

Milky Way Caramel Cheesecake Brownies

Snickers Cheesecake Bars

Cheesecake Snickers Bars

Sopapilla Cheesecake Bars

Sopapilla Cheesecake Bars

Skinny Mini Key Lime Pies

Skinny Mini Key Lime Pies

You can also connect with me here:

Thanks for visiting!

- Allyson

Guest Post: Watermelon Goat Cheese Salad

Published Sep 10, 2014 by Allyson
This post may contain affiliate links. Read my disclosure policy.

Today I am super excited to have Shannah guest posting for me on Domestic Superhero! Shannah has shared a couple recipes with my readers before, and they are always a big hit!  Let's see what she cooked up today...

Hi everyone! I am Shannah from the blog Just Us Four. I am so excited to be here sharing a favorite recipe of mine while Allyson is cuddling her new baby and enjoying some important family time. One of our absolute favorite things in the summer is watermelon. I think my daughter could eat an entire watermelon each day if given the chance. I like to use watermelon in recipes and that is how this watermelon goat cheese salad came about.

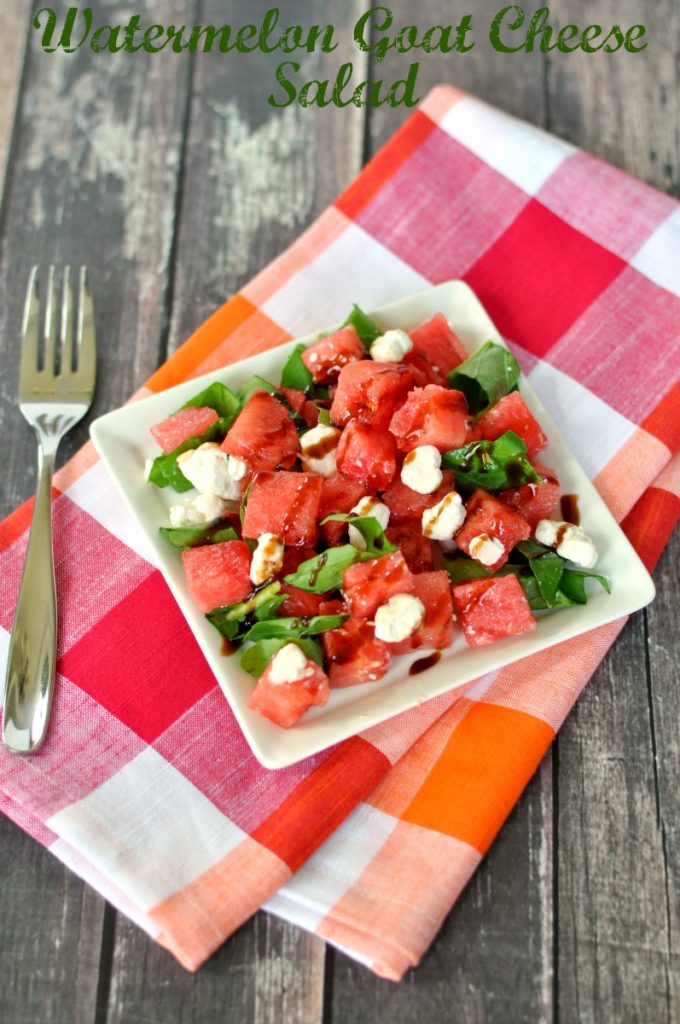
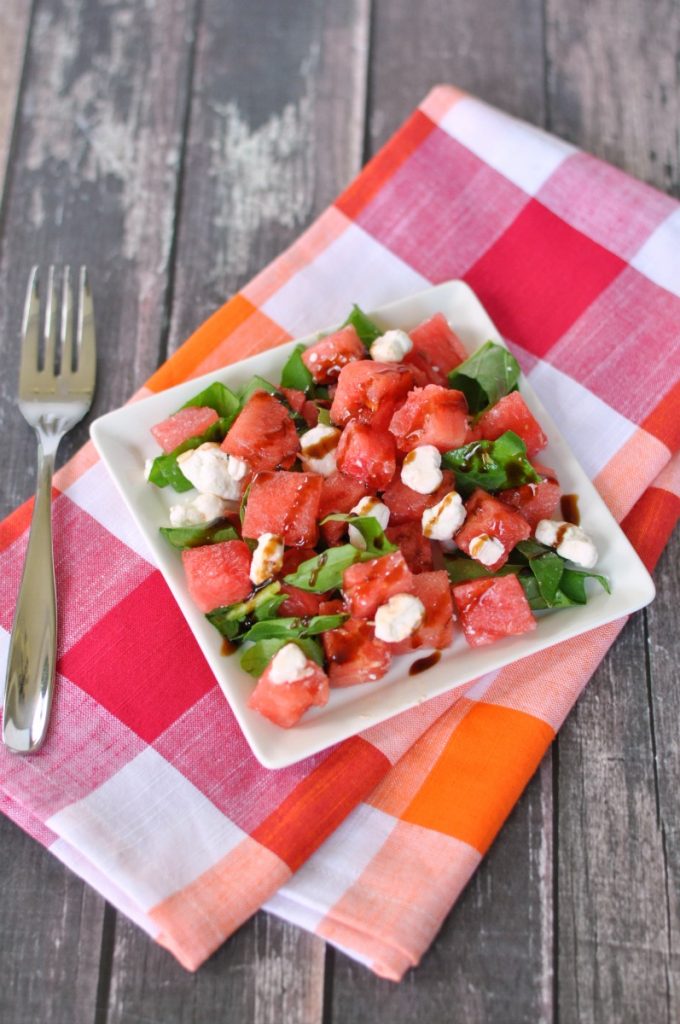
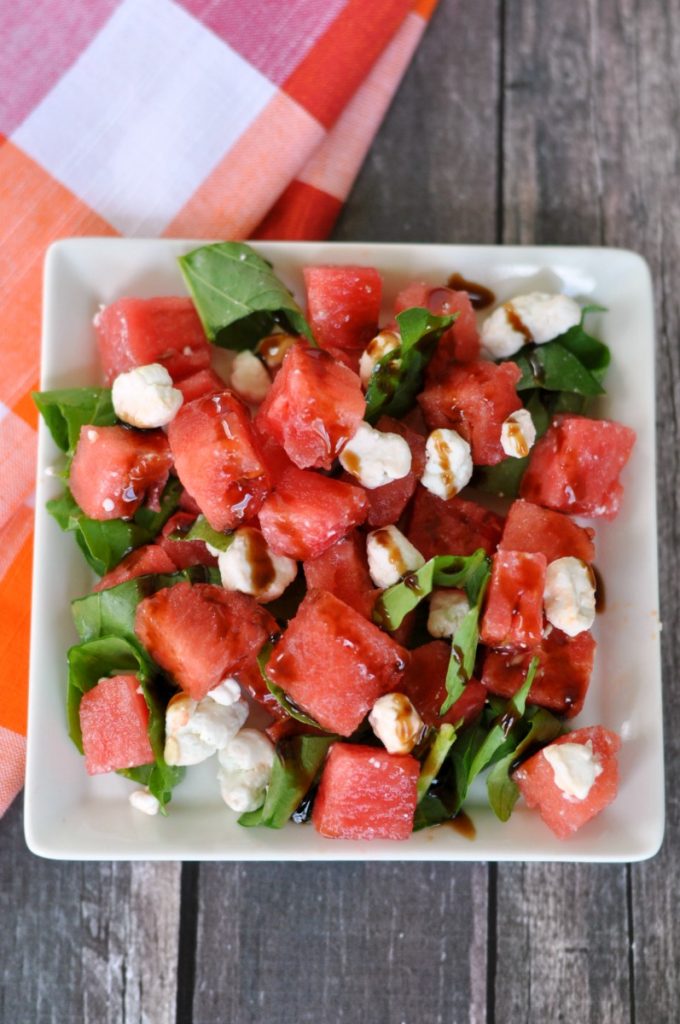
Watermelon is the best summer fruit. Enjoy it in a delicious watermelon goat cheese salad for an amazing and light snack or lunch.

Traditionally, most people combine watermelon and feta. I'm a HUGE goat cheese fan though so I decided to change up the cheese. I also added some peppery arugula and a tangy balsamic glaze to finish off the salad. 

Print
Watermelon Goat Cheese Salad
Ingredients
  • 1 cup balsamic vinegar
  • ¼ cup brown sugar
  • 3 cups watermelon cubes
  • 1 cup goat cheese crumbles
  • ½ cup chopped arugula
Instructions
  1. 1) In a small pan, combine the balsamic vinegar and brown sugar. Bring to a boil over medium heat, stirring constantly until sugar is completely dissolved. Reduce heat and simmer until glaze is reduced by half, about 20 minutes. Let cool.
  2. 2) In a large bowl, combine watermelon, goat cheese and arugula. Stir to combine. Drizzle balsamic glaze just before serving.

This salad is awesome because it requires so little prep time. You can even make the glaze ahead of time and store it in the refrigerator until you are ready to use. 

Love her combination of watermelon, goat cheese and balsamic glaze for this delicious salad.

This salad is such a delicious way to enjoy one of our favorite summer fruits: watermelon!

I hope you will come visit me over at Just Us Four where I share tons of recipes along with a few craft and DIY ideas too. You can also connect with me on social media

facebook icon Google+ Icon Pinterest Icon twitter icon

Buffalo Tofu Wraps

Published Sep 8, 2014 by Allyson
This post may contain affiliate links. Read my disclosure policy.

Buffalo Tofu Wraps are filled with crispy fried tofu, lettuce, tomato, and ranch or chunky blue cheese dressing! It's the perfect vegetarian lunch!

Buffalo Tofu Wraps are filled with crispy fried tofu, lettuce, tomato, and ranch or chunky blue cheese dressing! It's the perfect vegetarian lunch!

I have such a love affair with buffalo sauce, it’s not even funny. These buffalo tofu wraps were a no-brainer because I love buffalo sauce over a crispy crunch! Making crispy tofu is easy as well, so this is the perfect combination! If you feel like a salad, I also have a recipe for a Buffalo Tofu Salad!

Buffalo Tofu Wraps

I may have lost some of y’all at ‘tofu’, but trust me, this is NOT your typical tofu recipe. My husband thought I was feeding him chicken when I made this, because it is SO similar. It’s really all about the texture (like crunchy fried chicken bits), and the sauce, and the way this tofu is prepared makes it really seem like chicken. You just want to fry the tofu (I know, super healthy…but neither is fried chicken!), until it gets good and crispy. After frying it and drenching it in homemade buffalo sauce, there is no way you can’t like tofu. I used fresh lettuce and tomatoes to top the buffalo tofu, and then added homemade blue cheese dressing!

Buffalo Tofu Wraps

How to make Buffalo Tofu Wraps:

**scroll down for full ingredients list and printable directions**

  • Drain your tofu, then press out the water by placing the block of tofu between 2 clean towels, and then putting a heavy object on top of the top towel to press it down. This will drain all the water out. Leave for at least 20 minutes. Cut the tofu into bite-sized cubes.
  • Add cornstarch into a large ziplock bag and add half of the tofu cubes, close, and shake to coat the tofu.
  • Heat the vegetable oil in a tall sided stock-pot (or a pot good for frying), over medium heat. Once the oil ripples (about 1-2 minutes), remove the tofu from bag one by one, and drop carefully into the oil. Fry for about 4-5 minutes or until lightly browned, and then flip over in the oil and cook for another 3-4 minutes on that side. Remove tofu from pot, and set on paper towels. Repeat for the remaining cubes.
  • Place tofu in a medium bowl, add homemade buffalo sauce and then toss to coat.
  • Stack the tortillas one on top of the other and then loosely wrap a damp paper towel around them. Microwave for 20 seconds to heat them up.
  • To assemble the wraps:
    • place one wrap on a plate, then add ¼th of the blue cheese crumbles or dressing to the center of the wrap, add ¼th of the tofu cubes, a couple pieces of lettuce, and then ¼th of the sliced tomatoes. Then wrap and secure with a toothpick so it doesn't open.
  • Repeat for the rest of the wraps.

Like Buffalo Sauce as much as I do? Check out these other buffalo recipes!

  • Instant Pot Buffalo Chicken Dip
  • Air Fryer Buffalo Cauliflower Bites (No Oil)
  • Buffalo Chicken Quesadillas (Grilled)
  • Instant Pot Buffalo Chicken Lettuce Wraps
  • Buffalo Chicken Fries
  • Buffalo Chicken Lasagna

Make sure you don’t miss a thing! Follow Domestic Superhero on:

Facebook | Instagram | Pinterest | TikTok | Email

For NEW RECIPES delivered straight to your inbox, signup for our email list! 

Print
Buffalo Tofu Wraps
Prep Time
20 mins
Cook Time
15 mins
 

Buffalo Tofu Wraps are filled with crispy fried tofu, lettuce, tomato, and ranch or chunky blue cheese dressing! It's the perfect vegetarian lunch!

Course: Main Course
Cuisine: American
Keyword: buffalo tofu wraps
Servings: 4 wraps
Ingredients
  • 1 container extra firm tofu
  • ⅓ cup cornstarch
  • ½ cup vegetable oil
  • 4 whole wheat tortilla wraps 8 or 10 inches
  • lettuce
  • 1 large tomato sliced into thin slices
  • ¼ cup blue cheese crumbles or blue cheese dressing
  • ¼ cup buffalo sauce see homemade recipe in notes below
Instructions
  1. Drain tofu, then press out the water by placing the block of tofu between 2 clean towels, and then putting a heavy object on top of the top towel to press it down. This will drain all the water out. Leave for at least 20 minutes. Cut the tofu into bite-sized cubes.
  2. Add cornstarch into a large ziplock bag and add half of the tofu cubes, close, and shake to coat the tofu.
  3. Heat the vegetable oil in a tall sided stock-pot (or a pot good for frying), over medium heat. Once the oil ripples (about 1-2 minutes), remove the tofu from bag one by one, and drop carefully into the oil. Fry for about 4-5 minutes or until lightly browned, and then flip over in the oil and cook for another 3-4 minutes on that side. Remove tofu from pot, and set on paper towels. Repeat for the remaining cubes.
  4. Place tofu in a medium bowl, add homemade buffalo sauce and then toss to coat.
To assemble the wraps:
  1. Stack the tortillas one on top of the other and then loosely wrap a damp paper towel around them. Microwave for 20 seconds to heat them up.
  2. place one wrap on a plate, then add ¼th of the blue cheese crumbles or dressing to the center of the wrap, add ¼th of the tofu cubes, a couple pieces of lettuce, and then ¼th of the sliced tomatoes. Then wrap and secure with a toothpick so it doesn't open.
  3. Repeat for the rest of the wraps.
Recipe Notes

Homemade Buffalo Sauce Recipe Here.

Homemade Chunky Blue Cheese Dressing Recipe here.

Guest Post: No Bake Strawberry Ricotta Cheesecake

Published Aug 27, 2014 by Allyson
This post may contain affiliate links. Read my disclosure policy.

Today we have a delicious recipe from Joanna!! I can't wait for y'all to see this one because it looks delicious, and I'm sure tastes even better! Let's have a look....

_________________________________________

Hi, I'm Joanna from Lazy Mom's , and I'm really happy to share with you today, my favorite summer cheesecake recipe!

No Bake Strawberry Ricotta Cheesecake

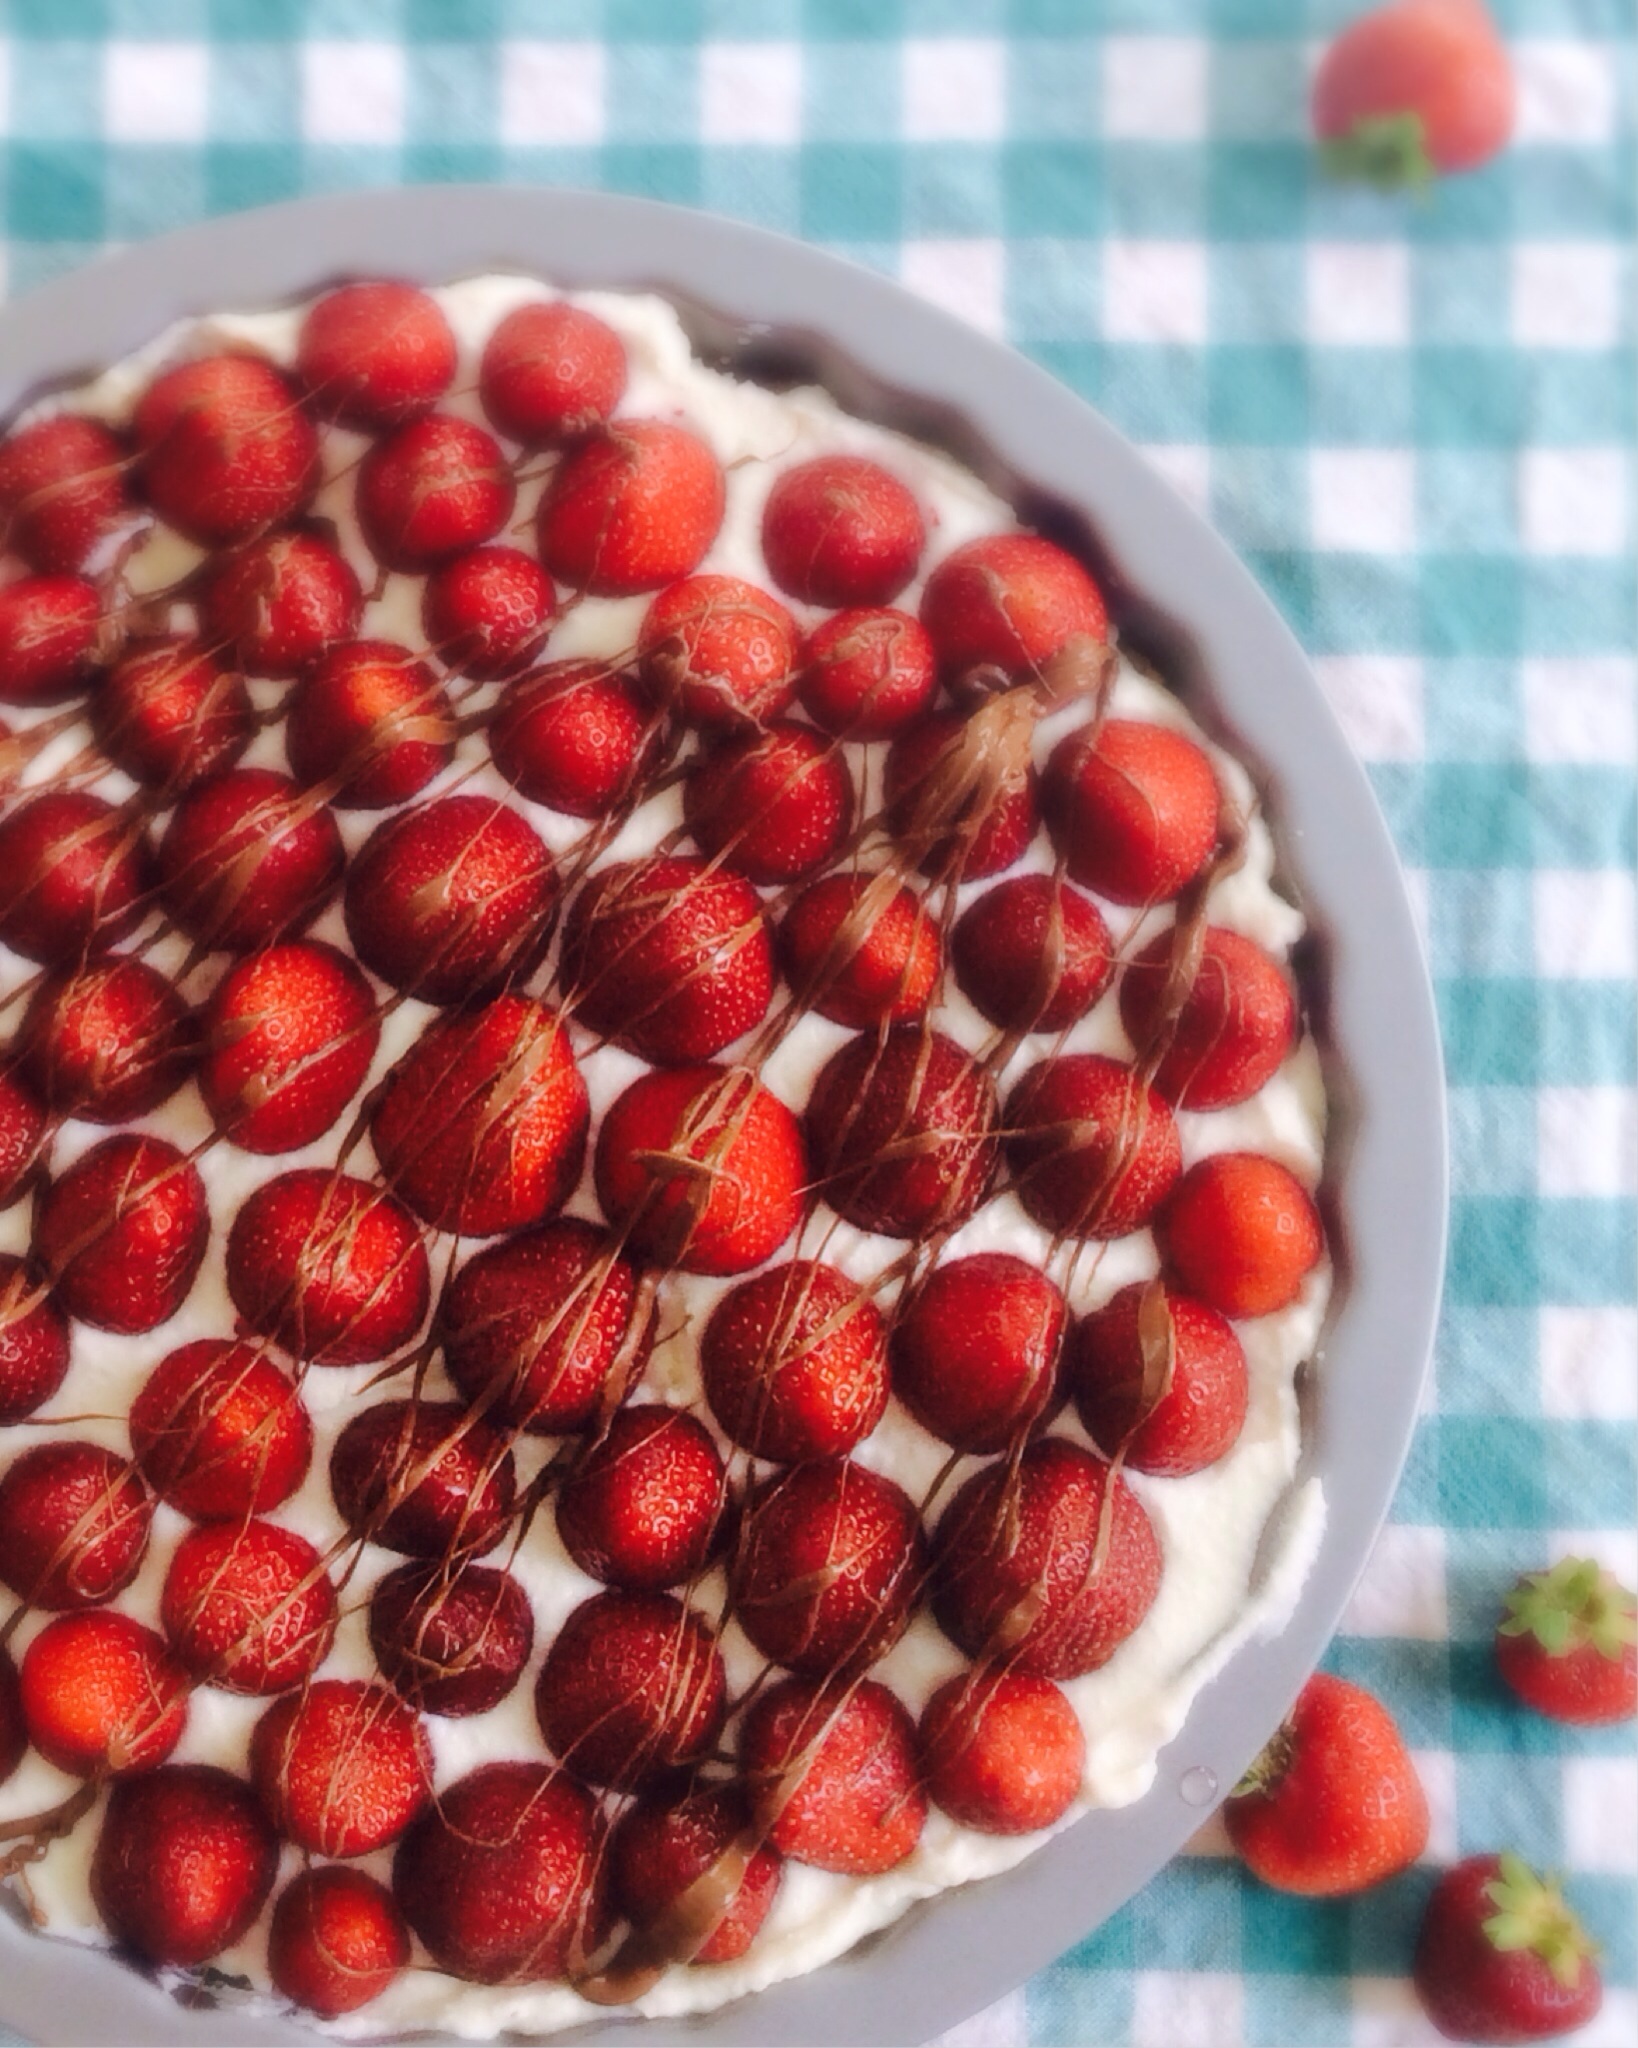
If you are anything like me, then probably you don't feel like turning on the oven and baking during the hot summer days, right? However, even though it's pretty hot here where we live, I still feel like sharing a dessert with my family. And this summer cheesecake is pretty awesome and ready in less than a half an hour: graham crackers crust coated with fluffy and delicate whipped ricotta, sweet strawberries and drizzled with milk chocolate! Pure summer perfection, in my opinion :).

What you'll need:

graham cracker crust:
12 graham crackers finely grounded
5 tablespoons unsalted melted butter
¼ cup sugar
⅛ teaspoon salt

Filling:
1 cup ricotta cheese
1 cup whipped cream
2 tablespoons sugar
1 cup fresh strawberries
½ cup chocolate chips

Prepare a classic graham cracker crust. But don't bake it. I usually mix the graham cracker crumbs with butter, sugar, and salt in a food processor until well combined. Then I firmly press crumb mixture into bottom of the dish and I set it aside.

No Bake Strawberry Ricotta Cheesecake

Now it's time to whip the cream with sugar. When you're done, add ricotta cheese and mix it on high until it's all smooth and fluffy. Pour it onto the graham cracker crust and place tightly strawberries one next to another.

No Bake Strawberry Ricotta Cheesecake

Melt milk chocolate and drizzle on top. I honestly think the more chocolate the better!

No Bake Strawberry Ricotta Cheesecake


Print
No Bake Strawberry Ricotta Cheesecake
Ingredients
Ingredients for graham cracker crust
  • 12 graham crackers finely grounded
  • 5 tablespoons unsalted melted butter
  • ¼ cup sugar
  • ⅛ teaspoon salt
Ingredients for filling
  • 1 cup ricotta cheese
  • 1 cup whipped cream
  • 2 tablespoons sugar
  • 1 cup fresh strawberries
  • ½ cup chocolate chips
Instructions
  1. Prepare a classic graham cracker crust, but don’t bake it. Mix the graham cracker crumbs with butter, sugar, and salt in a food processor until well combined. Then firmly press crumb mixture into bottom of the 12 inch pie dish and set it aside.
  2. Now it’s time to whip the cream with sugar. When you’re done, add ricotta cheese and mix it on high until it’s all smooth and fluffy. Pour it onto the graham cracker crust and place tightly strawberries one next to another.
  3. Melt milk chocolate and drizzle on top
Recipe Notes

I used a 12 inch pie dish for this recipe.

I hope your family will love this healthy intake on a classic strawberry cheesecake! And yes, of course it's healthy, it has plenty of calcium and protein from ricotta cheese, and vitamins from strawberries, so go ahead and have another portion! 🙂

I would love to connect with you on Facebook and Instagram !
And if you would like to see some more of my summer treat ideas click here!

Guest Post: Spinach and Mushroom Bruschetta

Published Aug 25, 2014 by Allyson
This post may contain affiliate links. Read my disclosure policy.

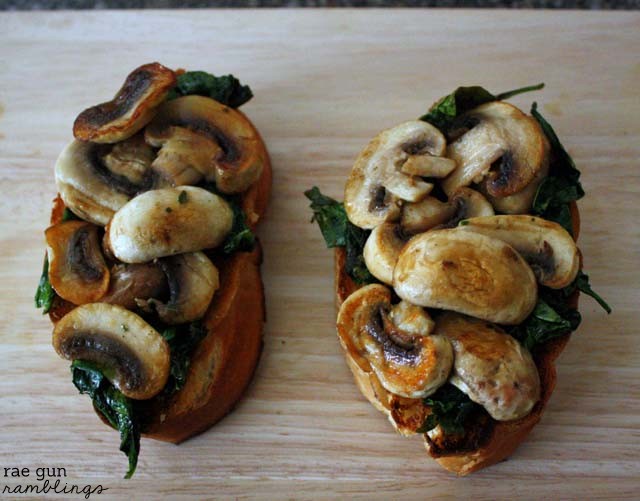
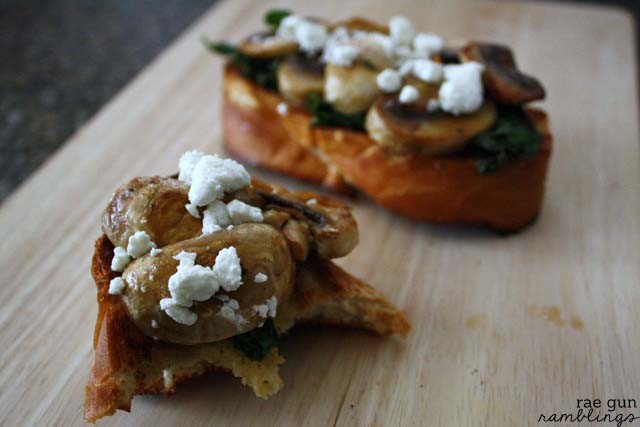
Today we have a delicious recipe from Marissa at Rae Gun Ramblings! I can't wait to make this one myself as I love mushrooms and spinach!

Spinach-Mushroom-Toast-003s

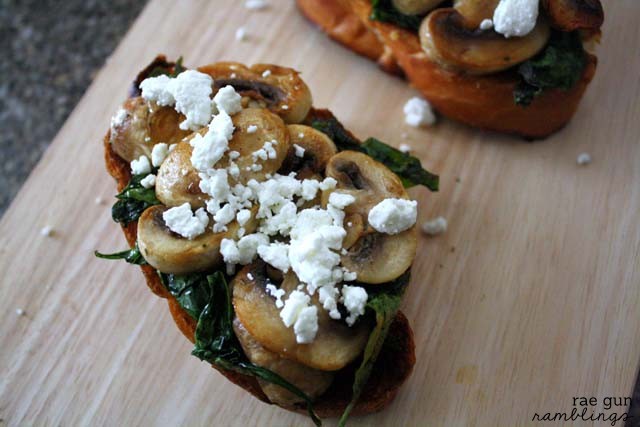
Hi everyone I'm Marissa from Rae Gun Ramblings where I share my addition to crafts of all sorts, delicious foods, and wonderful reads. I'm so excited to be here sharing an easy recipe for spinach and mushroom bruschetta. I love this recipe because it's something that you can throw together as an appetizer on small pieces of bread or do on a full sized loaf for a meal on it's own.

Spinach Mushroom Toast-007s

Not only is this dish speedy to put together but it's absolutely delicious. With it's simplicity it's easy to make it vegan, vegetarian, or if you want to add some meat even more hearty. I've been known to make this for myself for a quick lunch.

Spinach Mushroom Toast-001s

Print
Spinach and Mushroom Bruschetta Recipe
Ingredients
  • spinach
  • ½ cup mushrooms sliced
  • butter or butter alternative
  • garlic Salt
  • french Bread 2 slices
  • goat cheese optional
Instructions
  1. 1. Start by making some wilted spinach. Heat butter/alternative/or olive oil in a pan over medium heat. Add spinach and garlic salt, to taste, and mix with a spatula until wilted. This will only take a few minutes. *You only need a small amount of butter/oil. I've even used just spray oil. Set aside.
  2. 2. Saute the mushrooms in butter (or alternative) with garlic salt. Set aside
  3. 3. Next make garlic bread. I know other people take time using fresh garlic or rubbing garlic on the bread but my favorite garlic bread that is always a hit with my guest is just buttered bread sprinkled with garlic salt and cooked under the broiler.
  4. 4. Top the garlic bread with a generous layer of spinach and then with mushrooms.
  5. 5. Add a sprinkle of crumbled goat cheese if desired and enjoy!

Spinach Mushroom Toast-009s

I hope you give these non-traditional bruschetta a try and swing by my blog Rae Gun Ramblings to say hi!

Here are some other fun things you will find over at my blog: 

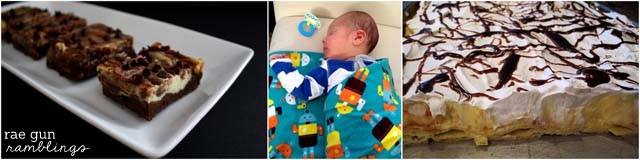
guest collage s

Cheesecake Swirl Brownies| The Best Swaddle Blankets | Eclair Cake

Let’s connect! You can also find me hanging out here.

PhotobucketPhotobucketPhotobucketPhotobucketPhotobucketPhotobucketPhotobucket

Rae Gun guest posting pictureMarissa’s a huge Harry Potter fan, lover of fried food, Instagram addict, and new mama to five month old Teddy. She spends her days sewing baby clothes for her shop Rae Gun and blogs over at Rae Gun Ramblings where she loves to share her favorite recipes, creative tutorials, and book recommendations. Here are a few of her favorite posts for Summer. Stop by her blog to see more and say hi!


Guest Post: Mini Banana Puddings

Published Aug 18, 2014 by Allyson
This post may contain affiliate links. Read my disclosure policy.

Today we have a great recipe from Dana! I can't wait to share it with y'all, because her recipes are always super delicious!

_____________________

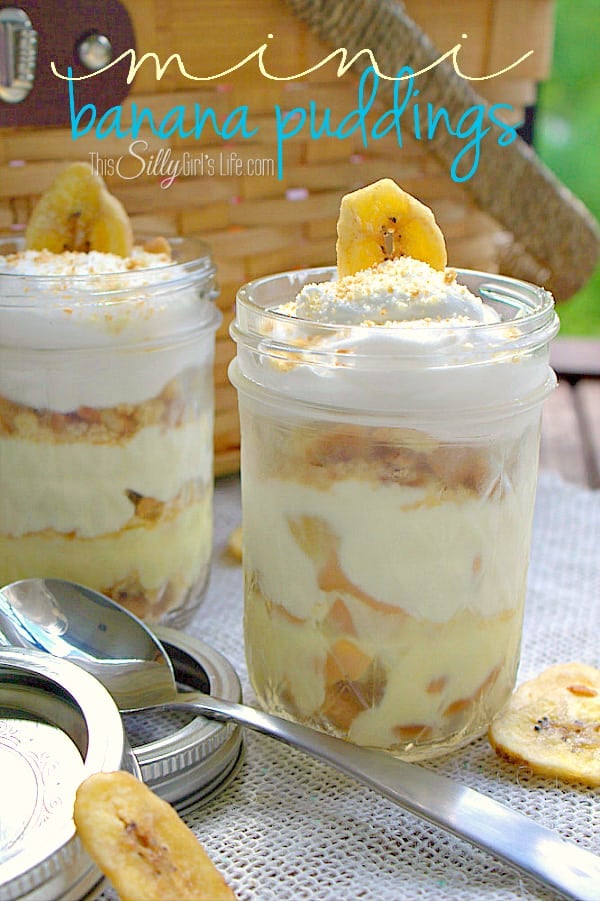
Hi there! It's Dana from This Silly Girl's Life and I'm so excited to be guest posting today for Allyson! I love recreating classic recipes to fit different occasions or tastes. I did that with a classic dessert, banana pudding! I love banana pudding and it always remind me of my childhood when my southern Grandma (yes, I have a southern and a northern Grandma, the best of both worlds!) would make it for us and it was gone in a flash! BUT, my least favorite part was the fresh bananas, I KNOW! I'm crazy like that, so I made a super quick and easy go -to banana pudding treat! Sans real bananas. 😉

Mini Banana Puddings

bfinal

[Read more...]

Guest Post: Black and Blue Berry Vanilla Protein Smoothie

Published Aug 6, 2014 by Allyson
This post may contain affiliate links. Read my disclosure policy.

Today's guest post is coming from Rachel over at {I love} My Disorganized Life, and her recipe looks super super delicious and healthy! Love these go-to quick recipes!

Profile+image+cropHeader-21.png

Hello! Before we 'jump right in', here are a few facts about me.

I’m a no-pattern-sewing, eye-ball-it-crafting, shortcut-recipe-making kind of girl. I don’t like to spend too much time on complicated recipes & patterns. I live in Southern AZ with my husband of 22+ years and three of our five children. When I grow up, I want to travel to foreign lands and capture it with my growing photography skills. I have awesome readers and love to engage with them on Facebook, Instagram, Twitter & G+.

This Black and Blue Berry Vanilla Protein Smoothie is perfect for busy mornings when you just can't seem to get out of the door on time!

Black and Blue Berry Vanilla Protein Smoothie for a quick and nutritious breakfast on the go #smoothie #quickbreakfast

It's almost unbelievable to me how fast summer has come and gone. Here in Arizona, school is just about to start- we're talking next week. I'm sad to see summer go, because I'll really miss the flexibility of the kids' schedule, not to mention being able to stay up late and sleep in.

Getting up and out the door on time hasn't been one of my strengths, for sure. And the kids, even though they have their own alarms, never seem to get out of bed until I drag them out. Needless to say, we are always in a time crunch.

Knowing that breakfast is literally the most important meal of the day, I feel super guilty if the kids leave the house hungry. Since making a full on breakfast is out of the question time wise, I try to find healthier substitutions. Toaster pastries are fine once in a while, but I usually just steer clear of them.

Black and Blue Berry Vanilla Protein Smoothie for a quick and nutritious breakfast on the go #smoothie #easybreakfast

Smoothies are one of my favorite ways to ensure my kids don't leave the house hungry and that they get nutrition first thing in the morning. I love that they are so versatile. There are so many combinations, I don't see how anyone could ever get bored with them!

I use fresh fruit whenever I can, but organic frozen fruit lasts much longer, eliminating a lot of waste.

This recipe for Black and Blue Berry Vanilla Protein Smoothies is so easy to make, you'll be out the door in no time- promise!

Print
Black and Blue Berry Vanilla Protein Smoothie
Ingredients
  • ¾ C Silk Almond Protein+Fiber {you can always substitute regular milk and still get protein}
  • 1 Cup {total} frozen blackberries and blueberries
  • 2 teaspoon agave nectar {you could also use honey}
Instructions
  1. Add all ingredients to a blender
  2. Blend on high speed until smooth {I used my Vitamix and it took about 30-45 seconds}
  3. Pour into a glass and enjoy!
Recipe Notes

Makes one 10 oz serving


Black and Blue Berry Vanilla Protein Smoothie for a quick and nutritious breakfast on the go

You may also like:

Homemade Instant Cinnamon Apple Oatmeal #instantoatmeal #homemade #cinnamonapple

Banana Pancakes- These thin banana pancakes are sweet enough to forgo the syrup, just top with banana slices and chopped pecans and you're good to go!

Dairy Free Triple Berry Popsicles #dairyfree #frozentreats #organicberries

Homemade Ranch Cheese Crackers

Published Aug 4, 2014 by Allyson
This post may contain affiliate links. Read my disclosure policy.

Homemade Ranch Cheese Crackers

As the beginning of the school year approaches, I always start brainstorming for lunch box ideas.  You see, my son, Austin, is the pickiest eater in the world.  Well, maybe not the world, but it’s up there.  We can rotate pretty much a handful of things to keep him eating and happy, and otherwise he doesn’t eat! I know, I know, ‘he will eat when he is hungry’, but this just isn’t always the case. He will literally go 9 hours at daycare without eating because he doesn’t like the food they are offering him. His teacher tells me all the time, “he is SUCH a picky boy!”…this, I know.  Now that he is starting preschool though, I am happy I get to pack his lunch because I know he will at least eat it!

One thing he will eat is pizza, but I know pizza isn’t the healthiest option, so I like to pack something somewhat healthy as well.  I was talking with one of my friends about healthy snack options, and she clued me in to making homemade cheez-its…say what?! Browsing around Pinterest, I found out this is a pretty easy and popular thing to do. I decided to spice things up though, but adding ranch seasoning to the crackers, and using whole wheat flour to make them healthier than the white flour alternative.

Homemade Ranch Cheese Crackers

These are so easy to make, and really require little effort (scroll all the way down for full recipe).  I add these bad boys into Austin’s lunch box along with his pizza, and a fruit squeeze pouch on the side.  

Homemade Ranch Cheese Crackers

5 from 1 vote
Print
Homemade Ranch Cheese Crackers
Ingredients
  • 1 cup whole wheat flour {reg flour works fine too}
  • 2 teaspoon ranch dip powder
  • 4 TBS of COLD butter cut into small cubes
  • 8 oz cheddar cheese grated
  • 3-4 TBS water
Instructions
  1. 1. Place food processor bowl in freezer for 5-10 minutes to chill.
  2. 2. In a food processor, pulse flour, ranch dip powder and cheese to combine. Add in butter and pulse until mixture looks like coarse meal {do not let machine just run because it heats up ingredients too much}.
  3. 3. Add the water, 1 TBS at a time, and pulse between additions. Dough will form into a bowl. {I used about 3 ¼ TBS water for mine}. Wrap dough in plastic wrap and refrigerate for at least 30 minutes.
  4. 4. Preheat oven to 350 degrees with baking sheet in oven.
  5. 5. Remove dough from refrigerator and let sit for 5 minutes. Roll out to ⅛" thickness. Using a pizza cutter, cut into 1" squares and place on preheated baking sheet lined with parchment paper {careful, it's hot!}.
  6. 6. Bake at 350 degrees for 12 minutes.
Recipe Notes

Store in an airtight bag or container to keep from going stale.

You can also connect with me here:

Thanks for visiting!

- Allyson


Chili Habanero Kettle Corn

Published Aug 2, 2014 by Allyson
This post may contain affiliate links. Read my disclosure policy.

IMG_7038

Over at our house, we love popcorn! I love taking out our popcorn maker and popping up a batch of fresh popcorn for movie nights! Since getting it a couple years ago, I just can’t eat microwave popcorn because the taste is so much different.  Another thing we love, well, I should say another thing my husband loves is hot sauce! I am always trying to think up ways to try new hot sauces and incorporate their flavors into our meals. My husband is a big fan of El Yucateco Hot Sauce, and actually inspired me to come up with this spicy and sweet kettle corn recipe.  I love the sweet taste of kettle corn, and he loves the hot spice of hot sauce, so I thought mixing the 2 would prove delicious…and I was right!

This recipe is so easy, too, and only takes a few minutes to whip up. If you don’t have a popcorn popper, you can use a pot over the stovetop just as easily! See below for the full/printable recipe!

IMG_7048


Print
Chili Habanero Kettle Corn
Ingredients
  • 1 TBS coconut oil or other oil such as canola or vegetable for popcorn popper or ¼ cup vegetable oil for stock pot
  • 1 TBS sugar
  • ½ cup popcorn kernals un-popped
  • 2 teaspoon El Yucateco Red Chili Habanero Hot Sauce
  • 1 TBS butter melted
  • salt to taste
Instructions
Directions if using a popcorn popper
  1. 1. In a popcorn popper (one that uses oil, not an air popper) add oil (1 TBS). Then add sugar and let mix around in the oil for a few seconds. Then add the popcorn and put the lid on top. Let the popcorn pop until finished, unplug machine and set popcorn aside.
Directions if using a pot
  1. 1. Heat the vegetable oil in a large pot over medium heat. Place 3 kernals into the pot and wait for them to pop. Once they pop, add the sugar and popcorn. Cover, and shake the pot constantly to keep the sugar from burning. Once the popping has slowed to once every 2 to 3 seconds, remove the pot from the heat and continue to shake for a few minutes until the popping has stopped. Pour into a large bowl and set aside.
Directions continued for both methods
  1. 2. Take 1 TBS melted butter and add the 2 teaspoon of El Yucateco Red Chili Habanero Hot Sauce to it. Stir with fork to combine. Drizzle butter sauce over popcorn, shake or toss to coat, and let cool for 2 minutes. Add salt to taste and then shake or toss to coat popcorn.


You can also connect with me here:

Thanks for visiting!

- Allyson

'Buttermilk' Kefir Biscuits with Summer Berry Compote

Published Jul 14, 2014 by Allyson
This post may contain affiliate links. Read my disclosure policy.

‘Buttermilk’ Kefir Biscuits with Summer Berry Compote

Until I moved to the south, I don’t think I really had a genuinely delicious biscuit that made me proclaim, ‘I love biscuits!’ But after being to a couple real southern restaurants, I learned what a real biscuit was supposed to taste like…fluffy, buttery, light and airy, and most of all delicious.  I have become obsessed with fresh biscuits, and I love making them at home.  If you have made biscuits at home, you probably know there are a ton of different ways to make them, and most yield different types of results…all delicious! We love using Lifeway Kefir at our house, so I wanted to try out making biscuits using Kefir, instead of buttermilk.  Kefir can be substituted in pretty much any recipe where it calls for buttermilk.  Lifeway Kefir contains 12 live and active probiotic cultures that support the immune system and balance digestive health. It is naturally gluten free, 99% lactose free, contains no artificial sweeteners and is rich in calcium.

‘Buttermilk’ Kefir Biscuits with Summer Berry Compote

Lifeway also only uses milk that comes from cows that are not treated with pesticides, antibiotics, or synthetic growth hormones - the cows are grass fed and GMO free. There are so many health benefits in using Lifeway Kefir, and like I said, it’s so easy to use it as a replacement in recipes!

For the first part of this recipe you need to mix the flour and kefir, and let it sit basically over night (at least 12 hours) in the fridge. I suggest doing it before you go to bed, and then you are ready to go in the morning. Once you get baking in the morning, it takes about 20 minutes to whip this entire breakfast up! So delicious and satisfying (see printable recipe at bottom of post).

Take the bowl from the fridge with the flour/kefir and dump it into a food processor.  Then add in 6 tablespoons of cut up cold butter. Pulse the food processor about 5 times, and once the mixture resembles a crumble-y texture, stop. You do not want to over mix this! Then, lay out the dough onto a lightly floured board, and press it together (the crumbles should come together easily), kneading it a bit.  Press the dough about an inch thick, and then use a biscuit cutter (or a small glass top like I do) to cut out the biscuit rounds.

‘Buttermilk’ Kefir Biscuits with Summer Berry Compote

Place the biscuits on parchment paper on a baking sheet and bake at 450 for about 12 minutes or until golden brown. You don’t want to overcook!

‘Buttermilk’ Kefir Biscuits with Summer Berry Compote

In the meantime you can make the summer berry compote.  In a small saucepan over low heat, add 2 TBS butter and ¼ cup packed brown sugar. Let the butter melt and stir to dissolve the sugar.  Then add ¾ cup chopped strawberries (tops removed), and ¾ cup blueberries.  Stir gently and increase heat to medium-low.  Let simmer for about 6-8 minutes (while biscuits are cooking), stirring occasionally.  Once the biscuits are ready, remove from oven and break each biscuit in half, placing on a plate. Spoon some of the compote on top of the biscuits and serve!

Enjoy!

‘Buttermilk’ Kefir Biscuits with Summer Berry Compote

Print
'Buttermilk' Kefir Biscuits with Summer Berry Compote
Ingredients
Ingredients for the Biscuits
  • 2 cups flour
  • ¾ cup Lifeway Plain Kefir
  • ¼ teaspoon baking soda
  • 1 tablespoon baking powder
  • 1 teaspoon salt
  • 6 tablespoons butter very cold
Ingredients for the Berry Compote
  • 2 TBS butter
  • ¼ cup packed brown sugar
  • ¾ cup chopped strawberries
  • ¾ cup blueberries
Instructions
Directions for Biscuits
  1. 1. 12 to 24 hours prior to making biscuits, mix the flour and kefir together. Cover and place in fridge.
  2. 2. Preheat the oven to 450°F.
  3. 3. Cut the butter into small chunks and then work it into the flour/kefir mixture along with the baking soda, baking powder, and salt. Do not over-mix. I used my food processor for this step, pulsing 5 times or so).
  4. 4. Turn the dough onto a lightly floured board. Gently pat the dough to 1 inch thick.
  5. 5. Use a round cutter to cut out the biscuits and place onto a baking sheet covered in parchment paper.
  6. 6. Bake for 10 to 12 minutes until golden brown.
Directions for berry compote (make while biscuits are baking)
  1. 1. In a small saucepan over low heat, add butter and brown sugar. Let the butter melt and stir to dissolve the sugar.
  2. 2. Add the strawberries and blueberries and stir gently-increase heat to medium-low. Let simmer for about 6-8 minutes (while biscuits are cooking), stirring occasionally.
  3. Once biscuits are done baking, remove from oven. Let cool a few minutes, then break each biscuit in half, and spoon compote over each side of the biscuit. Enjoy!
Recipe Notes

You can use other berries such as blackberries or raspberries as well!

You can also connect with me here:

Thanks for visiting!

- Allyson

Whipped Basil Feta Dip

Published Jul 8, 2014 by Allyson
This post may contain affiliate links. Read my disclosure policy.

Whipped Basil Feta Dip 2

Since starting my garden a few months ago, I’ve had several things growing; tomatoes, zucchinis, bell peppers, sweet peppers, and various herbs including basil.  For some reason unknown to me, whenever I have grown basil in the past, it has always died. I blame it on the heat down here in Georgia, but I really don’t know if that is the case because I see other people’s plants doing extremely well.  So this year I tried to plant it more out of the sun, so it wouldn't be exposed to the sun all day long, which I thought was maybe too long. I think I was right because this year, my basil plant is growing a lot better!  So much better in fact, a bunch of little bugs like eating it up! Ugh! I can never win.  Luckily I have been using it up before they can get to all of it though; thank goodness because there is nothing like fresh basil!

Whipped Basil Feta Dip 3

I was doing my weekly grocery shopping a few weeks ago, and noticed the feta cheese crumbles were on sale for buy one get one free…naturally, I had to buy them. We LOVE feta cheese at my house, and I often use it to top things like pizza or in salads or veggie quesadillas. I love the bit of tartness it adds to things.  Then it dawned on me to make a creamy feta dip with some delicious fresh basil.  We were not disappointed and this recipe is a total win! It seriously takes 2 minutes to ‘whip’ up, and it lasts in the fridge for 2 weeks, tightly covered. I guarantee it won’t last that long though.  This is a dip that is perfect for bringing to potlucks or parties, serving as an appetizer at a get together, or just eating at home when you are craving some delicious dip!  We have had it with lightly toasted baguette slices, pretzel chips, pretzel rods, and fresh cut-up veggie sticks (carrots, celery, cucumber slices…). I even used it the other day on top of baguette slices, and then put a fresh balsamic tomato bruschetta on top…SO good!

Print
Whipped Basil Feta Dip
Course: Appetizer
Cuisine: Mediterranean
Author: Allyson
Ingredients
  • 8 oz of feta crumbles or block of feta
  • 8 oz of cream cheese I used nuefatchel- reduced fat, softened
  • ½ cup tightly packed basil leaves rinsed and dried
  • 1 clove of garlic
  • 1 TBS white wine cooking wine or regular wine, or can be omitted
  • salt and pepper to taste
Instructions
  1. If using a block of feta, first place it in the food processor and pulse to crumble. Next add the cream cheese, basil, and garlic and process on high for 1 minute or until creamy and smooth.

  2. Add wine, salt and pepper and combine for a few more seconds until nice and smooth.

  3. Remove from processor bowl and place in an air-tight container in the fridge. Refrigerate at least 1 hour, but the longer the better (overnight if possible before a party).

  4. Serve with toasted baguette slices, vegetable slices, crackers, pretzels, or whatever you prefer- Enjoy!
Recipe Notes

When serving the dip, it is best at room temperature so remove from fridge a bit before serving.

Whipped Basil Feta Dip

Like dips as much as me?! Check out these delicious Dips on Domestic Superhero (click on photo to go to recipe):

Cilantro Lime Dip

Chipotle Dip

Hot and Cheesy Artichoke Dip

Copycat Outback Bloom Sauce


You can also connect with me here:
 

Thanks for visiting!

- Allyson

Peach Margaritas

Published Jun 25, 2014 by Allyson
This post may contain affiliate links. Read my disclosure policy.

Peach Margarita

Living in Georgia, peaches are a big deal.  Georgia peaches when in season are the juiciest, most delicious peach out there. There are so many varieties, over 40 produced just in Georgia, that there is definitely one that you have to love. Some are more sweet, others more tart, but the Clingstone variety is most popular for just eating straight up. I used that variety (which is likely what you find in your grocery store, too) for making these margaritas because it is juicier than some of the other varieties and always nice and sweet!

Peach Margarita

These drinks are perfect on a warm day in the middle of summer. You can alter the recipe to make a big pitcher, but I would recommend that you only make enough for how much you need at that time…meaning, you don’t want left overs for tomorrow. I find the peach gets really potent and the flavor gets super funky. Trust me, don’t risk it. Make what you need, when you need it.

Print
Peach Margarita
Ingredients
  • 3 peaches peeled and sliced
  • 2 TBS fresh lime juice
  • 8 oz tequila
  • 4 oz triple sec orange cointreau
  • 3 TBS honey
  • 3 cups ice
Instructions
  1. Place everything into a blender and mix on high until you reach desired consistency. Serve with lime and peace slice as garnish. Add salt or sugar based on preference to the rim of the glass.
Recipe Notes

Makes 3-4 margaritas

Peach Margarita

Like summer cocktails as much as I do? Check out these other drinks from Domestic Superhero:

basil lemonade (12) edited   blueberry basil margaritas 6 (2)   Watermelon Marg 1

IMG_6832   Peach Margarita 3   Strawberry Moscow Mule

Pomegranate Limeade 1    cranberry margs  Strawberry-Basil-Margaritas-3.jpg

Mixed-Berry-Mojitos-1_thumb.jpg  Blackberry-Mojito.jpg

You can also connect with me here:

Thanks for visiting!

- Allyson

Black Bean & Sweet Potato Baked Flautas

Published Jun 11, 2014 by Allyson
This post may contain affiliate links. Read my disclosure policy.

Black Bean and Sweet Potato Baked Flautas

When I lived out in California I used to frequent a little Mexican chain called Baja Fresh, and they had what I thought were the best flautas ever.  Little did I know, these were not the best flautas ever, I just didn’t have much to compare them to at that point.  However, once I discovered how much I liked flautas, I started trying them more frequently at Mexican restaurants.  This was hard for me, because whenever I went out for Mexican I would always order the same thing: enchiladas with red sauce. It was my staple, my comfort food…I could never go wrong with that red sauce and whatever filling choice I decided for that day.  This isn't typical to my food trying personality though, because I love trying new things (except when someone tries to mess with my enchiladas!), so I am happy I started branching out a bit when it came to Mexican food. 

Black Bean and Sweet Potato Baked Flautas 2

Anyway, flash forward years later, I’m a vegetarian, and I've never been able to find vegetarian flautas at a restaurant. Always with chicken or some other meat, they tempt me and then crush my flauta dreams when they don’t offer some delicious veggie option. So I set out to make a vegetarian flauta that would satisfy my flauta cravings and put the meat versions to shame! After a couple different attempts at different veggie combos, I found the best…..This is it!

Black Bean and Sweet Potato Baked Flautas 3

These bake up in no time, and the trick to getting them crispy, instead of soggy on the bottom, is to bake them on top of a wire rack (like the kind you use to cool cookies!). You give it a light spray of non stick spray, and then load them on top in a single layer. It works amazingly well and it ensures that the whole flauta gets crispy!  If you aren’t interested in vegetarian meals, you could easily add shredded chicken to this recipe…however, even without it, between the beans and the sweet potato, you get a really hearty and healthy meal.  It’s great for meatless Monday’s or whenever!

Print
Black Bean and Sweet Potato Baked Flautas
Ingredients
  • 1 package of flour tortilla small/taco size
  • 1 15 ounce can black beans
  • 1 cup corn
  • 1 medium sweet potato cooked and diced into small pieces
  • ½ large onion diced (any color onion works)
  • ½ teaspoon chili powder
  • ½ teaspoon dried or fresh cilantro
  • ½ teaspoon cumin
  • ¼ teaspoon cayenne pepper or red pepper flakes [optional]
  • 2 oz cream cheese room temperature (can use low fat if desired), cut into small cubes
  • 6 ounces pepperjack cheese grated
  • ¼ cup red enchilada sauce
  • salt and pepper to taste
  • olive oil spray
  • toothpicks
  • salsa guacamole, and plain greek yogurt or sour cream for dipping
Instructions
  1. 1. Pre-heat your oven to 425F. Place a wire rack or 2 depending on size, on top of a large baking sheet. Spray wire rack with non-stick spray and set aside.
  2. 2. In a large non-stick skillet, combine beans, corn, onion, chili powder, cumin, cilantro, cayenne, and enchilada sauce. Cook for about 3 minutes, stirring regularly to evenly cook. Add in the cubed of cream cheese, and stir to melt and incorporate into veggies. Carefully add the sweet potato and mix gently. Add salt, pepper, and any additional seasoning to taste. Turn off heat.
  3. 3. Placing your tortillas in a pile on the counter, slice off about ½ inch from one side (***see photo below labeled step 3 for visual). Add a "line" of veggie filling to the center of the of the tortilla, about 1-inch thick. Top with a layer of cheese, and then roll the tortilla (cut side going over the top and getting rolled under) all the way around, and place seem side up, onto the wire rack/baking sheet. **You may have to secure the flauta with a toothpick to keep it closed (I always do this). Repeat with all the tortillas and filling mixture.
  4. 4. Once all the flautas are rolled up on the wire rack, spray a quick layer of olive oil spray over them, and then place into the oven. Bake for 15 minutes*, or until the flautas are browning and crispy (*may be a few minutes more or less depending on oven- check after 12 minutes). Remove when finished and allow a few minutes to cool.
  5. 5. Serve with salsa, Greek yogurt/sour cream, and guacamole for dipping. Enjoy!
Recipe Notes

See below photo for step #3 visualization
**You may have to secure the flauta with a toothpick to keep it closed (I always do this)

Recipe Adapted from Peas & Crayons

Step #3:

step 3 flautas

Like Mexican food as much as us? Try out some of these delicious recipes (click on photo to see recipe):

Cheesy Veggie Enchilada Skillet Rice  Crispy Black Bean Tacos

homemade taco seasoning (2)

Skinny Mexican Stuffed Peppers

Taco Bell Mexican Pizzas

You can also connect with me here:

Thanks for visiting!

- Allyson

Pomegranate Limeade

Published May 14, 2014 by Allyson
This post may contain affiliate links. Read my disclosure policy.

Pomegranate Limeade

One thing I absolutely love about summer is hanging out with our friends, the kids, and being poolside. Last summer was filled with Strawberry Basil Margaritas and Blueberry Basil Margaritas by the pitcher. The pool never gets too hot with a fresh marg in hand!  Well, this summer is a little different considering I have a little (I should probably refer to baby dos as big by now) bun in the oven.  No margaritas for me…well, not until this little bundle of joy pops out in mid to late July.  That’s okay…living in Georgia that means I still have 2 good months of pool/margarita time.  Anyway, I have been wanting to make a ‘mocktail’ of sorts and I was able to come up with this delicious concoction.  I guess it’s technically a flavored limeade, but I will consider this my pregnancy cocktail! It’s super refreshing for the warm weather and it comes together with only a few ingredients.  This is going to be a staple in our fridge this summer.  Another plus side of this Pomegranate Limeade? It’s kid friendly! So when my toddler asks for a sip, I can happily give him his own cup of this delicious drink! Rather have alcohol? Hop over to my friend Shannah blog and check out her spiked version!

Pomegranate Limeade

Like I said, this drink only has a few ingredients…and by few, I mean 3: POM juice, frozen limeade, and limes (which could technically be a garnish and not even counted).  If you are going to keep this in the fridge for a while (which is fine), do no keep limes in the pitcher as it will get VERY sour.  You don’t want to learn the hard way like I did. Serve the limes as a garnish, when it’s time to pour the drink….or put them in the pitcher for pretty pictures, and then remove them. Do not, I repeat, do not leave the limes in the pitcher for an extended period of time.

Pomegranate Limeade

Print
Pomegranate Limeade
Ingredients
  • 1-2 bottles of POM Juice 16 oz total, 2 8oz containers
  • 1 can frozen limeade concentrate
  • Limes for garnish optional
  • Sugar for glass rims optional
Instructions
  1. 1. Empty the limeade concentrate into a large pitcher. Add 3 cans of cold water, POM juice, and ice to fill. Mix thoroughly.
  2. 2.Place the pitcher covered in the fridge. Serve in sugar rimmed glasses, over ice, garnished with lime if desired.

Like summer cocktails as much as I do? Check out these other drinks from Domestic Superhero:

basil lemonade (12) edited   blueberry basil margaritas 6 (2)   Watermelon Marg 1

IMG_6832   Peach Margarita 3   Strawberry Moscow Mule

Pomegranate Limeade 1    cranberry margs  Strawberry-Basil-Margaritas-3.jpg

Mixed-Berry-Mojitos-1_thumb.jpg  Blackberry-Mojito.jpg

You can also connect with me here:

Thanks for visiting!

- Allyson

3 Herb Garlic Cheese Bread

Published May 12, 2014 by Allyson
This post may contain affiliate links. Read my disclosure policy.

3 Herb Garlic Cheesy Bread

We are HUGE dippers at my house.  My husband often ‘jokes’ that whatever we are eating is just a vehicle for the sauce…because it’s all about the sauce! Over the weekend I decided to cook up some delicious cheesy bread to take to a Mother’s Day BBQ, and I knew that Barilla® Sauce would be the perfect dipping sauce.  

Of course, I was right! I used some dough I whipped up the night before and then added fresh herbs from my garden and mounds of delicious mozzarella cheese.  Can’t go wrong with that!

3 Herb Garlic Cheesy Bread 2

Using the fresh herbs definitely brings something extra to the regular cheesy bread taste. It spices it up (herbs are spices, right?!), but not in a hot spicy way.  The fresh taste of the 3 Herb Garlic Cheesy Bread pairs perfectly with the Barilla® Marinara Sauce because it’s made from all natural, quality ingredients like vine-ripe tomatoes, extra virgin olive oil and fragrant herbs.  I served both the standard marinara and the Basil & Tomato flavor on the side and they were both a hit! Yum!

3 Herb Garlic Cheesy Bread 4

Print
3 Herb Garlic Cheesy Bread
Ingredients
  • 1 ball of pizza dough see recipe linked above or use your favorite
  • 2 TBS olive oil
  • 2 cloves garlic diced
  • 3 sprigs fresh rosemary chopped
  • 2 TBS fresh parsley chopped
  • 2 TBS fresh chives chopped
  • 8 oz mozzarella cheese shredded
  • 1 cup Barilla Marinara Sauce
Instructions
  1. Preheat your oven to 425 degrees F.
  2. 1. Roll your dough out to a round/oval shape (or whatever shape you want!). Dust a cookie sheet lightly with flour and place dough on top in desired shape.
  3. 2. Drizzle oil over the dough and use your hands to spread around the dough, covering completely. Add garlic, rosemary, parsley, and chives on top, and spread around evenly (I also used my hands for this).
  4. 3. Sprinkle cheese in a thick layer over the top of herbs/dough and spread evenly.
  5. 4. Place into preheated oven and cook for 15-25 minutes, or until dough is cooked through and cheese is melted and bubbly/browned in places.
  6. 5. Place Barilla Marinara Sauce in a microwave safe bowl and cook for 30-60 seconds, or until warm (stir halfway through).
Recipe Notes

After 15 minutes in the oven I would check the bread frequently. It definitely depends on oven temp and my bread is usually done right around 20 minutes.
You could use dried herbs in this recipe as well, but I highly recommend using fresh for the best flavor.

Like bread as much as me? Check out these other breads from Domestic Superhero:
Mushroom-and-Goat-Cheese-Flatbread-with-Balsamic-Glaze.jpg
 
Cheesy-Pizza-Dip-Bread-Bowl-1.jpg
 
Cheesy-Bread-9.jpg
 
BEst-Ever-Easy-Garlic-Bread-1_thumb.jpg 

You can also connect with me here:

Thanks for visiting!

- Allyson

Easy Homemade Vegetarian Chipotle Enchilada Sauce

Published Apr 30, 2014 by Allyson
This post may contain affiliate links. Read my disclosure policy.

Easy Homemade Vegetarian Chipotle Enchilada Sauce

Easy Homemade Vegetarian Chipotle Enchilada Sauce

I’m not going to lie, I had never tried making enchilada sauce at home until about a year ago.  I was a serious Old El Paso girl.  That red sauce in the yellow can seemed perfect always and I was happy to buy it.  However, then I tried making it at home, and I was BLOWN away.  Not only because there are so many varieties you can make, but because it’s so much healthier and it tastes SO much better…like so much better.  I found a recipe for some Chipotle Enchilada sauce, but it had chicken stock in it which meant it wasn’t technically vegetarian. Sometimes I let things like this slide (especially in restaurants), but I knew it would be an easy switch to make it veggie friendly.  So, if you aren’t a vegetarian, go ahead and make this with chicken stock and it will be the same delicious sauce.

The chipotle peppers in adobo sauce add so much flavor to this sauce. It is so good. You can find those pepper in adobo sauce in the international aisle, next to the Mexican food stuff.  This is what you are looking for (whatever brand is fine):

peppers

Whatever peppers you don’t end up using, you can put in a ziplock and pop into the freezer for next time.  These are so delicious.

Easy Homemade Vegetarian Chipotle Enchilada Sauce

This sauce is also really quick to make. Literally it takes 10 minutes max.  I usually double he recipe and save half for another time. I store it in either zipper freezer bags or plastic freezer containers and then defrost when I need it.  Lately I have been using it on my ‘Taco Bell’ Mexican Pizzas and it adds a nice pop of flavor.  This sauce is also a lot lower in sodium than the canned sauce, which is nice for your health as well!  Use it on your enchiladas, Skillet Enchilada Rice, tacos, taco bell pizzas, nachos (I love drizzling enchilada sauce on top of nachos), or whatever you want. It is good, you are going to love it…trust me.

Easy Homemade Vegetarian Chipotle Enchilada Sauce
Print
Easy Homemade Vegetarian Chipotle Enchilada Sauce
Ingredients
  • 2-3 garlic cloves minced
  • 2 TBS chipotle chilis in adobo sauce chopped (try 1 TBS is you don't like a lot of spice)
  • 1-½ cups tomato sauce no salt added
  • ½ teaspoon chipotle chili powder
  • ½ teaspoon cumin
  • ¾ cup vegetable broth/stock if you aren't a vegetarian, go ahead and use chicken stock
  • dash of salt
  • dash of pepper
Instructions
  1. 1. In a medium saucepan, spray oil spray and saute garlic. Add chipotle chiles, chipotle chili powder, cumin, veggie broth, tomato sauce, salt and pepper. Bring to a boil. Reduce the heat to low and simmer for 5-10 minutes.
  2. 2. Set aside until ready to use.
Recipe Notes

Easily double this recipe and freeze half for later use!
Recipe adapted from Skinny Taste

Here are some more recipes you can use this delicious sauce on:

Cheesy veggie Enchilada Skillet Rice 6

Cheesy Veggie Skillet Enchilada Rice

Taco Bell Mexican Pizzas

‘Taco Bell’ Mexican Pizzas

You can also connect with me here:

Thanks for visiting!

- Allyson

Cilantro Lime Dip

Published Apr 24, 2014 by Allyson
This post may contain affiliate links. Read my disclosure policy.

Cilantro Lime Dip

Now that summer is rapidly approaching, I love thinking up new dips that will be great for BBQ’s and get togethers.  We eat chips pretty much year round, and I love coming up with new dips, but I was thinking I wanted to make something light and summery!  Now, even thought we eat Mexican food year round, I always associate eating Mexican and drinking margaritas during the summer, outside on a patio.  Really, what’s better than that?!  I am so looking forward to July when I have this baby and can drink a good ‘ole margarita again! 

Cilantro Lime Dip

Anyway, back to the dip!  This dip is full of summer flavors- lime and cilantro! I am excited to be growing cilantro in my garden this year, because that means I can make this dip pretty much anytime.  Winning.  I also love this dip because it’s not a full fat-make you feel guilty kind of dip.  Using Greek yogurt when making it not only lowers the calories, but it also builds the protein content which is something you wouldn’t expect of a dip.  The Cilantro Lime Dip comes together in just a few minutes, and then I suggest refrigerating it for a while to meld all the flavors.  It gets better with time, trust me.  This dip is also good on anything! I like it with chips, fresh tacos, on top of burritos, for pizza…you can’t go wrong!

5 from 1 vote
Print
Cilantro Lime Dip
Ingredients
  • ¾ cup mayo
  • 1 and ¼ cup plain Greek yogurt I use 0%
  • ¾ cup-1 cup cilantro doesn't have to be exact, I used a big handful
  • Juice of 2 limes or about ⅓ cup
  • dash of salt and pepper
Instructions
  1. Put everything into the bowl of a food processor or blender. Blend until everything is combined and the cilantro is mixed well. Place in fridge for at least 1 hour, then serve with whatever you like to dip!
Recipe Notes

The longer this dip sits, the better. If you leave it in the fridge overnight it's super delicious the next day. Weill keep about a week in the fridge. Good on tacos, burritos, enchiladas, with chips....anything!

Cilantro Lime Dip

Thinking about what else you could enjoy with this dip?  How about some Mexican food and Margaritas?

blueberry basil margaritas 6 (2)   Watermelon Marg 1

Blueberry Basil Margaritas & Watermelon Margaritas are always a winning choice….

Some Mexican food inspiration?

Cheesy Veggie Enchilada Skillet Rice

Cheesy Veggie Enchilada Skillet Rice

Taco Bell Mexican Pizzas

“Taco Bell” Mexican Pizzas


You can also connect with me here:
 

Thanks for visiting!

- Allyson

The Best Ever Easy Garlic Bread

Published Apr 19, 2014 by Allyson
This post may contain affiliate links. Read my disclosure policy.

BEst Ever Easy Garlic Bread 1

We probably eat pasta once a week or at least a couple times a month. It’s quick and easy and time is one thing we are always running short on.  I love making garlic bread to go with pasta, and it wasn’t until recently that I thought to add some seasoning to it.  Why wasn’t I doing this before?!? It seriously adds so much to the bread, and it makes it soooo yummy! It only takes a few minutes and it’s well worth it.  Serve this bread with this Easy Baked Mostaccioli for the perfect dinner!

Easy Garlic Bread

Slice up your fresh bread and lay it out on a baking sheet. Semi-melt your butter, and then add 3-4 teaspoon minced garlic, some oregano, thyme, basil leaves, salt and pepper to the butter. Then mash that together with a fork.  Using a brush or knife, smear the butter mixture over the each slice.  Then cook a few minutes under the broiler.  Super easy!

You can also make this delicious roasted garlic spread to keep on hand, and then use it when you need it on top of the bread!

Best Ever Easy Garlic Bread 2

Meals to serve with this delicious Easy Garlic Bread:

  • One Skillet Chicken Fettuccine Alfredo
  • Bacon Mac & Cheese Gnocchi
  • One Pot Wonder Tomato Basil Pasta
  • 20 minute Cheesy Vegetable Pasta Bake
  • Instant Pot Stuffed Shells (shortcut recipe)
  • Weight Watchers Spinach & Mushroom Stuffed Shells
  • Healthy Instant Pot Lasagna Soup (vegetarian and meat option)
  • The BEST EVER Vegetable Lasagna

Make sure you don’t miss a thing! Follow Domestic Superhero on:

Facebook | Instagram | Pinterest | TikTok | Email

For NEW RECIPES delivered straight to your inbox, signup for our email list! 

Print
The Best Ever Easy Garlic Bread
Course: Side Dish
Cuisine: Italian
Keyword: easy garlic bread
Servings: 10 slices
Ingredients
  • 1 loaf Italian bread or other crusty bread
  • 4 TBS butter
  • 3-4 teaspoon minced garlic I like the pre-chopped kind
  • ½ teaspoon oregano dried
  • ½ teaspoon basil leaves dried
  • ½ teaspoon thyme dried
  • dash of salt and pepper
Instructions
  1. Preheat broiler to high. Slice bread into slices and arrange on a lined baking sheet.

  2. Cut butter into 1 TBS wedges and put into a microwave safe bowl. Microwave at increments of 15 seconds, for about 45 seconds. You want the butter extra soft, but not melted (it's okay if some melts a little but think pudding consistency). Add the garlic and seasonings to bowl with butter and use a fork to mash/mix well.

  3. Using a pastry brush or a knife, spread a generous amount of herb butter onto the top of each slice of bread. Don't be stingy with the butter!

  4. Place in broiler and cook until lightly browned on the edges, about 3-4 minutes. Watch closely as it can burn very quickly under the broiler. Remove and serve!

Recipe Notes

**You can definitely try using fresh herbs in this recipe. You can also add more herbs if you'd like. I don't typically measure them out and just sprinkle a bunch into my bowl.

Baked Tofu Parmesan

Published Apr 3, 2014 by Allyson
This post may contain affiliate links. Read my disclosure policy.

Baked Tofu Parmesan

With Easter quickly approaching, I have been trying to decide what to make for our family meal. Before we became vegetarians, we used to have a late lunch, around 2pm, and would have all the typical foods.  A turkey, mashed potatoes, sweet potatoes, salad, and other various things would dress our table.  The last couple years I have been at a loss on what to make; Everyone wants something delicious, filling, and ‘special.’  That’s when I heard about Kraft Fresh Takes, and how they could make a plainer dish into something amazing. 

After looking through the different types; Italian Parmesan, Cheddar Jack w/ Bacon, or Southwest 3-Cheese, I decided on the Italian Parmesan.  While these blends are typically to go along with meat, I decided that I could use it with tofu and it would be equally easy.I had a great idea for an Easter meal, Baked Tofu Parmesan! At only $1.98 per package (great deal, it even includes cheese!), I decided to get 2 based on the size of the recipe I was creating.

While at the store I didn’t realize right away that this breadcrumb blend also came with cheese. I’m not talking a little tiny bit of cheese either, it was a large quality, perfect for cooking. At $1.98 per package, this Fresh Take.

Okay, so now for the recipe. It was relatively easy making the Baked Tofu Parmesan. Even as a vegetarian, I was skeptical on how it would turn out, but it was SO good. I had never tried freezing tofu before cooking it, but this made a HUGE difference.  The Kraft Fresh Take product coated the tofu perfectly and really gave an exceptional flavor.

Baked Tofu Parmesan

You can see how perfect the tofu strips look coated in the Fresh Take seasoning and cheese.  Also, one big tip I learned recently for cooking anything breaded, is to put it on a wire rack in the oven. It makes a HUGE difference. Instead of the breading getting soggy and falling off on the bottom, it stays on and gets nice and crispy. Any juices fall into the pan underneath the rack, and the food doesn’t just sit in them getting soggy. Genius!

Baked Tofu Parmesan

I swear this recipe would delight vegetarians and meat eaters a like. It was seriously so tasty. We ate it all up for dinner, and both my husband and I cannot wait to make this winning recipe for Easter!

Baked Tofu Parmesan

Print
Baked Tofu Parmesan with Kraft Fresh Take
Ingredients
  • 1 block extra firm tofu
  • 2 packages Kraft Fresh Take Italian Parmesan
  • 2 eggs beaten
  • ¼ cup flour
  • oil spray
  • 1 jar marinara sauce any variety
Instructions
  1. 1. Slice the tofu in ¼ inch slices and set on clean kitchen towel. Place another clean kitchen towel on top of the slices, and stack some books or other even heavy objects on top of towel. Let sit for at least 30 minutes. This will squeeze excess water out of the tofu.
  2. 2. Place tofu slices on a cookie sheet, and place in freezer for 25-30 minutes to flash freeze.
  3. 3. Heat oven to 400 degrees.
  4. 4. Place flour in a shallow dish. Place beaten eggs in a separate shallow dish. Mix bread crumbs from BOTH packages of Fresh Take in a shallow dish, and add cheese from one pack to the breadcrumb mixture. Set aside the cheese from other package.
  5. 5. After the tofu has been in the freezer for 30 minutes, remove, and set aside.
  6. 6. Prep a cookie sheet but placing it to the side of your egg/flour/crumb station and put a wire rack on top of the cookie sheet (the kind of wire rack you use for cooling cookies). Spray the rack with nonstick spray.
  7. 7. Take a slice of tofu, coat with flour, dip into egg mixture, and then press into breadcrumb/cheese mixture. Press down on each side, making sure to coat completely with the crumbs. Place coated slice onto wire rack. Repeat with all the tofu slices until you are finished. Spray tops of tofu slices lightly with oil spray and place in preheated oven and bake for 18-22 minutes, watching them after the 18 minute mark to be sure not to burn. They should be browned and crispy. Remove from oven.
  8. 8. Taking a glass baking dish (9x11 worked well for me), spray with nonstick spray, and then cover the bottom of the dish with marinara sauce (a light layer). Place tofu slices side by side in the baking dish. **If you have too many to fit at the bottom, feel free to stack them (add a layer of sauce between stacking). Using a spoon, add marinara on top of each tofu slice, coating the top, but not adding too much (about 1.5 TBS per slice). Sprinkle remaining cheese on top of sauced tofu slices.
  9. 9. Place back in oven and bake for 15-20 minutes or until cheese is melted and sauce is warmed through.
  10. 10. Remove and serve slices.
Recipe Notes

Serving size: 3-4 slices per person, serves 4 people.

Baked Tofu Parmesan

Like tofu as much as I do? Check out these other recipes from Domestic Superhero:

Creole Tofu with Onions and Peppers  Firecracker Tofu with Brown Rice  Bang Bang Tofu

Buffalo Tofu Salad  Buffalo Tofu Wrap (4) edited  Baked Tofu Parmesan 1

General Tso's Tofu 1

Baked Tofu


You can also connect with me here:

Thanks for visiting!

- Allyson

Baked Cream Cheese Rangoon

Published Mar 31, 2014 by Allyson
This post may contain affiliate links. Read my disclosure policy.

Last month I had a really great opportunity to write a guest post for one of my favorite blogs, Lil' Luna, and I was delighted to share this recipe. Now that it's been a while, I wanted to share it with my readers as well, because it's just too delicious to miss out on! 

Baked Cream Cheese Rangoon

I am obsessed with Chinese food, and I will pretty much make any excuse to indulge in it.  But lets be real, most Chinese take out isn’t exactly what you would call healthy. After spotting some of these wonton wrappers at my local grocery store, I decided to try my hand in making one of my favorite Chinese appetizers, Cream Cheese Rangoon.  Typically these bad boys are fried to crispy perfection, but I figured they would be just as good baked. After browsing different recipes for a while, I pretty much came to the conclusion that these would be easy to make, and there was no reason I had to spend $6 on an order of 5 rangoons anymore.  They would be amazing, I knew it.

Baked Cream Cheese Rangoon 4

Sure enough, I was right! These were so easy to whip up, and you only need 6 ingredients to make them (though, I wouldn’t even count 2 of the 6, personally).  Baked Cream Cheese Rangoon are perfect for a dinner party passed appetizer, march madness snack, or as an appetizer to your favorite make at home Chinese meal.  Baking these saves so many calories, and you still get that awesome crunch you expect.

Baked Cream Cheese Rangoon 3

Serve them up with your favorite sweet and sour sauce and you are good to go!

Print
Baked Cream Cheese Rangoon
Ingredients
  • 8 oz cream cheese , softened
  • ½ clove garlic , minced
  • dash of salt
  • 2 green onions , chopped
  • 1 egg
  • 24 square wonton wrappers
Instructions
  1. Preheat oven to 400 degrees F. In a medium bowl, beat cream cheese, garlic, salt and onions until well mixed.

  2. Whisk egg until well beaten in a small bowl.

  3. Place one teaspoon of cream cheese mixture into the center of one wonton wrapper. Dip your finger into the beaten egg and lightly coat the outer edges of the wonton wrapper. Bring all the corners of the wonton together up to the center and pinch. Slide your fingers all the sides together to to form an "X" or star appearance, and make sure they are sealed (or else the filling may come out). You can add more egg wash if needed. Place on a lined baking sheet. Repeat for remaining wontons.

  4. Lightly spray the tops of the wontons with olive oil spray.

  5. Bake at 400 degrees F for 7-12 minutes or until tops are golden brown in color. Check after 7 minutes to ensure they don’t burn.

  6. Serve with your favorite dipping sauce, out of the oven

Recipe Notes

Makes 24 rangoon

That’s all there is to it! I hope y’all enjoy the Baked Cream Cheese Rangoons as much as we do at my house!

Like I mentioned earlier, we love Asian inspired food over here…these are some of my favorite recipes:

General Tso's Tofu

General Tso's Tofu

Quinoa Fried Rice

Quinoa Fried Rice 

 Honey Sesame Chicken

Crock Pot Honey Sesame Chicken Lettuce Wraps

Baked Tofu

Easy Baked Tofu

You can also connect with me here:

Thanks for visiting!

- Allyson

Broccoli Cheddar Grilled Cheese

Published Mar 26, 2014 by Allyson
This post may contain affiliate links. Read my disclosure policy.

Broccoli Cheddar Grilled Cheese

So I know I just posted a recipe for Gluten Free Buffalo Chicken Grilled Cheese last week, but what can I say….we like grilled cheese!  I made this broccoli and cheddar grilled cheese a few weeks ago, and it was so good. I had some left over broccoli and cheese, from making….you guessed it, Skinny Broccoli Cheddar soup so I was thinking about what I could do with it.  Then it dawned on me…add it to some bread and grill it up! Broccoli cheddar grilled cheese! Yum!

Broccoli Cheddar Grilled Cheese

I made sure to chop this broccoli up pretty well (and I used the stems too, not just the florets), because I didn’t want huge pieces of broccoli in the sandwich. I also wanted to make sure the cheese was able to keep it glued together. I used a ton of cheese, just to be sure it didn’t fall apart (or because I love cheese, you be the judge).  This is a great meat-free lunch or dinner option, but if you have to have meat, some chopped up deli chicken or turkey would probably be really good in here as well. I would just chop it roughly and then add it to your skillet as you are cooking the broccoli.

Broccoli Cheddar Grilled Cheese

I love how the cheese drips down the crust. Some even gets a little browned in the skillet while cooking, and then it gets that delicious crispy cheese crust. So yum.

Broccoli Cheddar Grilled Cheese

Print
Broccoli Cheddar Grilled Cheese

Broccoli Cheddar Grilled Cheese is the most comforting and delicious grilled cheese!

Course: Main Course
Cuisine: American
Keyword: Broccoli Cheddar Grilled Cheese
Servings: 3 sandwiches
Ingredients
  • ½ medium yellow onion , chopped
  • 1 large head of broccoli , chopped well (if you don't want to use the stems, you need to get more florets)
  • butter
  • 6 slices sharp cheddar cheese (you can use any variety of cheddar)
  • 1 garlic clove , diced
  • salt and pepper
  • 6 slices fresh bread (I like a rustic type of bread, sourdough or french are great)
Instructions
  1. Heat a medium skillet over medium/high heat, with a bit of butter tossed in. Add onions and garlic and saute for minute. Add broccoli bits and mix around, stirring frequently. Cook for about 5 minutes, or until broccoli is tender and bright green. Remove from heat, dump contents on a plate or bowl and set aside.

  2. Wipe out skillet and put back on stove. Heat on low heat. Butter 3 slices of bread, and set them in the skillet butter side down. Add a slice of cheese to the bread (in the skillet), then add ⅓ of the broccoli mixture on top, then a second slice of cheese. Butter another slice of bread and set on top of the sandwich, butter side up. Repeat for remaining sandwiches.

  3. Once you have all the sandwiches in the skillet and assembled, turn heat up to medium (not too high, we want the bread to toast and the cheese to melt, if you cook too high then the cheese will not melt before the bread burns), and let cook for 3-4 minutes. Check to see if the bottom is golden brown, and if so, carefully flip sandwiches over. Cook another 3-4 minutes on the other side, checking to make sure not to burn.

  4. Remove sandwiches from skillet, cut in half, serve hot.

Recipe Notes

You can easily add a little more broccoli/cheese to make an additional sandwich, or you can cut this recipe down to make just one sandwich.
If adding sliced meat, I would add that to the skillet while cooking the broccoli, about the last minute of cooking- just enough to warm the meat.

Broccoli Cheddar Grilled Cheese

What is your favorite grilled cheese? We love grilled cheese sandwiches on Domestic Superhero…check out these other great recipes:

Caprese Panini (3)1

Caprese Panini with Tomatoes, Mozzarella, & Pesto

Caramelized Onion and Mushroom Melt (1)

Caramelized Onion & Mushroom Havarti Melt

Gluten Free Buffalo Chicken Grilled Cheese

Gluten Free Buffalo Chicken Grilled Cheese

You can also connect with me here:

Thanks for visiting!

- Allyson

Samosa Stuffed Baked Potatoes

Published Mar 24, 2014 by Allyson
This post may contain affiliate links. Read my disclosure policy.

Samosa Stuffed Baked Potatoes

Have you ever had a samosa?  Considered Indian food, they are little deep fried shells that are filled with a mixture of mashed potato, onion, green peas, spices and green chili. They are usually served with a little sauce on the side as well. They are SO delicious. My friend recommended trying a samosa the first time I ever had Indian food, and I was hooked since then.  They are seriously the perfect little appetizer, but unfortunately they aren’t too little (they are kind of large, stuffed triangles), and they fill you up. So while you are eating those, your other food is cooking, and then you have no room for the main course! That is a problem for me, because I LOVE Indian food, and I always want to eat the most possible (seriously).  Lately I find myself splitting a samosa when I go out, which is a lot less food, so I have more room for the main course…works like a charm! Use the EASY AIR FRYER METHOD to bake these potatoes!

Samosa Stuffed Baked Potatoes

So anyway, I was looking up ways to make samosas at home, but I don’t really like frying food. There are versions where you can bake the outside, and those look promising, but then I had an idea to do a play on the samosa, using just a baked potato.  I probably could have used a baked sweet potato to make it even healthier, but for the first try, I wanted to use a real potato since that’s what is used when making a real samosa. I am glad I did, because it came out really delicious. This larger russet potato is so filling that this is all you need as your main dish. You can serve some sides with it if you want, but one potato each was more than enough for my husband and I. 

Two of the star ingredients, ginger and curry powder, are absolute musts in this recipe.

Samosa Stuffed Baked Potatoes

Print
Samosa Stuffed Baked Potatoes
Ingredients
  • 2 large potatoes
  • ½ onion diced
  • 2 teaspoon curry powder
  • 2 teaspoon minced ginger
  • ½ teaspoon mustard seeds
  • olive oil
  • ¼ cup cilantro chopped
  • ¾ cup peas cooked
  • 3 TBS butter
  • Salt and pepper
  • Plain Greek yogurt for topping
Instructions
  1. 1. Wash potatoes, and pierce with fork. Bake directly on oven rack at 400 degrees, for one hour.
  2. 2. While potatoes cook, saute onions, curry, ginger, and mustard in olive oil over medium heat until onions are translucent, about 5-7 minutes.
  3. 3. Carefully remove potatoes from oven using oven mitts, and split lengthwise (but don't cut all the way in half). Carefully scoop out insides into a bowl. Add onion mixture, cilantro, peas, and butter, and mash with a potato masher or fork until most lumps are gone. Season to taste with salt and pepper.
  4. 4. Fill the potato with mixture, top with yogurt and cilantro, and serve.
Recipe Notes

Each potato serves 1 person as a main dish, but these could also be split in half and served as sides. Double to recipe for 4 full servings.

Samosa Stuffed Baked Potatoes

You can also connect with me here:

Thanks for visiting!

- Allyson

Buffalo Chicken Grilled Cheese

Published Mar 20, 2014 by Allyson
This post may contain affiliate links. Read my disclosure policy.

Buffalo Chicken Grilled Cheese is the perfect sandwich! Pair it with a side of soup or eat it on it's own, everyone will love this simple recipe!

Gluten Free Buffalo Chicken Grilled Cheese

One thing we can never get enough of in this house is buffalo sauce. We put it on everything and anything, and it’s always delicious.  Pairing buffalo sauce with chicken is a no brainer, and then making it into a sandwich seemed like an even better idea - I was right! This Buffalo Chicken Grilled Cheese is AMAZING!

Gluten Free Buffalo Chicken Grilled Cheese

I love using Buffalo Sauce in my recipes, and I've already shared these amazing Buffalo Chicken Quesadillas, Instant Pot Buffalo Chicken Dip, and Buffalo Mashed Potato cakes!

How to make Buffalo Chicken Grilled Cheese:

**scroll down for full ingredients list and printable directions**

  • First, I used frozen chicken so I defrosted the chicken breast’s. 
Gluten Free Buffalo Chicken Grilled Cheese
  • Next, I mixed up the other ingredients - buffalo sauce, blue cheese, sour cream, cream cheese, pepper jack cheese, and cheddar cheese….mix it good! 
  • Added the chopped up chicken breast to the mixture, getting everything mixed up well. 
  • Next, put the mixture on the bread, and start making the grilled cheeses (see below for full recipe and instructions).
Gluten Free Buffalo Chicken Grilled Cheese

Like grilled cheese as much as me? Checkout these other delicious grilled cheeses from Domestic Superhero:

  • Turkey Cranberry Grilled Cheese (Thanksgiving Leftover Sandwiches)
  • Jalapeno Popper Grilled Cheese
  • Apple Grilled Cheese
  • French Onion Grilled Cheese
  • Spinach Pesto Grilled Cheese

Make sure you don’t miss a thing! Follow Domestic Superhero on:

Facebook | Instagram | Pinterest | TikTok | Email

For NEW RECIPES delivered straight to your inbox, signup for our email list! 

Print
Buffalo Chicken Grilled Cheese
Prep Time
5 mins
Cook Time
6 mins
 

Buffalo Chicken Grilled Cheese is the perfect sandwich! Pair it with a side of soup or eat it on it's own, everyone will love this simple recipe!

Course: Main Course
Cuisine: American
Keyword: buffalo chicken grilled cheese
Servings: 3 sandwiches
Ingredients
  • 6 slices thick sliced bread
  • butter
  • 3 TBS cream cheese
  • 3 TBS crumbled blue cheese
  • ¼ cup shredded cheddar
  • ¼ cup pepper jack cheese shredded or chopped up
  • 2 chicken breast fillets cooked and chopped
  • ¼ cup buffalo sauce see recipe in notes below
Instructions
  1. Mix cream cheese, blue cheese, cheddar cheese, pepper jack cheese, and buffalo sauce in a medium bowl. Add chicken and mix to coat.

  2. Heat large skillet over medium heat. Spread butter onto one side of bread, on 3 slices. Place those slices buttered side down in the pan. Top each slice of bread with ⅓ of the mixture, and spread with a fork. Butter one side of remaining 3 slices. Place each slice on top of the sandwiches in the skillet, butter side up. Lightly press down with a spatula.
  3. Cook for 3-4 minutes, or until bread is crispy. Do not turn heat up as you don't want it to burn. Once the bottom is golden brown, carefully flip over to other side. Repeat cooking on that side, and then remove from skillet.
  4. Serve and enjoy!
Recipe Notes

Buffalo Sauce recipe HERE

Overnight Blueberry Stuffed French Toast

Published Mar 12, 2014 by Allyson
This post may contain affiliate links. Read my disclosure policy.

Overnight Blueberry Stuffed French Toast 1

Every year around early December I start searching Pinterest for the perfect Christmas morning breakfast. The last few years we have hosted Christmas morning at our house, and I love serving a delicious breakfast for our family. I like to find something different from what we normally eat, so when I came across multiple recipes for overnight french toasts I found them interesting.  It would be so much easier to prep on Christmas Eve and then just have to bake in the morning! Plus, I wouldn’t have to make another big mess in my kitchen, and things would stay relatively clean because all the prep would be the night before! What a genius idea!  I found a few different recipes that looked good, and I decided to try my hand at one and use blueberries.  Another great part about this recipe is that you can use frozen blueberries…how convenient.

Overnight Blueberry Stuffed French Toast

I also used neufatchel cheese (low fat cream cheese) because it’s a lot easier to spread, and coincidentally has lower fat and calories. Around the holidays, everyone can stand to save a few calories where they can.  I was also a bit skeptical of putting chunks of bread on the top, but I went with it and I’m glad I did because it was delicious.  Even my super super picky toddler liked this dish, which was shocking and made me really happy!

You may be wondering why I am sharing this ‘Christmas breakfast’ now, well, sometimes I run a little behind on posting things, but also, I think this recipe would be great anytime. It would be perfect for hosting Sunday brunch or breakfast, or to make anytime you have company in town. It’s really quick to fix, and then you just bake it in the morning! So easy!  I served mine up with a cheesy au gratin potatoes- which were seriously the best breakfast potatoes I have EVER had. I also made those the night before and baked in the morning, which made this breakfast the easiest ever!

Overnight Blueberry Stuffed French Toast 3

Print
Overnight Blueberry Stuffed French Toast
Ingredients
  • 12 oz. Neufchatel cheese ⅓ less fat cream cheese
  • ¼ cup powdered sugar
  • 1 ½ teaspoon vanilla divided
  • 2 cups fresh or frozen blueberries no thawing necessary if frozen
  • Zest of 1 lemon
  • 10 large eggs
  • 2 cups milk I used 1%
  • 5 TBS granulated sugar divided
  • 1 loaf day old french bread
Instructions
  1. 1. Cut ½-inch off both ends of bread and discard (or eat). Cut loaf into 1-inch slices then cut each slice into 1-inch cubes (I cut the loaf in half first then kept the cubes from each half separate so it would be easier to determine half). Spread half of the bread cubes into an even layer in a buttered 13 by 9-inch baking dish, set aside remaining bread cubes.
  2. 2. In a small bowl, using an electric hand mixer, blend together Neufchatel cheese, powdered sugar and ½ teaspoon vanilla.
  3. 3. In a separate bowl stir together lemon zest and 1 TBS sugar.
  4. 4. Using a rubber spatula and a clean fingertip, spread Neufchatel cheese mixture over bread cube layer in baking dish. Sprinkle blueberries over Neufchatel cheese layer then sprinkle lemon zest mixture evenly over blueberry layer. Spread remaining bread cubes into an even layer over top of blueberries.
  5. 5. In a blender, blend together eggs, milk, remaining ¼ cup sugar and remaining 1 teaspoon vanilla on low speed until well blended, about 10 seconds. Slowly pour mixture evenly over top of bread cubes in baking dish. Cover with plastic wrap and refrigerate 8 hours or overnight.
  6. 6. The following morning, remove baking dish from refrigerator and allow to rest at room temperature for 30 minutes. Preheat oven to 350 degrees.
  7. 7. Remove plastic wrap and cover baking dish with aluminium foil and bake for 30 minutes, then remove foil and continue to bake 25 - 35 minutes, until golden brown (if it is becoming too golden brown but isn't cooked through then you can cover with foil again during the last few minutes of baking). 8. Allow to rest 5 minutes, then cut into servings.
  8. Serve with syrup if desired.
Recipe Notes

Recipe adapted from Cookingclassy.com


You can also connect with me here:

Thanks for visiting!

- Allyson

Chipotle Ranch Dip

Published Mar 5, 2014 by Allyson
This post may contain affiliate links. Read my disclosure policy.

Chipotle Ranch Dip

Most of my regular readers know that I love dips and sauces. I love how you can really turn anything into a dip. I love chips and veggies and I love dipping them.  We always have some sort of sauce or dip stored on the top shelf of our fridge.  Lately I have been making lots of recipes with chipotle peppers, and I love the smoky spicy taste they add.  I really like the chipotle peppers in adobo sauce (found in your international aisle in a small can), as the sauce they are in is so good.  I had some left over from making some homemade enchilada sauce so I thought I would put them to good use.  Plus, we had pizza on our menu plan for the following day, and I love dipping pizza in different dips. Yum.

Chipotle Ranch Dip

This recipe is very simple. You only need a few things and some sort of blender or food processor. I am obsessed with my Food Processor. Best. Gift. Ever.  Anyway, you just throw everything in there, hit mix, let it mix for a minute, and then let it chill in the fridge.  Now, I know you will be tempted to dig into this dip right away, but please believe me when I tell you, it gets better with time.  You don’t need a lot of time, but I would say at least keep this in the fridge for 2 hours, and then enjoy.  The flavors really come out in that short time.  Even after the day in the fridge the flavors get deeper and spicier…it’s so delicious.

Chipotle Ranch Dip

Like I said, this dip is great for whatever. Parties, potlucks, dipping pizza or veggies, chip dip, football games, or just for funsies. It’s great. Trust me, you don’t need a special occasion for this dip.

Chipotle Ranch Dip

Print
Chipotle Ranch Dip
Ingredients
  • 1 package Ranch dressing not dip mix
  • 1 ½ cups light sour cream sometimes I divide this and do half greek yogurt, half sour cream
  • 1 TBS chipotle peppers in adobo sauce this will get your dip fairly spicy, use less - ½ TBS if you don't want a lot of spice
  • 1 teaspoon adobo sauce from can
  • ¼ cup to ½ cup buttermilk
  • Chips veggies, pizza slices, or whatever food you will be dipping into this delicious concoction
Instructions
  1. Throw everything into your food processor or blender. Blend for 30 seconds-1 minute. Slowly add buttermilk and mix until you have your desired dipping consistency. The less you use the thicker it will be, and it will thicken up a bit in the fridge.
  2. When it's all mixed up pour into jar or bowl, cover, and refrigerate for at least 2 hours. Enjoy!

Chipotle Ranch Dip

Like sauces and dips as much as I do? Check out these other recipes from Domestic Superhero:

Easy Homemade Vegetarian Enchilada Sauce 4  Copycat Outback Bloom Sauce 2Zax Sauce (2)  Dip Trio Sriracha & Basil Aiolis and Avocado Ranch DipsCilantro Lime Dip  Chipotle Ranch Dip (3)Creamy Jalapeno Ranch 1  The-Best-Ever-Homemade-Chunky-Blue-Cheese-Dressing-2.jpg

You can also connect with me here:

Thanks for visiting!

- Allyson

Vegetarian Nacho Soup

Published Mar 3, 2014 by Allyson
This post may contain affiliate links. Read my disclosure policy.

Vegetarian Nacho Soup 2

Have you ever followed a basic recipe, only to have it come out horribly?  Yeah, that happens to me occasionally, and it’s always such a bummer when it does.  When I saw this recipe (gone wrong), I thought it looked good and wanted to try it. It’s hard to find vegetarian soup recipes that are really hearty because typically a nacho soup would have beef or some kind of meat, right? So this veggie-only option is really great, however the recipe I followed did not come out well…it came out bad. So bad that I ended up tossing it. It just really didn’t seem salvageable. I hate hate hate wasting food, but sometimes I guess there is nothing that can be done.  I was still determined to fix this recipe though, and make it great. With the big changes I made, I think it came out really well and have definitely added this to our regular soup rotation.

Vegetarian Nacho Soup 1

This soup is thick, I mean thick (however you can thin it as much as you want), but it’s really great for dipping. Bread, chips, and veggie sticks would all be great dippers. This soup is so dip-able in fact, that you could keep it super thick, and serve it as a bean dip at a party. It’s versatile and you can thin it out to your desire based on what you want to use it for.

Vegetarian Nacho Soup

You can also add a multitude of toppings to this soup. I really liked it topped with cheese and green onions, while my husband added some hot sauce, cheese, green onions, Greek yogurt (or sour cream), and a bit of pico de gallo. There are lots of options! It would be fun to set this up as a ‘top it yourself’ bar on the table….everyone can add what they like, kind of like a taco bar!

Vegetarian Nacho Soup 4

Print
Vegetarian Nacho Soup
Ingredients
  • 1 TBS oil
  • 1 small onion diced
  • 2 cloves garlic minced
  • ½ bell pepper red, yellow, or green are all fine
  • ½ teaspoon chilli powder
  • ½ teaspoon smoked paprika
  • ½ teaspoon cayenne pepper
  • 15 oz can diced tomatoes I like fire-roasted
  • 15 oz can vegetarian refried beans
  • 10 oz can red enchilada sauce
  • 1 cup veggie stock or water if making dip, this might not be needed
  • salt
  • black pepper
  • **Optional toppings: cheese sour cream/Greek yogurt, guacamole, green onions, salsa, hot sauce, etc.
Instructions
  1. 1. Heat oil in a pot, and cook the onion, garlic and pepper over a medium heat until translucent and soft.
  2. 2.Add chili powder, paprika, cayenne, salt, and pepper; cook a few more minutes while stirring until fragrant.
  3. 3. Add tomatoes, refried beans, and enchilada sauce, and mix well. Cook over low heat, mixing frequently for a few minutes.
  4. 4. Slowly add the vegetable stock while mixing until you reach your desired consistency.
  5. Serve hot with your desired toppings.

Vegetarian Nacho Soup 3

You can also connect with me here:

Thanks for visiting!

- Allyson

Baked Potatoes with Broccoli and Buffalo Cheese Sauce

Published Feb 19, 2014 by Allyson
This post may contain affiliate links. Read my disclosure policy.

Baked Potatoes with Broccoli and Buffalo Cheese Sauce make the perfect meal or side dish. Everyone will love this hearty meal!

Baked Potatoes with Broccoli and Buffalo Cheese Sauce

In case I haven’t mentioned this before (although I am 99% sure I have), we are a potato family.  We were out to dinner a few weeks ago and I actually looked down at our food to realize we were eating 3 different potato dishes.  My son had french fries, I had potato skins, and my husband had loaded cheese fries.  At that point I knew we could really say with 100% confidence that we love our potatoes!  Use the easy AIR FRYER METHOD to make these BAKED POTATOES!

Baked Potatoes with Broccoli and Buffalo Cheese Sauce

Having plain baked potatoes over and over gets boring and there are so many great ways to dress them up. I’ve seen Tex-Mex baked potatoes, fancy baked potatoes, meaty baked potatoes, and of course baked potatoes with broccoli and cheese. I love the broccoli and cheese combo because it adds a healthy vegetable, broccoli, to balance out the not so super healthy cheese sauce (oh come on, it’s healthy!).  In our house we like things spicy though, so I decided to take the typical cheese sauce and turn it into a buffalo cheese sauce. Delish.

Baked Potatoes with Broccoli and Buffalo Cheese Sauce

Tips for making Baked Potatoes with Broccoli and Buffalo Cheese Sauce:

  • Use the air fryer baked potatoes method for quick baked potatoes.
  • Use the Instant Pot method to make the baked potatoes.
  • Use this easy homemade buffalo sauce recipe.
Baked Potatoes with Broccoli and Buffalo Cheese Sauce

Here some other delicious potato recipes from Domestic Superhero:

  • Air Fryer Potato Skins
  • Air Fryer Sweet Potatoes
  • Instant Pot Loaded Mashed Potatoes
  • Instant Pot Meatloaf and Baked Potatoes
  • BEST EVER Salty Herbed Smashed Red Potatoes

Make sure you don’t miss a thing! Follow Domestic Superhero on:

Facebook | Instagram | Pinterest | TikTok | Email

For NEW RECIPES delivered straight to your inbox, signup for our email list! 

Print
Baked Potatoes with Broccoli and Buffalo Cheese Sauce

Baked Potatoes with Broccoli and Buffalo Cheese Sauce

Course: Main Course, Side Dish
Cuisine: American
Keyword: Baked Potatoes with Broccoli and Buffalo Cheese Sauce
Servings: 4 potatoes
Ingredients
  • 4 large Russet potatoes
  • olive oil
  • 1 lb fresh broccoli crowns or 1lb bag frozen broccoli, chopped
  • 1 TBS butter
  • 2 TBS flour
  • 1.5 cups extra sharp/sharp cheddar cheese grated
  • 1.5 cups of milk (any %)
  • ½ cup buffalo wing sauce (see homemade recipe in notes)
Instructions
  1. Preheat oven to 375 degrees F. Wash potatoes thoroughly and dry. Rub olive oil over skin of potatoes and place potatoes on rack in preheated oven. (I like to put a cookie sheet on the 2nd rack to catch anything that drips down, though isn't usually much) Bake for 50-70 minutes or use AIR FRYER METHOD until done (fork should poke into the potato easily). Remove from oven and set on wire rack to cool.

  2. After broccoli is chopped steam it on the stove top or microwave. Set aside.
  3. In a medium sauce pan make a roux: over medium heat melt butter, then add the flour. Whisk together and cook for 1 minutes, whisking the entire time. Slowly add milk ½ cup at a time, whisking until completely combined after every addition. Once all the milk is added turn up the heat a bit (not too high), and continue to whisk. The mixture will bubble and start to thicken as you are mixing. Once it has thickened up, turn off heat and remove the sauce pan. Add cheddar cheese to milk mixture and whisk until melted and combined. Add buffalo sauce and mix until combined.

  4. Slice open potatoes down the center length wise, then make several cuts across the other way so your potato resembles the strings on a football. Top with broccoli and then spoon buffalo cheese sauce over top.
Recipe Notes

Buffalo Sauce Recipe HERE.

Super Simple Buffalo Potato Wedges

Published Feb 13, 2014 by Allyson
This post may contain affiliate links. Read my disclosure policy.

These Buffalo Potato Wedges are homemade and delicious. Simple to bake and serve on gameday as an appetizer or as a side dish!

These Buffalo Potato Wedges are homemade and delicious. Simple to bake and serve on gameday as an appetizer or as a side dish!

These buffalo potato wedges are the perfect side dish, snack, or appetizer! The recipe is super easy and the taste is phenomenal! Use my homemade buffalo sauce and the flavor will really pop! Making potatoes is my favorite as you know from my Air Fryer Baked Potatoes and the Best Ever Salty Smashed Potatoes recipes that I have already shared!

These Buffalo Potato Wedges are homemade and delicious. Simple to bake and serve on gameday as an appetizer or as a side dish!

How delicious do these look? Pair them with my FAMOUS BEST EVER BLUE CHEESE DRESSING! They are super simple to make, too, here's how...

How to make Simple Buffalo Potato Wedges:

**scroll down for full ingredients list and printable directions**

  • Preheat oven to 425 degrees F.
  • Cut the potatoes length wise once, and then those halves in half.
  • In a large bowl, combine oil and potatoes add a little salt and toss until evenly coated.
  • Arrange wedges evenly on a lined baking sheet, without any overlapping.
  • Bake for 30 minutes. Turn potatoes and continue cooking another 20 minutes, or until golden and crispy.
  • Place wedges in a large bowl, drizzle homemade buffalo sauce, and toss until they are coated evenly.
  • After they are done, drench them in buffalo sauce.

Serve these Buffalo Wedges with a nice dip on the side! Here are my recommendations:

  • Sriracha Ranch Dip
  • Creamy Jalapeno Ranch
  • Homemade Chunky Blue Cheese Dressing (BEST EVER)
These Buffalo Potato Wedges are homemade and delicious. Simple to bake and serve on gameday as an appetizer or as a side dish!

Like Buffalo style recipes as much as I do?! Checkout these other recipes from Domestic Superhero:

  • Instant Pot Buffalo Chicken Dip
  • Air Fryer Buffalo Cauliflower Bites (No Oil)
  • Buffalo Chicken Quesadillas (Grilled)
  • Instant Pot Buffalo Chicken Lettuce Wraps
  • Buffalo Chicken Fries
  • Buffalo Tofu Salad
  • Buffalo Tofu Wrap
  • Slow Cooker Buffalo Chicken Lettuce Wraps
  • Buffalo Blue Mac & Cheese
These Buffalo Potato Wedges are homemade and delicious. Simple to bake and serve on gameday as an appetizer or as a side dish!

Make sure you don’t miss a thing! Follow Domestic Superhero on:

Facebook | Instagram | Pinterest | TikTok | Email

For NEW RECIPES delivered straight to your inbox, signup for our email list! 

Print
Simple Buffalo Potato Wedges

These Buffalo Potato Wedges are homemade and delicious. Simple to bake and serve on gameday as an appetizer or as a side dish!

Course: Appetizer, Side Dish
Cuisine: American
Keyword: buffalo potato wedges
Servings: 7 servings
Ingredients
  • ¼ cup olive oil
  • 7 large potatoes russet (scrubbed clean)
  • ½ cup wing sauce I use Franks Buffalo Sauce
  • salt
Instructions
  1. Preheat oven to 425 degrees F.
  2. Cut the potatoes length wise once, and then those halves in half.
  3. In a large bowl, combine oil and potatoes add a little salt and toss until evenly coated.
  4. Arrange wedges evenly on a lined baking sheet, without any overlapping.
  5. Bake for 30 minutes. Turn potatoes and continue cooking another 20 minutes, or until golden and crispy.
  6. Place wedges in a large bowl, drizzle with homemade wing sauce, and toss until they are coated evenly.

Recipe Notes

Homemade Buffalo Sauce Recipe HERE.

Snickers Cheesecake Bars

Published Jan 28, 2014 by Allyson
This post may contain affiliate links. Read my disclosure policy.

Snickers Cheesecake Bars

One of my all time favorite candy bars is Snickers. I also love Twix and Caramello….I think as long as it has caramel, I like it.  As for desserts go, cheesecake is my ultimate favorite. When I was little I used to request a cheesecake instead of a regular birthday cake.  Sometimes my mom would pick up on the the kinds that had all the different flavors…a sampler cheesecake. I would be so happy, because I love cheesecake…every. single. kind.  Later in life, when I started baking and cooking, I always shied away from making cheesecake. I am not sure why, although I think it was probably because I was too intimidated by it.  How could I replicate the most delicious, perfect dessert?  I never even looked into how it was made, because it just seemed impossible.

Snickers Cheesecake Bars

When Pinterest started getting popular, I would see different cheesecakes popping up everywhere. Cheesecake cupcakes, double layered cheesecakes, cheesecake bars….’how hard could it be?’ I wondered.  Finally I decided to tackle my first cheesecake dessert, Sopapilla Cheesecake.  Now, this was a little bit of a cheat, because the ‘cheesecake’ was actually just a filling, but I would later find out that the mixture for the filling, is the same basic filling in regular cheesecake. I went on to make Cookies & Cream Cheesecake Cupcakes, Skinny Mini Key Lime Cheesecake Cupcakes, and Chocolate Almond Cheesecake Bars…all of which were not difficult. Some more tedious than others, but I wouldn’t say any were hard.

Snickers Cheesecake Bars

Moving on, I decided to combine my 2 favorite treats: Cheesecake and Snickers.  How could I go wrong? I decided to make them on an Oreo crust, but I think they would be equally delicious on a graham cracker crust as well.  It can be made the same was as the Oreo crust, just with graham crackers instead.  The end result of these Snicker Cheesecake Bars was soooo delicious. It was hard to get a picture that did them justice, because they get so messy when you cut them up (or maybe I just need a better knife?).  Trust me, you want to make these.  I wasn’t even going to post these for a few weeks, but I had such overwhelming feedback when I posted a teaser picture on my Facebook page, that I felt like y’all needed this recipe ASAP.

Snickers Cheesecake Bars


Print
Snickers Cheesecake Bars
Ingredients
For the Crust
  • 20 Oreo cookies any type
  • 5 TBS unsalted butter melted
For the Cheesecake Filling
  • 16 ounces cream cheese softened to room temperature (can use lower fat as well)
  • 1 large egg
  • ¼ cup granulated sugar
  • 2 teaspoon vanilla extract
  • 12 fun size snickers chopped
  • ⅓ cup milk chocolate chips
Instructions
  1. 1. Preheat oven to 350F degrees. Set aside a 8x8 or 9x9 baking pan.
  2. 2. For the crust: In a food processor or blender, pulse the whole Oreos into fine crumbs. Stir the cookie crumbs and melted butter together until well blended. Press mixture into the baking pan filling in all gaps. Bake for 9-10 minutes. Allow to cool as you prepare the filling.
  3. 3. For the filling: Beat cream cheese, egg, sugar, and vanilla extract together with a hand or stand mixer until smooth and creamy, about 3 full minutes. Fold in the Snickers. Spread the mixture over your cooled crust. Top with chocolate chips.
  4. 4. Bake for 35 minutes, or until the cheesecake has set and the edges are lightly browned. Allow to cool for 30 minutes on a wire rack and then completely cool in the refrigerator for at least three hours.
  5. 5. Using a sharp knife cut the cheesecake into bars.
Recipe Notes

Store bars in a covered container for up to 10 days in the refrigerator.
Recipe can easily be doubled and baked in a 9x13-inch pan, baking time will vary - about 45-55 minutes.

You can also connect with me here:

Thanks for visiting!

- Allyson

  • « Previous Page
  • 1
  • …
  • 15
  • 16
  • 17
  • 18
  • 19
  • 20
  • Next Page »

Hi! I’m Allyson

Welcome to Domestic Superhero where you will find lots of recipes & food goodness! Let's connect on social media, and be sure to subscribe to my email so you won’t miss a post!

More About Me →

  • Facebook
  • Instagram
  • Pinterest
  • Twitter
  • TikTok

Footer

↑ back to top

About

  • About Me
  • Contact
  • Disclosure & Privacy Policy
  • Featured On

Social

  • Facebook
  • Instagram
  • Pinterest
  • Twitter
  • TikTok

Recipes

  • Dinner Ideas
  • Desserts
  • Drinks
  • Appetizers

Disclaimer

Domestic Superhero is a participant in the Amazon Services LLC Associates Program, an affiliate advertising program designed to provide a means for sites to earn advertising fees by advertising and linking to amazon.com

Copyright © 2025 Domestic Superhero. Privacy