
If you're on Pinterest, you've probably seen all kinds of pallet projects. Pallets are the wooden platforms used to ship products, and they're often reused or tossed.
For months I kept my eyes peeled for a discarded pallet so I could finally try one of those fun upcycling projects. Every one I found was either broken or falling apart...until one day I spotted a pallet sitting next to the trash at Kroger. It looked almost too good to be true. I walked over expecting to find something wrong with it, but it was practically brand new.
JACKPOT!
I pulled my car over, wrestled the pallet up (those things are HEAVY!), and tried to load it into my trunk. Nope. Too big. The backseat? Also nope. It wouldn't even fit through the door. Defeated, I put it back and drove home.
But I couldn't stop thinking about that pallet.
A few hours later it hit me...I could strap it to the roof of my car! I grabbed a pile of bungee cords and headed back to Kroger.
The whole drive I was convinced someone would have taken it—or that the rain would have ruined it. Thankfully, it was still there! I laid a towel across my roof to protect the paint, then went to grab it.
Of course, the pallet was now soaking wet and covered in little bugs (aka my worst nightmare). After shooing them away, I somehow managed to hoist the giant thing onto the roof using what I can only describe as temporary superhuman strength.
Then I secured it with what felt like 10 bungee cords threaded through my windows. That pallet wasn't going anywhere.
As I pulled away, I noticed several people standing in the parking lot staring at me. I probably looked completely ridiculous...but I didn't care. I had a vision! I drove home extra slowly, and when I pulled into the driveway, my husband was just standing in the window shaking his head.
Worth it.
So what was this grand vision? An ottoman! We had just bought a new couch, and our coffee table was way too big. I thought the pallet would be the perfect size...it wasn't. But after trimming it down, it really was the perfect size.
I've been so excited to share this project! It's been finished for a few weeks, but I kept putting off writing this post because it's a big one. I'll do my best to explain each step, but feel free to ask questions along the way. I originally thought this would be a simple project, but then I was convinced to tuft the ottoman—which added a whole new level of research and difficulty. In the end, I'm so glad I did. I usually save the reveal for the end, but I can't wait this time!
Here's the finished ottoman, and then I'll show you exactly how I made it.

How to make a DIY Tufted Ottoman:
I started off with the pallet:
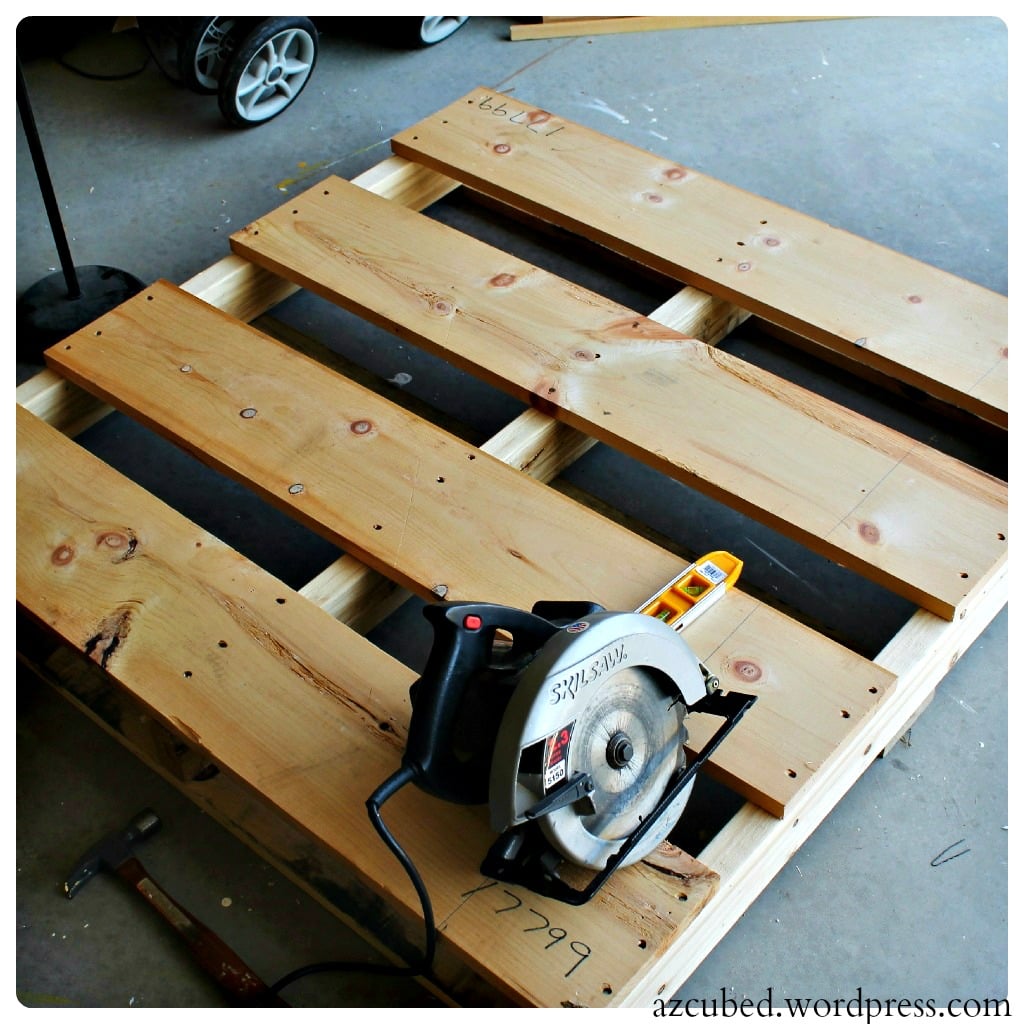
See what I mean about it being in great condition? The wood is practically new, and I would imagine that it was only used once...maybe twice, and for something minimal.
Next, I decided I needed to make it a bit smaller. It was just a little too big for the space. I cut it down to 36 inches by 30 inches.
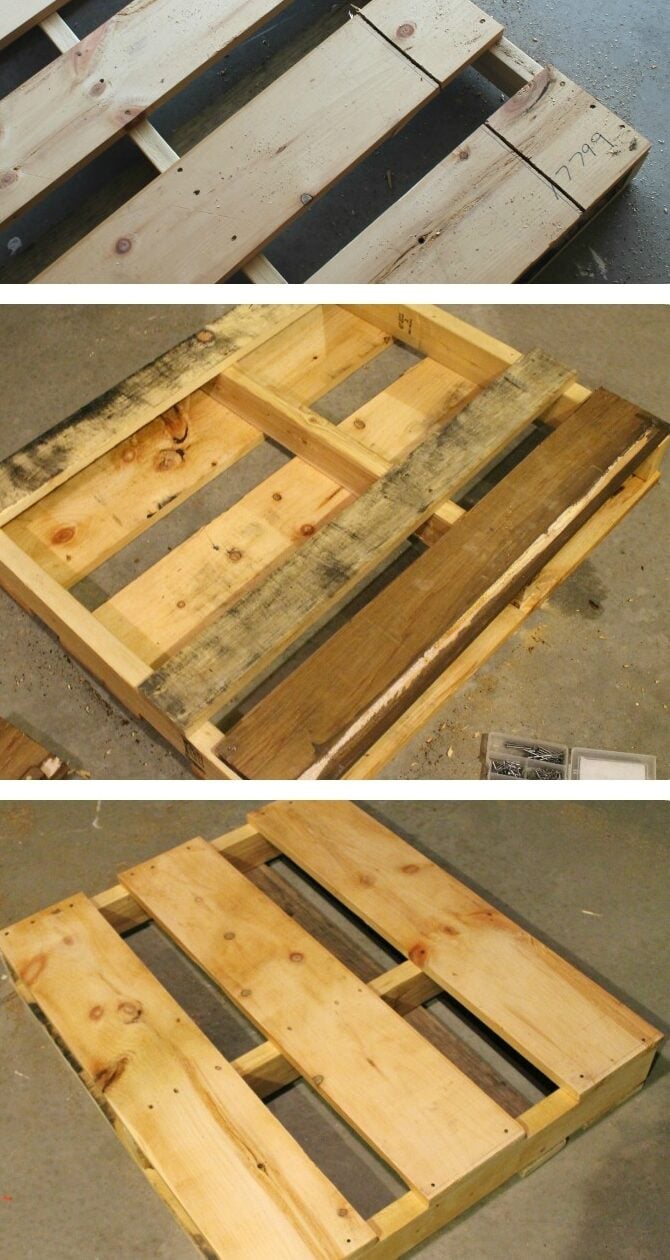
You can see what both sides look like in this photo, and how I cut it down. As you can see, the bottom side wasn't totally filled in with wood, and I didn't want any foam sinking into those gaps, or to have a hard time stapling the fabric on. So I sanded the entire pallet really well (I wanted to get off all the yuckies), and then I added plywood to the bottom side:
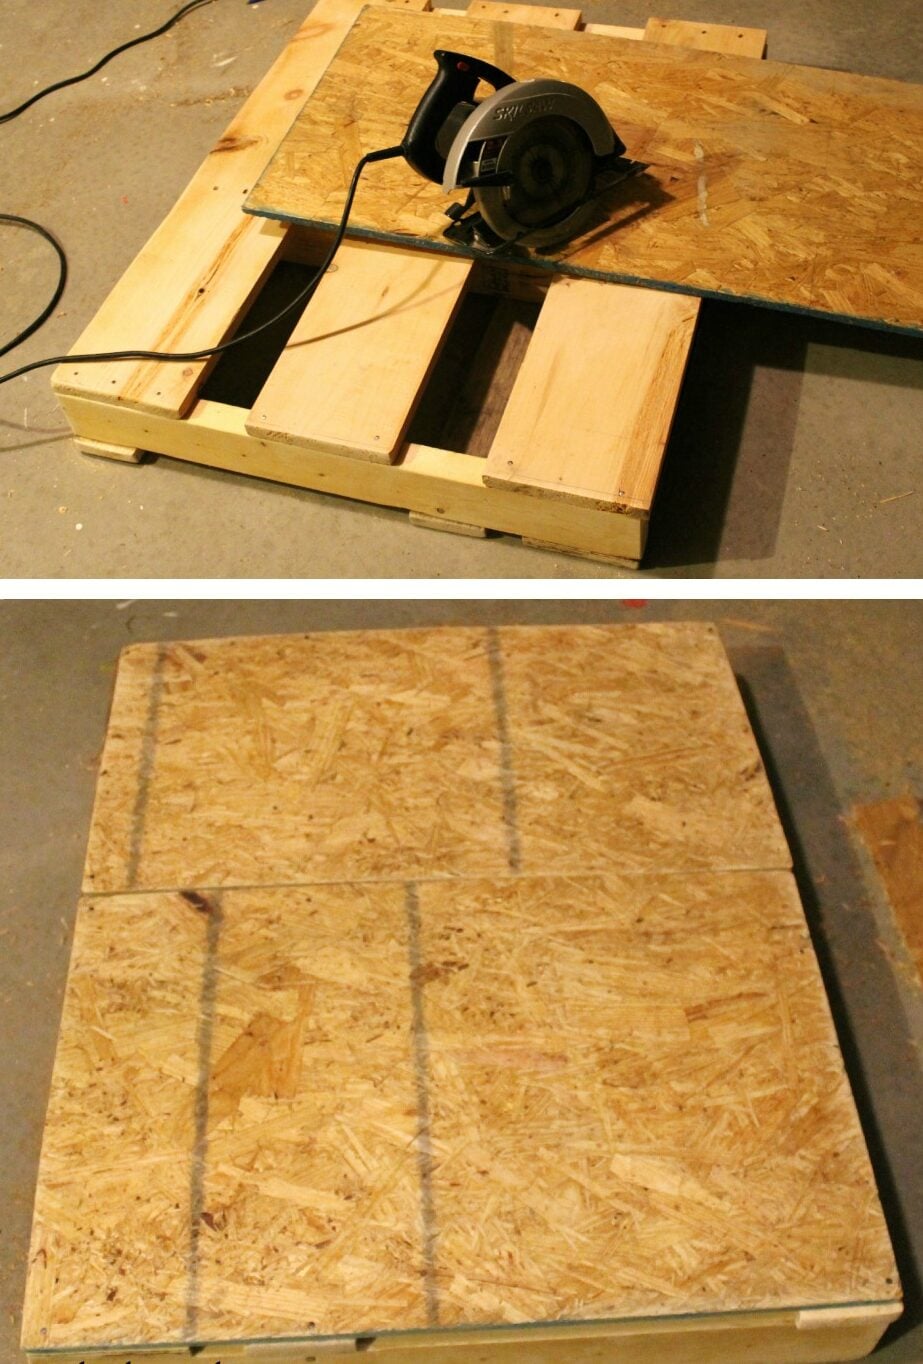
I cut the plywood into 2 sections, so I could cover the entire pallet. Then I nailed the plywood onto the base, and sanded the top of the plywood and along the outside edges.
After I did this step, things came to a stand still. My next step would be to upholster...however, I still had not decided on a fabric. I went to a really nice fabric store and spent a lot of time going over the different fabrics they had. Part of me wanted to match to the pillows, but then I was worried it would be too matchy-matchy. I started thinking maybe a solid color would work best...cream perhaps. But then I thought about how dirty it would get with my toddler, and deep down I wanted a print. I showed my pillows and couch to a designer at the fabric store, and she suggested a patterned textured fabric. I ended up buying it, but regretted it immediately.
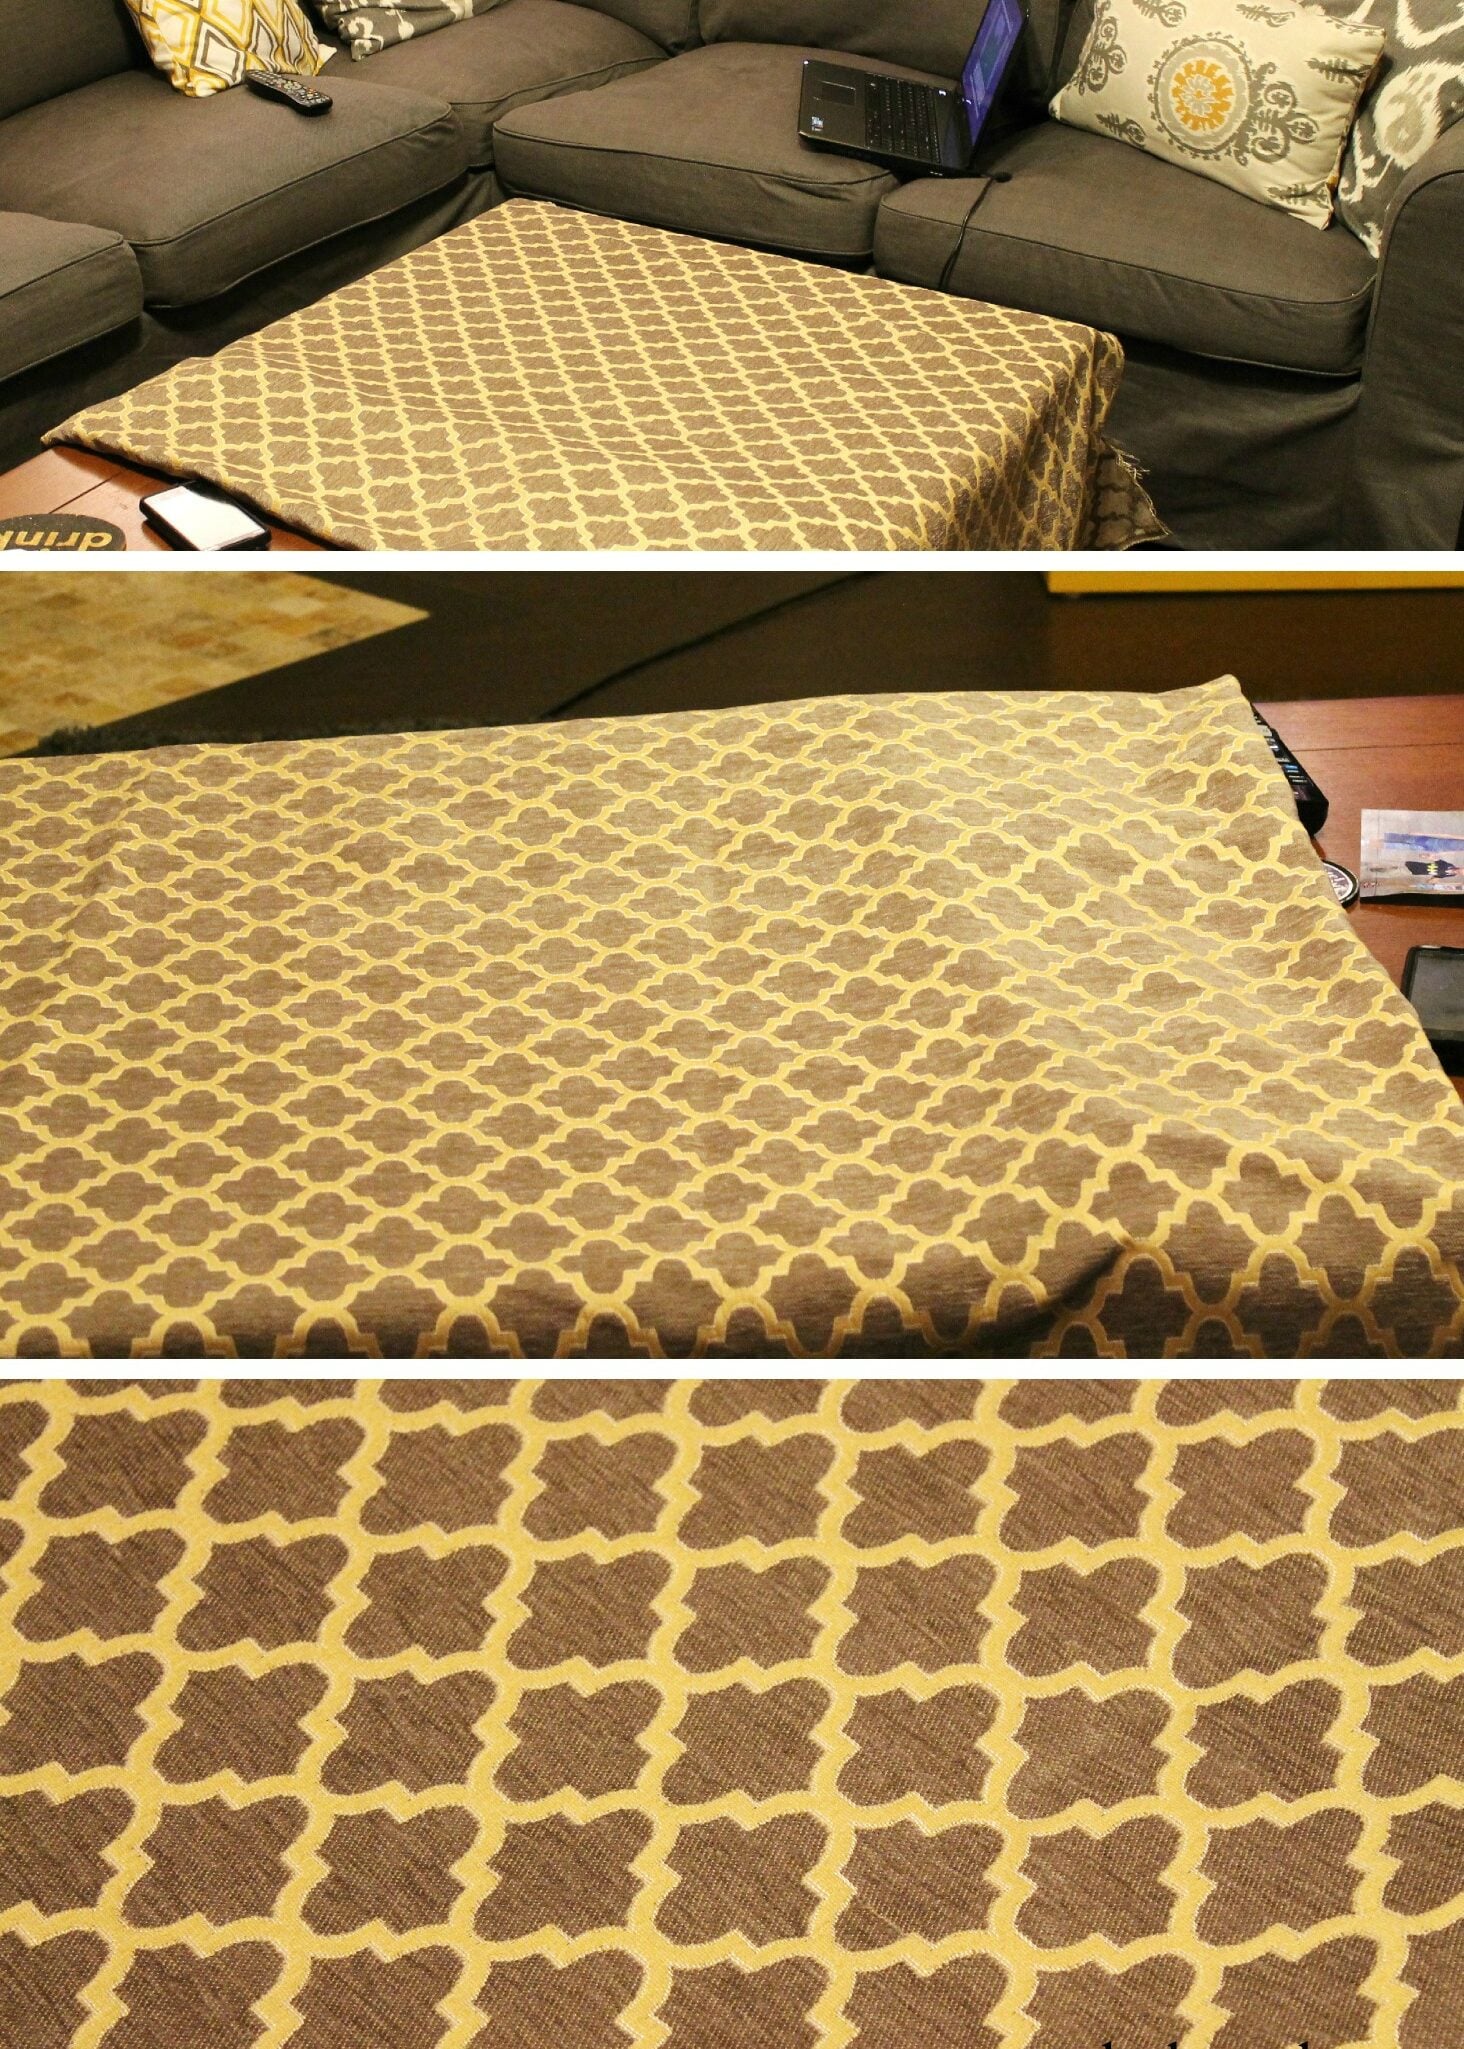
I decided to think about it for a few days, and then asked my 34 closest friends how they felt about it (this is not a joke). Most people liked the fabric, but didn't like it for this space. I felt like if I used this fabric, I would end up hating it and being mad about this whole project. So, I returned it. I had lots of suggestions from my friends....solid teal, solid purple, other patterns, cream, textured, chenille....so many options. I was spending lots of evenings looking around at fabric online, and trying to find the perfect one.
Then, I found it!! I found a fabric that was exactly the same as the grey ikat print I have on a pillow already (see grey pillow below), except it had yellow as the base color, not grey.
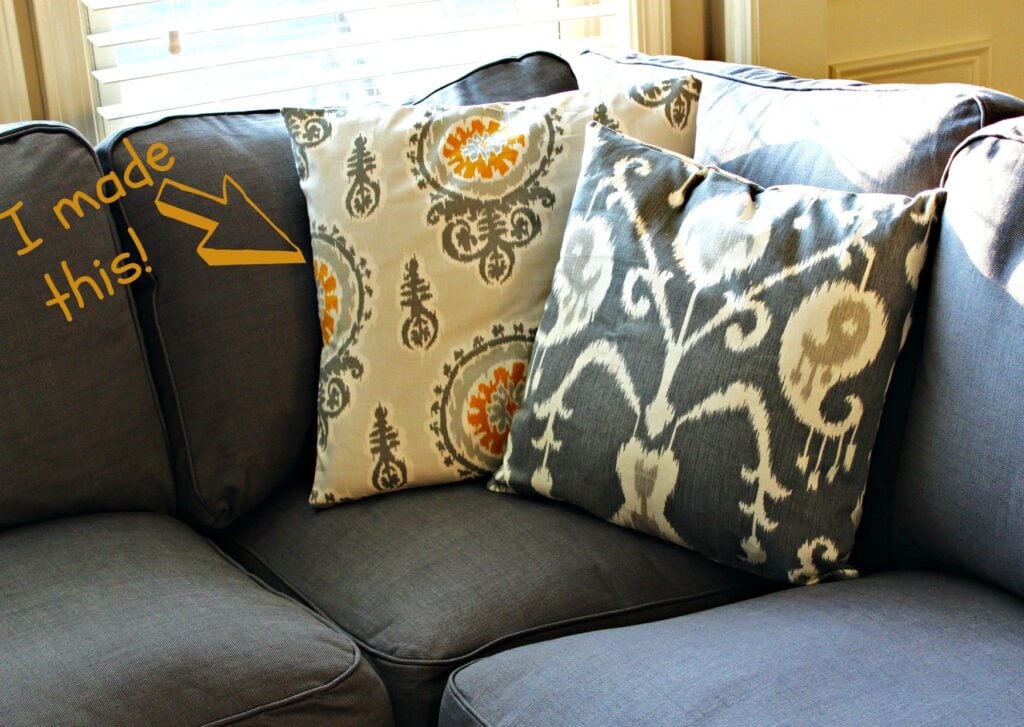
Ding ding ding!!! We had a winner! I placed the order, and then played the waiting game. After about a week and a half the fabric came arrived, and I knew I made the right choice.
Before I could do anything with the fabric, I had to go to Home Depot and have a piece of wood (thin wood, like plywood, really thin) cut to the exact measurement of the pallet. I would use this wood to put on the top of the pallet, and secure the foam, batting, and fabric to it.
Next I purchased thick foam (can be found at Joann's or any craft store), and batting (I used Morning Glory Great Glory Full Extra Loft Batting ) as well. I cut the foam to the exact size of the top of the pallet (I used the thin wood as an outline, since it is the same size).
After this, I used the thin wood to figure out where I would put my tufting buttons. I measured everything out, and spaced 11 evenly on the board. I marked where each one would go with a sharpie, and then drilled a small hole in the wood at each point. I didn't take many pictures of this process because I was on a roll and not really thinking about it.
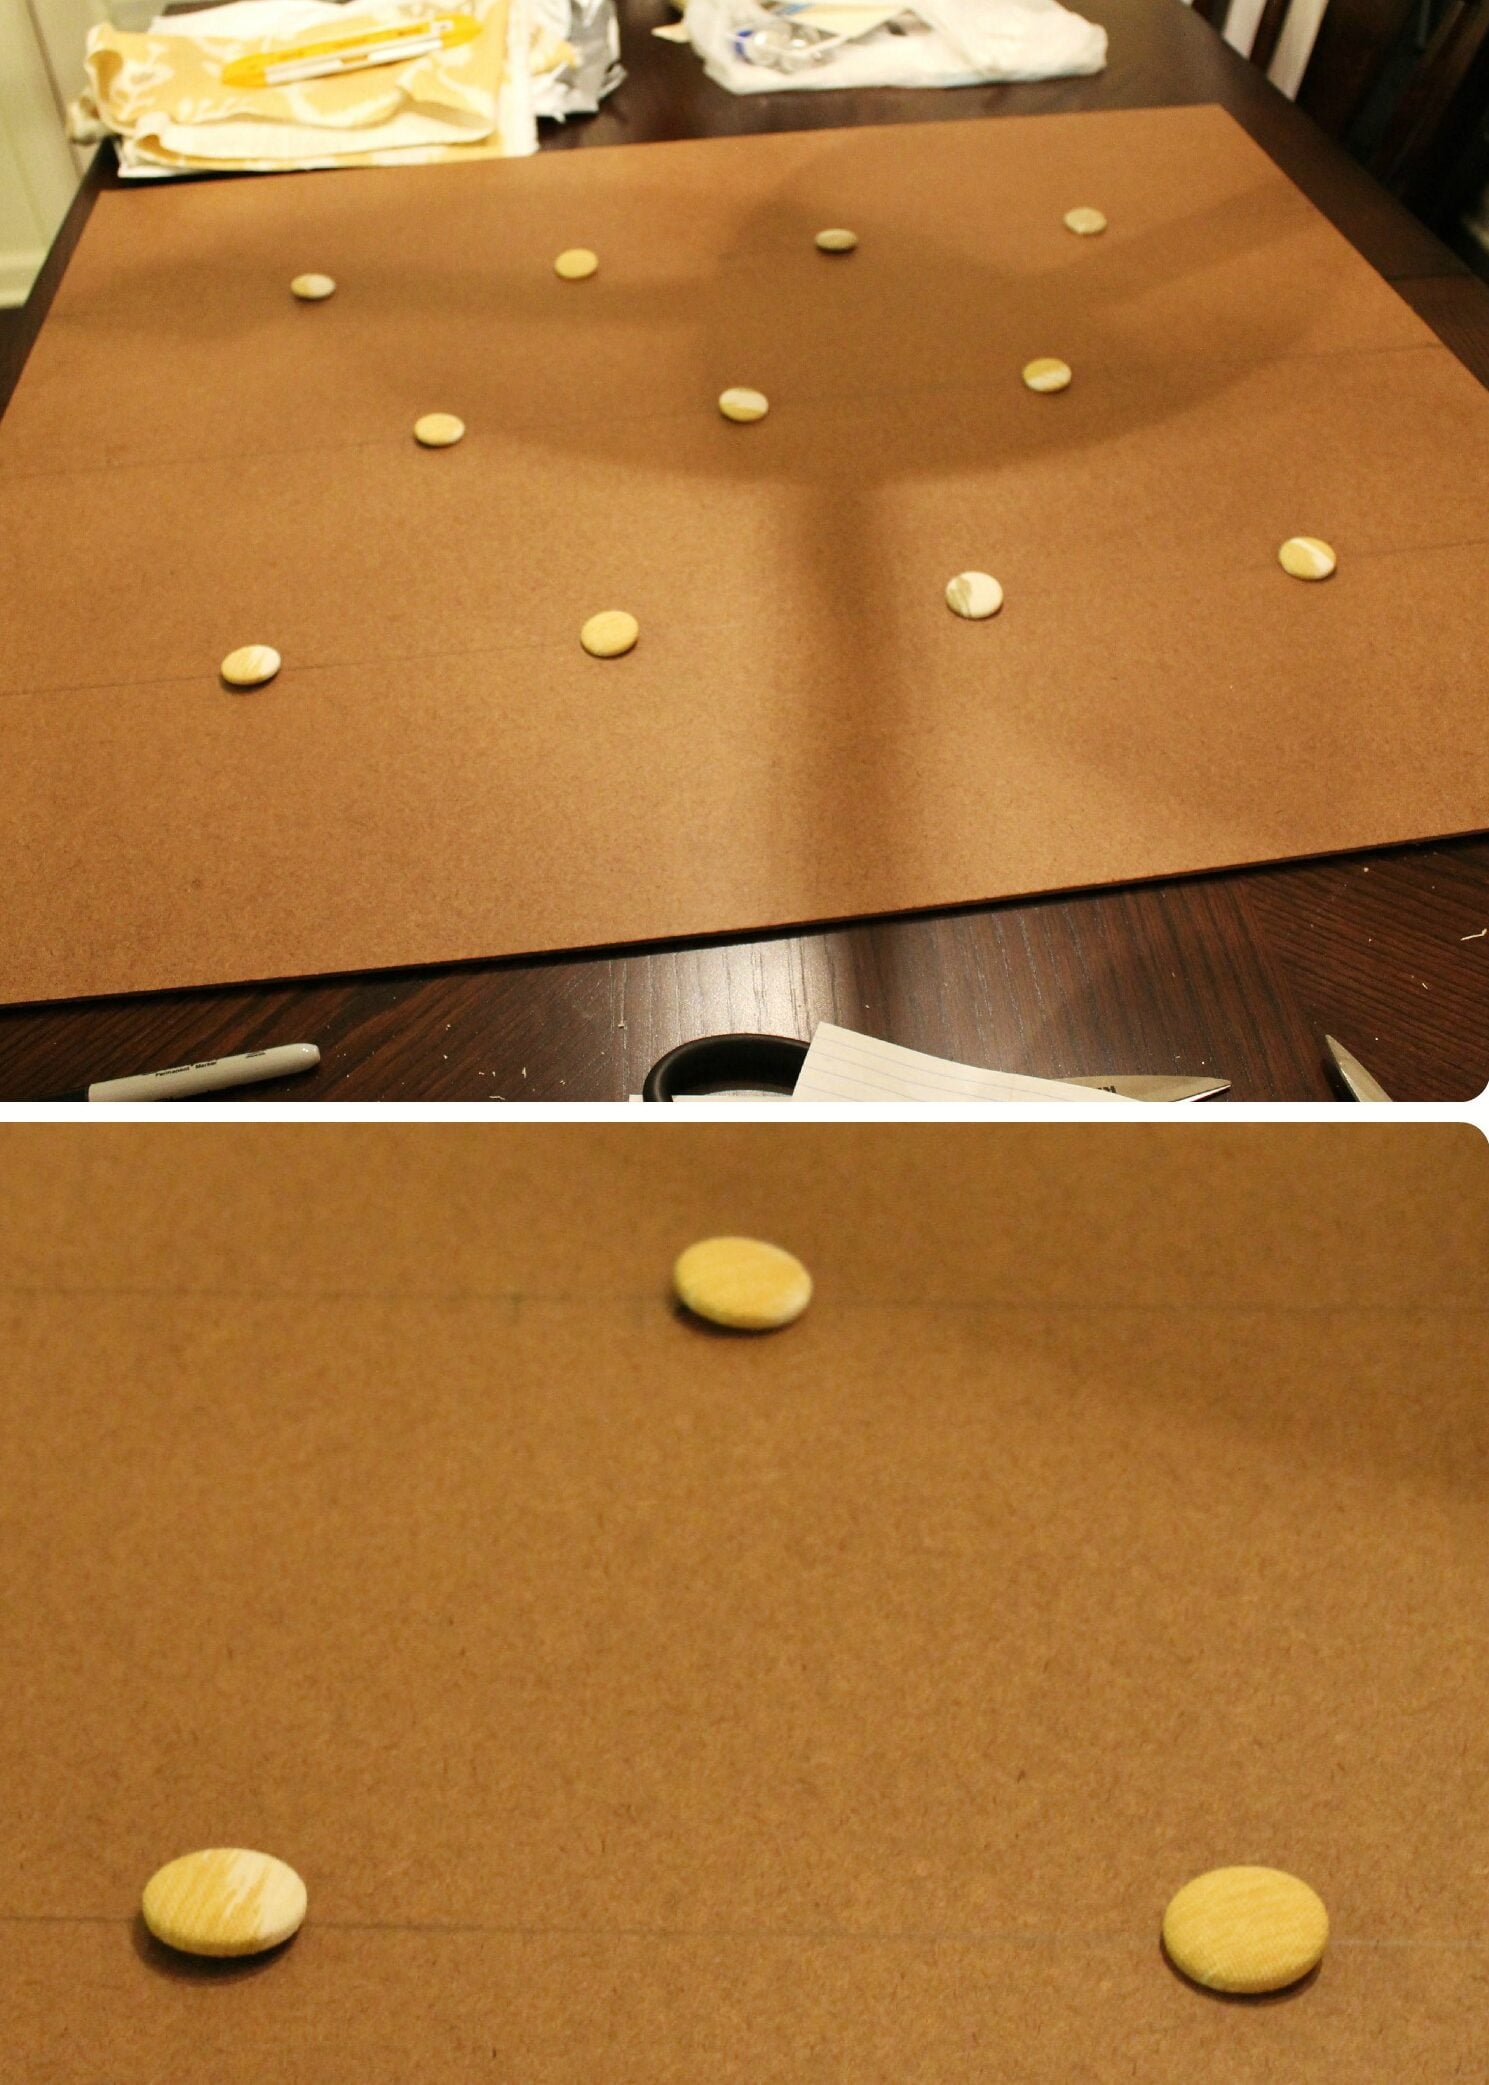
I did make my own buttons using a button making thing from Amazon .
.
- I really liked this brand because it came with the tool to make it, and it made it pretty easy. I read a lot of horror stories online though, about the buttons popping apart while doing the actual tufting-how frustrating.
- I nipped this in the bud but squirting a glob of Liquid Nails
 into the cover before securing the back on the button (if you make them, you will see what I mean). I didn't have any buttons pop apart-thank goodness! I read a lot of tufting tutorials which helped me with the tufting and upholstering questions I had. You can see them all here:
 into the cover before securing the back on the button (if you make them, you will see what I mean). I didn't have any buttons pop apart-thank goodness! I read a lot of tufting tutorials which helped me with the tufting and upholstering questions I had. You can see them all here:
- Welcome to the Mouse House (Upholstering)
- Addicted 2 Decorating: How to Make a Diamond Tufted Headboard (tufting tutorial-great!!!)
- All Things Thrifty- Diamond tufting tutorial
Next I laid the fabric face down on the carpet, and placed the batting on the top. I used Spray Adhesive to attach the thick foam to the wood, and then placed that on top of the batting (foam down, wood should be at the very top, facing you).
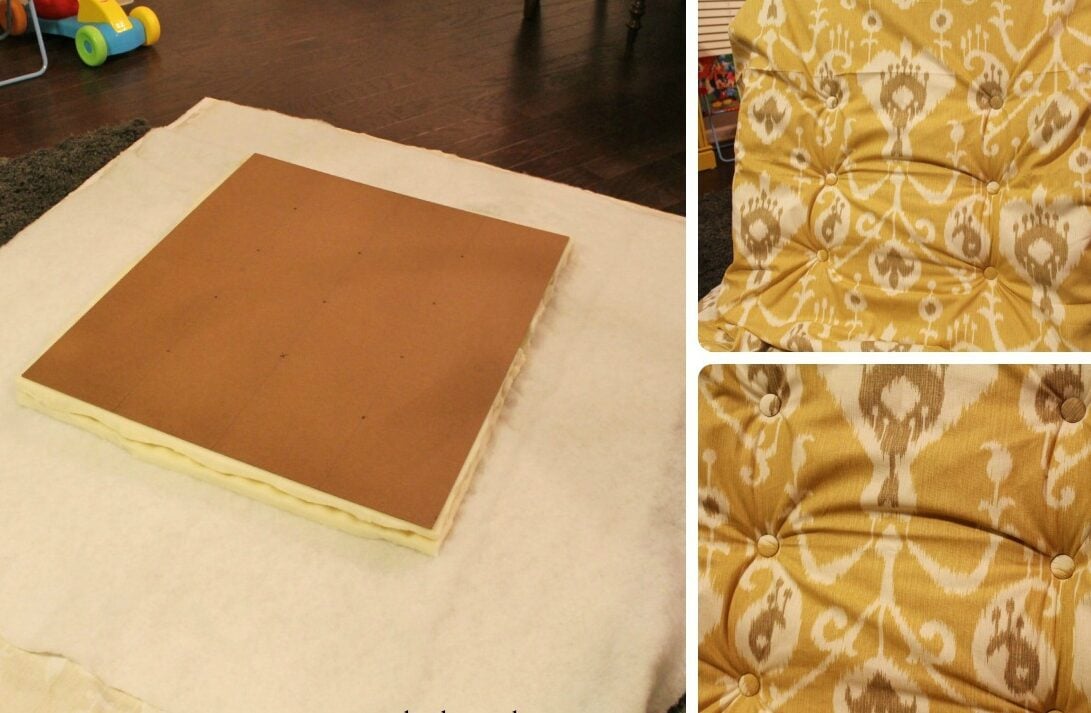
For this next part, I recommend that you have someone to assist you - Luckily I had both my mom, and my husband helping me, because I couldn't have done this myself.
Using an upholstery needle (found at Joann's or on Amazon, I used the 2nd longest one), and very thick string (I did the sides first, and then the middle), feed the string through the needle, then did a double layer (kind of like how you can to to thread when sewing), and tied a knot at the end. I tied 3-5 more knots over that knot to make a large knot that would not be able to fit through the hole I drilled into the wood.
I put the needle through the wood, then poked it out the front (of the fabric), then strung the button onto the cord, and came back through the same hole, out the back. This was a little tricky, because you can't really see where the needle is going. I ended up putting my arm through the side and feeling where the needle needed to go. It was hard, because of the spray adhesive, but I still did it.
When the needle comes out of the hole on the wood side again, then I tied more knots around the initial knot, ensuring it would not be pulled out. There are lots of methods for securing the buttons (check out the tutorials I linked above), but this is what worked best for me. I did this over and over until I had all eleven buttons in place.
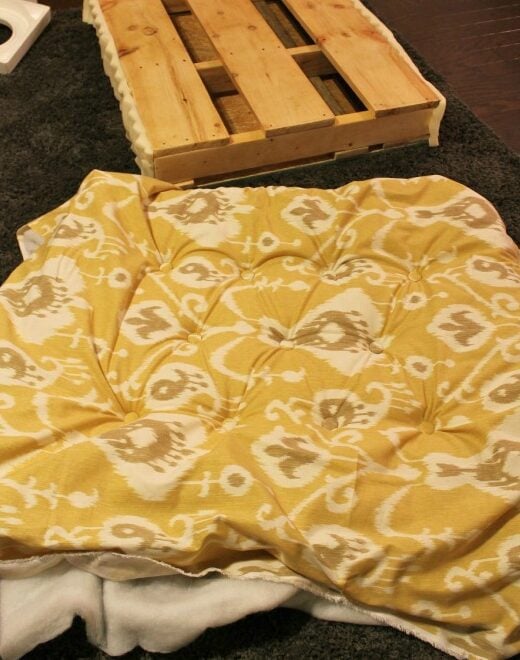
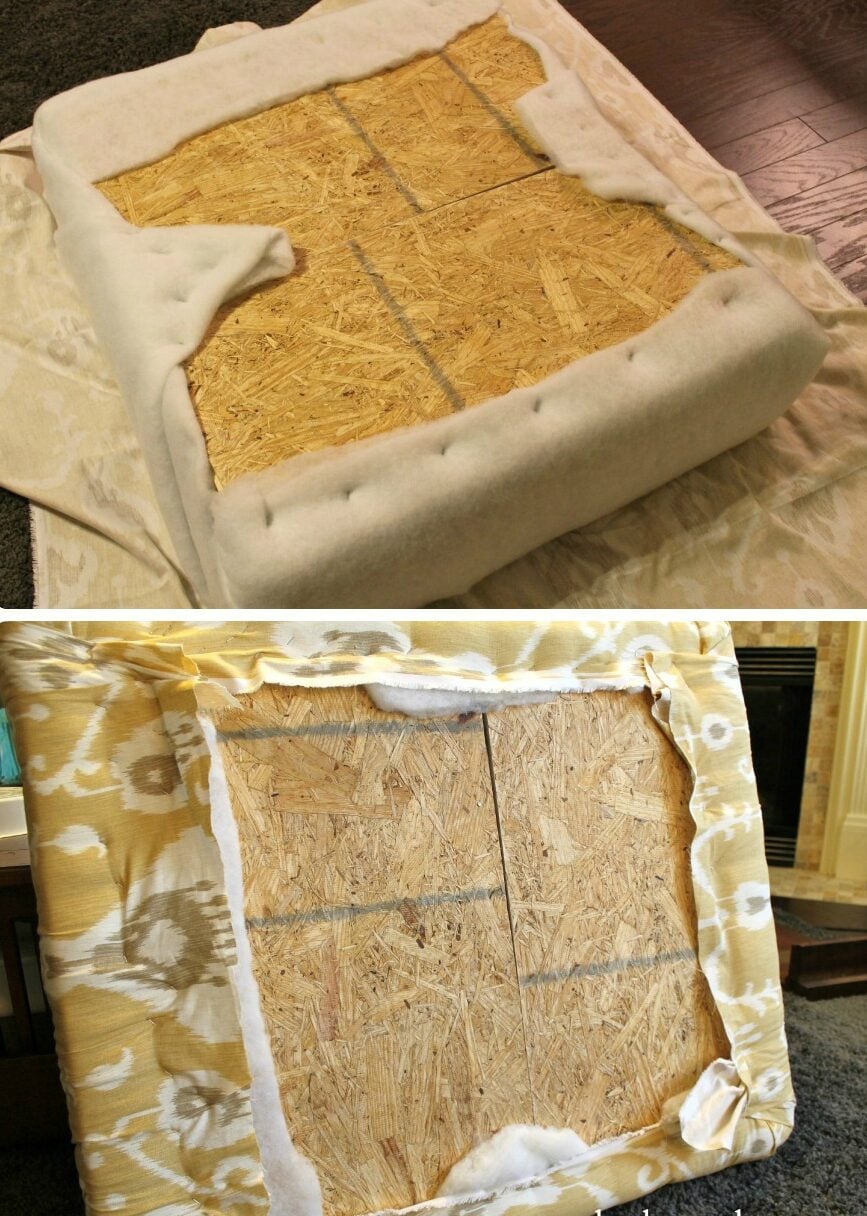
Next, I took the pallet and glued the left over foam to the sides. I didn't want any hard edges poking out, so I thought this would help with having a softer cushion on the outside. I also put the batting on top, so there are multiple layers of cushion.
The next day, it was time to do the actual upholstering. I turned the fabric back to the ground, and put the pallet on top of the wood backing. I had to make sure that the side of the pallet I covered with plywood was facing up to me, so I had an even and solid surface to staple the fabric onto. First, I pulled the batting tightly up and around, and stapled that all the way around. Then I did the same with the fabric.
The next step would be stain the legs that I bought at Home Depot, and let them dry.
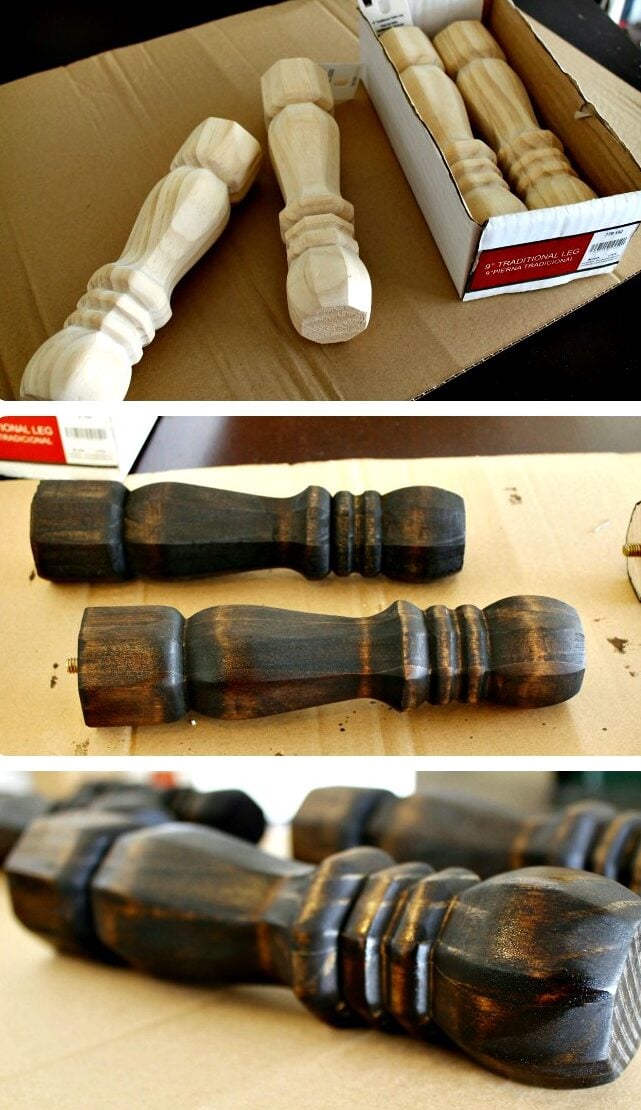
I stained them using leftover stain from our wood floors, and then after they were dry I used Minwax Soft Wax Paste to wax them. I love how they came out.
While they were drying, I attached the mounting brackets to the bottom of the ottoman. This was probably the easiest step. I made sure they were even, because I wanted the legs lined up with one another.
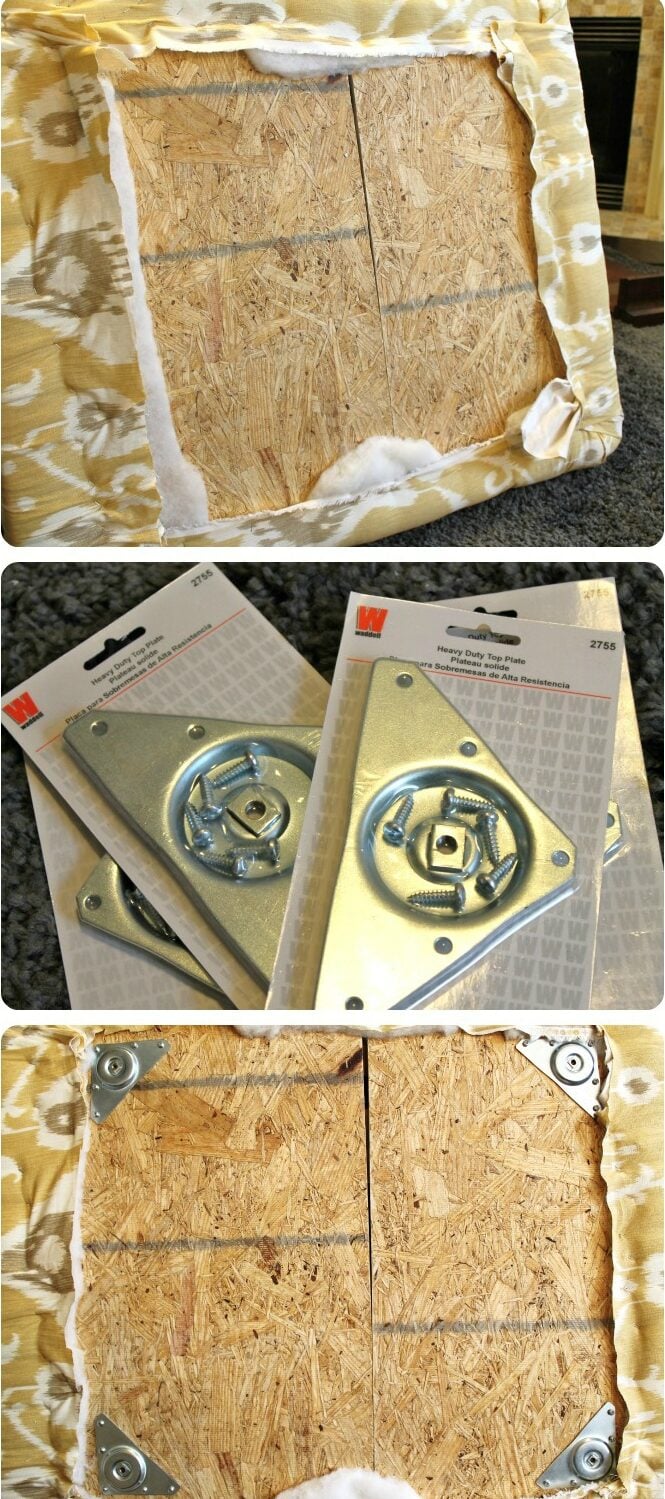
After the brackets were screwed in (the power drill is your friend here), I used a scrap piece of muslin to cover the bottom. I didn't want the bottom to be exposed or have the possibility of little toddler hands playing with those staples on the bottom. I used hot glue to secure it around the bottom, tucking the edge under so it wouldn't show.
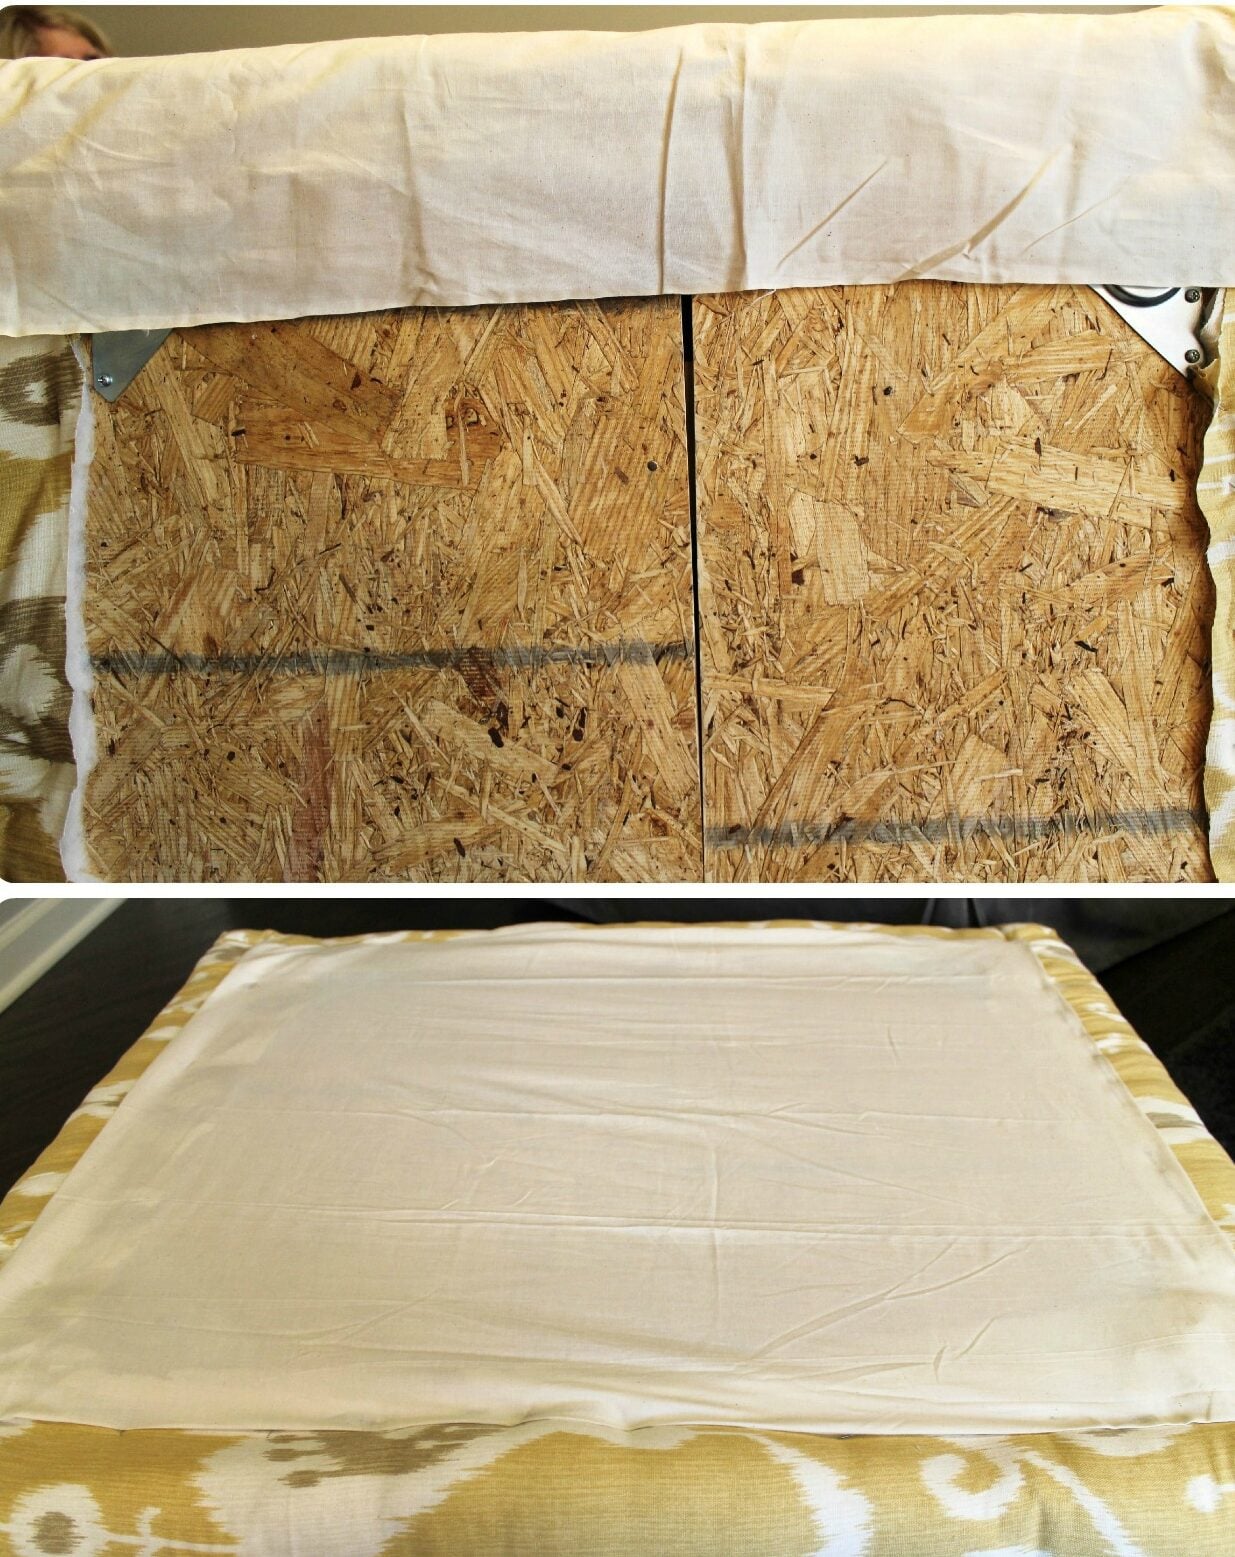
Lastly, I used a pair of scissors to poke a little hole where the leg would screw in (you don't need a big hole), and screwed the 4 legs into the brackets. Voila!!! Done!!! Yessss!!! Now, I know it's not perfect, but I love how it turned out!

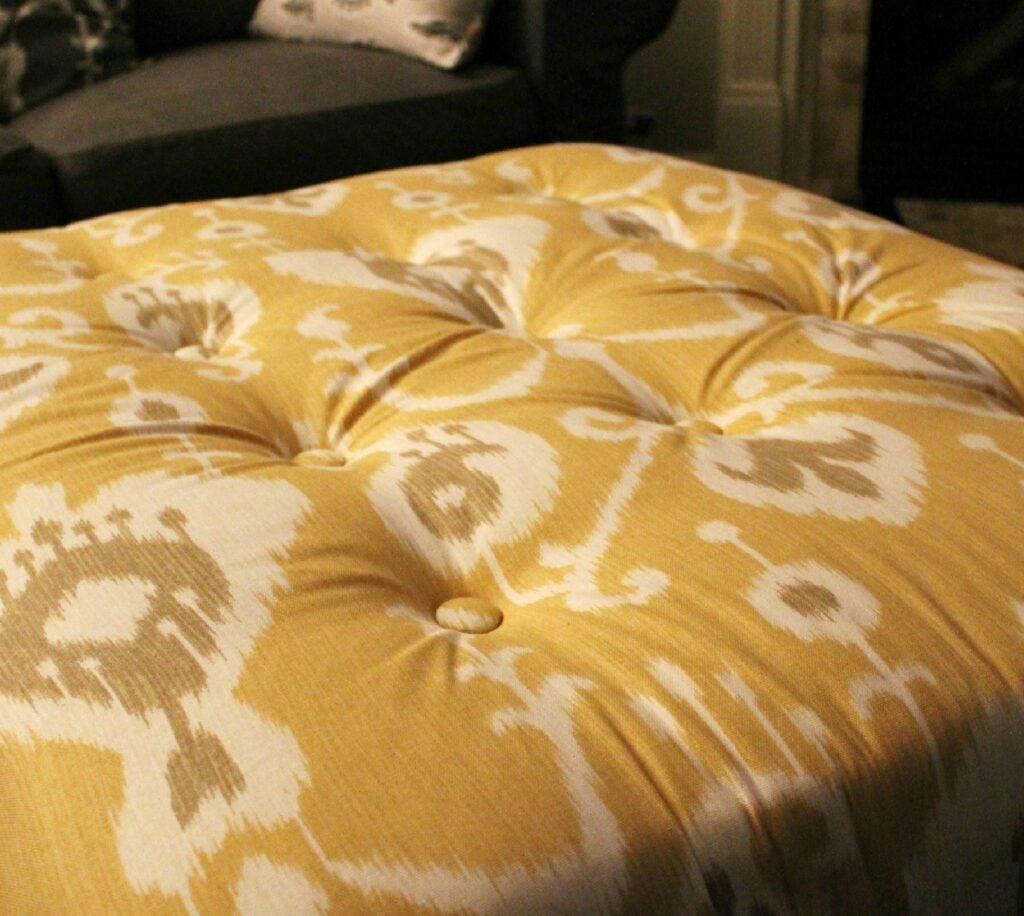
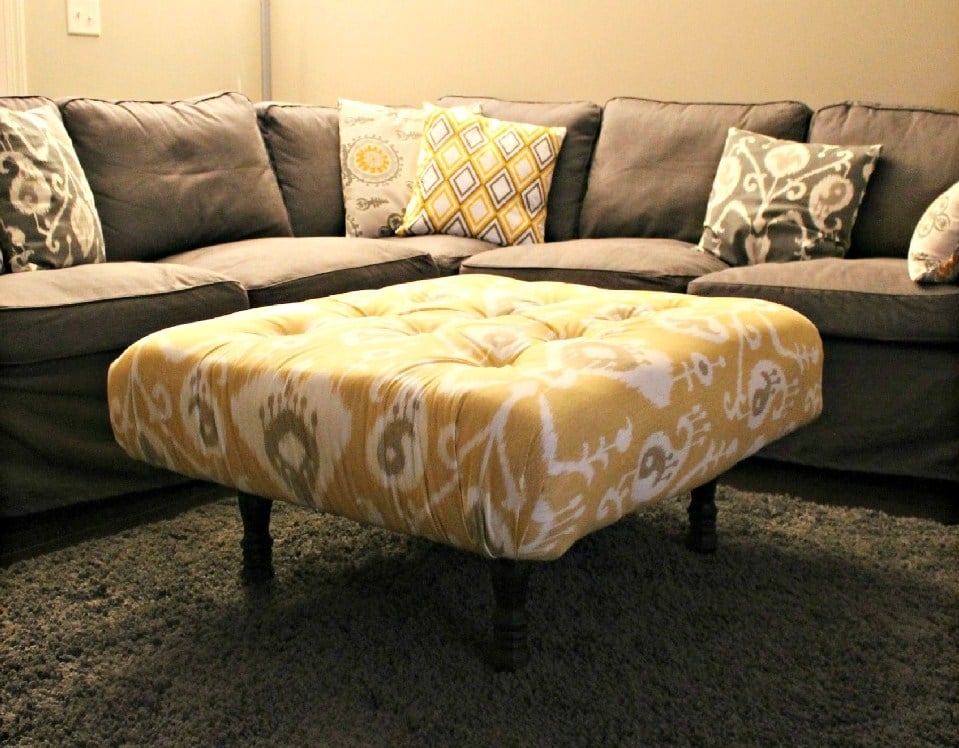
....my son loves it too!

Cost Breakdown:
- Pallet: Free
- Plywood for pallet backing: Free
- Wood for foam support: $1.60
- Foam: $7 (with 40% off coupon)
- Batting: $10 (with 40% off coupon)
- Button Covers: $4.99 (½ off coupon - don't forget these!)
- Fabric: $8.99 per yard x 2= $17.98, plus shipping= about $24
- Legs: $3.65 x 4 = $14.60
- Leg brackets: $2.38 x 4 = $9.52
- Muslin scrap fabric: $1.20
Total: $72.91
Other things you might need (that I already had):
The total time it took to make this was probably around 4 hours. I think it was well worth it! What do you think?
If you like this project, go on over to Facebook and 'like' Domestic Superhero over there!
ATTENTION!!! This project is currently in a contest for Best Pallet Project on Bob Vila! If you like this, take a second and go vote for my Ottoman! I would totally appreciate it! UPDATE: I WON Bob Vila's first round, and then championship round with this project!! Update: This project took FIRST PRIZE in Bob Vila's DIY Competition!

Like furniture DIYs as much as I do? Check out my other projects:


DIY Tufted Ikat Ottoman from Upcycled Pallet with Tutorial

Refinished Farmhouse Hutch Tutorial
Thanks for visiting!
- Allyson
April says
What a great idea! Love the fabric choice!
arzea says
Thank you, April!
Vanessa says
beautiful!!
arzea says
thanks, girl!
Dana L Emch says
you never cease to amaze me! great job girl. i look forward to seeing whats next!
arzea says
Thank you, Dana!! I think I am going to work on a little side table next, and a paint company sent me all this free paint to do it...we shall see how it turns out!!
Becky says
Hi!! I love the ottoman! Which paint store sent you free samples? My next project is to paint and distress two end tables and that would be awesome! Thanks:)
now at home mom says
WOW! WOW! WOW! What a beautiful piece you created! It looks amazing! & Yes all your efforts were worth it! You did put a lot of efforts getting the pallet, but again, so worth it! I wonder what the people in the street were thinking when they saw you 🙂 I don't even know where to start about everything I like about your project: the palette (amazing condition, you lucky), the fabric is beautiful (good choice), the legs (love how they turned out after you stained them). Looks great in your living room! 🙂 Another amazing project you did! I'm glad, I follow your blog, you always keep it interesting! 🙂
arzea says
Wow! Thank YOU for such a sweet comment!! I am so happy you like it and follow my blog!!!
closefamilies says
Can you come live with me? My home would just love you. lol
arzea says
LOL! I am on my way 😉
paula Dean says
no no no, she's coming to live with me!!!! I'm staring at the table I want to replace with an ottoman right this second.....
Made For A King says
I really can't even tell you how much I love this! It is so amazing! And it looks great with your throw pillows. So cute, and you did an amazing job!
Kirsten@madeforaking
arzea says
Thank you so much for your sweet comment Kristen!! I am so happy with how it came out, and am happy that i ended up choosing the yellow ikat print!
Peggy says
WOW!!!! You did a great job. Who would a thunk...and all from a pallet! I would have never thought of a foot stool.
arzea says
Thank you, Peggy!! I am in love with how it turned out 🙂
De'nise says
Beautiful and your hard work definately paid off. LOVE IT! I really enjoy reading your blogs and how you always have such wonderfully detailed instructions. 😉
arzea says
Thanks, De'nise!
Elissa says
You did a great job! Where did you find the fabric?
arzea says
Thanks! I ended up ordering it online from Denver fabrics.
runtspickins says
That looks great!!! Congratulations!!!! =]
arzea says
Thank you!
Rachel Rockwell (@BubblyNature) says
This is the best thing I have seen made with a pallet! Wow...just wow!
arzea says
Rachel, thank you for stopping by my blog and the sweet compliments!! I am very happy with how the ottoman turned out, too! Thanks!!
Stephanie @ The Styled Soul says
OK, I can't "like" this because I SUPER LOVE it!! Great job!!
arzea says
Thanks!!!!
fynesdesigns says
LOVE< LOVE, LOVE!!!
arzea says
thank you!!!!
Jessi @ Practically Functional says
Wow, what an awesome transformation! I love it! And your site looks great. 🙂 Thanks for sharing at The Fun In Functional!
Allyson says
Thanks, Jesse!! I Still have a long way to go and am hoping to roll out a custom site in January!
Jessi @ Practically Functional says
Well it looks great. And congrats, you've been featured again today on Practically Functional! You can check it out and grab a button here: http://practicallyfunctional.net/2012/10/the-fun-in-functional-link-party-23/
Allyson says
Wow! Thanks!!
Allyson says
For some reason I can't get on your site? It's giving me a 403 error!
The Shoestring Contessa says
I absolutely love how this turned out. My husband and I just recently upcycled a pallet into a coffee table
http://shoestringstyle-amanda.blogspot.com/2012/09/how-we-made-pallet-coffee-table.html and I know what you mean about keeping an eye out for a good one!! I had him garbage-pick this one for me (sweet man!).
Allyson says
Your project turned out awesome, too! Lucky for you that your husband helped you out...mine was thinking of sending me to the loony bin 😉
Lindsey says
LOVE this idea! You made a custom ottoman for much less than it would have cost in stores! 🙂
Allyson says
Thank you!!
carolyn ~ homework says
Just to let you know I featured your wonderful project today.
Stop by and grab a featured button and thank you so much for sharing your project.
http://carolynshomework.blogspot.com/2012/11/the-inspiration-board-link-party.html
Allyson says
Thank you, Carolyn!! I added your button and I appreciate you featuring me!
Shabby Chic Home says
Great idea!!! Love it!!!!
Allyson says
Thanks so much for the comment and stopping by my blog!
Claire says
You did a fabulous job creating this ottoman and it looks perfect in your room- great fabric choice- wanted you to know I featured this on my Saturday favorites- have a great weekend! Claire
Kathie (Krafty Kat) says
This is fantastic! Amazing what you can make with a pallet and a little creativity! Thanks for sharing at Gettin' Krafty With It! Can't wait to see what you've been up to this week!
Allyson says
Thanks girl! Thanks for hosting your party! love your blog!
Jamie @ Love Bakes Good Cakes says
I wish I was crafty like this! I love this idea! I love the fabric too 🙂 Thank you for sharing at All my Bloggy Friends. I'm looking forward to seeing what you share this week! 🙂
Allyson says
Thanks! I need to get on the ball and get craftin!
Christine says
CONGRATS!!! You have been featured at The DIY Dreamer... From Dream To Reality!! Come on over and grab your featured button.. you deserve it!
http://thediydreamer.com/2012/11/from-dream-to-reality-linky-party-41/
Allyson says
WooHoo!! Thanks for featuring me! I am going to grab your button!
Megan says
This is absolutely fantastic! Thanks so much for sharing your entire tutorial with us. It's super helpful. Megan
Allyson says
Thanks, Megan! I appreciate you stopping by my blog!
Lynet Witty says
Where did you get the foam from? You did such a great job on this I am passing this onto my sister who is in LOVE with pallet furniture
Allyson says
I actually ended up buying some foam from Target that was meant for a dorm room bed. It was on clearance so I scooped it up!
Elise says
Wow, this was quite the project. You did a great job! Would love it if you linked up on my blog hop http://www.w-t-fab.com/search/label/bloghop. Also let me know if you'd like to follow each other!
Allyson says
I would love too!! Thanks for the message! Email me at DomesticSuperheroAZ@gmail.com and let me know the details! I Have never done something like that so I have no idea how it works! Thanks!!!
megan says
Oh my gosh, I love this! It turned out fabulous! My son would love something like this too! Its funny I was thinking that while I was reading your post and then saw the pic of your son :). Where did you end up buying the fabric? I am in the market for some new curtains.
Allyson says
Thanks! He loooves climbing on it and sitting on it, it's so funny. We always had a table there before, so I didn't know he would react that way! I ended up finding the fabric at Denver fabrics, online. Their shipping was decent and the price was unbeatable (I checked everywhere), at $9 a yard!
Ginger says
Gorgeous! I love that you had vision and went for it. 🙂
I'm starting a new link party and would love for you to come link up. http://www.gingerlymade.com/2012/11/show-and-tell-1.html
Allyson says
Thank you for stopping by my blog, Ginger! I hopped over and love your space! I linked up, and can't wait for your next party! I want to get in on these linky parties too...was it pretty easy?
Paula Parrish says
Wow! That is a amazing transformation from a pallet to a ottoman. So pretty and green at the same time, love it. Nice Work! ;o)
Allyson says
Thank you, Paula! I am definitely trying to keep my projects green! Thanks for stopping by my blog!
Kathryn Griffin says
OMGoodness! You did an amazing job on this!! Absolutely fantastic!! Thank you for sharing. Would love it if you would share this at my Make it Pretty Monday party at The Dedicated House which goes live at 8am CST on Monday. http://thededicatedhouse.blogspot.com Hope to see you at the bash! Toodles, Kathryn @TheDedicatedHouse
Allyson says
Thanks Kathryn! I would love to stop by and link up to your party! Thanks for hosting!
Amanda says
Fabulous project! I love how it turned out. Come over to my house and make one, please? 🙂 Thanks for sharing at I Made It! Monday. Be sure and grab a featured button when you link up this week.
Hani Shabbir says
You have been featured at Friday Fun Party. 🙂
Allyson says
For tomorrow!? I can't wait!
Lura says
I will definitely be doing this!!!!!!!!!!!!!!!!!! This looks amazing. Thanks for sharing!
Lura
x
Allyson says
Thanks for stopping by my blog, Lura! I love yours and am gonna hop over and follow you on FB!
Allyson says
Oh wait...you aren't on FB 🙁
stacey says
Love this!!! I have some pallets in the garage that need love. You have inspired me!!!
Thanks for linking up at Glued To My Crafts
Allyson says
That is awesome!! Thanks for hosting! I can't wait to see what you do with them!
Jessica says
What type of foam did you use? I priced some at JoAnns and it was pretty pricey.
Allyson says
Hi Jessica...I used a foam that was meant for a dorm size bed, like the foam cushion that goes on top. I cut it in half, then put the egg crates facing each other so it would be flat on the outside. It was just over $7 on sale at Target. However, I think if you are going to buy some foam at Joann's...you should look for 3-4 inch foam, and use a 50% off coupon on it. They have them online everywhere. You could also check hobby lobby, and use their coupons, too. Good luck!
Nicole says
That is so gorgeous!
Allyson says
Thanks, Nicole!! Thanks for stopping by my blog, too!
Jann Olson says
Your ottoman turned out darling! Let me tell you it cost a heck of alot less than my purchased big round ottoman in my family room. Your hard work really paid off! Thanks so much for sharing it with Share Your Cup. I will be featuring you this week.
Hugs,
Jann
Allyson says
thank you, jan!!! Can you let me know when it goes live?! thanks!!
salvageforthesoul says
I'm very late to the party, but nice work! 🙂
Allyson says
Thanks so much!
Alexandra says
Wow, great idea! I love it!
Allyson says
Thank you! I appreciate you stopping by my blog!
Becki says
Great project! I love everything about it! I would love if you would link it up at Eco-Kids: http://organicaspirations.blogspot.com/2012/11/kids-learn-and-play-and-eco-kids-tuesday.html
Allyson says
Thanks, Becky! I just swung by your blog and linked it up! Thanks for the invite!
Peggy-PJH Designs says
Wow Allyson! What a story! And what an ottoman! I'm so glad you didn't give up on it. Thanks so much for sharing on Transformed Tuesday! I'm featuring you later tonight and by the way your son is adorable! Hugs, Peggy
Allyson says
Hi Peggy!! Thanks so much! I love your blog! I will definitely check it out tonight! Cheers!
Stacy says
I LOVE the fabric that you chose. Where did you order it from?
Allyson says
Thanks!! I ordered it online from Denver Fabrics! It was super cheap too, less than $9 a yard!
Charlotte Conner says
I really like the breakdown of your pictures. Your color scheme is very pleasing. Check out my ikat furniture on my blog...
Julie Boarder says
I just came across your blog on The Rustic Pig and I love your ottoman. Very funny story btw and I can't believe what good condition your pallet was in. I have a pallet sitting beside my garage which I had my husband rush to collect in his van so I wouldn't lose it to someone else...but now I don't know what to do with it! Perhaps an ottoman is in our future...
I'm now following you, thanks for the inspiration,
Julie
Allyson says
Thanks for the sweet words, Julie. It was quite the event getting that darn pallet home...but, I am really happy I did it...and would likely do it again, lol! I can't wait to see what you do with your pallet! Please, please keep me updated!
Rose @ Walnut Acre says
I love pallet projects! This looks wonderful.
Allyson says
Thanks, Rose!
singlelife2marriedwife says
LOVES! nice work.... you are so handy!
Lacey S says
Great tutorial thank you! I just went over to fb and liked your page. I have had a pallet in my garage since our flooring was delivered last year. We are currently remodeling our basement and if the sectional we pick out doesn't haven't have an ottoman, I am so doing this!
Allyson says
Thanks for stopping by, Lacey!! I would love to see your final product!! Thanks for the like on Facebook and be sure to update me! I can't wait to see it!
De'nise says
LOVE-love following your blog! Your instructions and pictures on each project
are presented so clearly with a sense of humor too. 🙂
Thanks so much for inspiring me!
adventuresofaprincess says
I love this tutorial! I definitely want to do something like this once the boyfriend and I move to a bigger place. Out of curiosity, do you have any problems with it tipping over because the legs are in so far? Thanks!
Allyson says
That is so funny that you asked me that, because I never even thought of that!! It has never tipped over, and the legs aren't in very far...maybe 2 inches...maybe. It's super sturdy and me, my son, and my husband regularly sit on it!
This Silly Girl's Life says
This looks amazing and soo professional! I need one, where can I order it?! haha... We would love it if you would link up at our new linky party: Two Girls and a Party Hosted by:
Dana @ This Silly Girl's Life
Parrish @ Life with the Crust Cut Off
We hope to see you there!
Allyson says
Hey! Thanks!! I linked up and love your page!
Brenda says
So love this!!! Thanks! 🙂
Parrish RItchie says
I cannot wait to try this!!! So cute, my only problem is I would want to make like 50 of them every time I came across some cute fabric lol. Thanks for linking up!
Alexis @ We Like to Learn as We Go says
Wow your ottoman turned out awesome! And I love the fabric you chose! This was the most clicked on at my link party! I'm featuring your post tonight!
Allyson says
Thanks!!!
Ashley says
Love the project! And the couch also! Where did u end up finding it?
Allyson says
Thanks, Ashley! After months of searching, we found it at Ikea!! It's the Ektorp sectional 🙂
Jann Olson says
I remember featuring this when you first showed it. Love it still! Thanks for sharing with SYC.
hugs,
Jann
Ariela says
What an amazing detailed tutorial. Love everything about this. I also have a grey couch and yellow accents throughout the living room. I have a cheap coffee table right now and have been wanting to change it out for an ottoman. Now to find a pallet (hopefully from work!) and pick out some fabric!
lmreece says
Incredibly creative!! love it!!
apeach4jessie says
I am thinking of trying this. I already have 2 pallets on hand from an abandoned platform bed idea (my son decided he didn't like the idea) so what I think I'd like to do is find a way to make your ottoman into a storage ottoman instead of adding legs. What do you think?
Allyson says
That sound totally awesome!!! Please, please update me when you do it! I would love to see how it turns out!
apeach4jessie says
Absolutely. I am definitely going to do it because it's been rolling around in my head all day now. Only way to get it out is to make it.
Linda says
I think this is amazing! Who would have thought? The pallet that you picked up was exceptional, too. The pallets around here are much thinner wood and broken looking, but it's still fun picking them up. I remember seeing a desk on the side of the road. It was an old oak desk and I wasn't leaving without it (that's what I told my husband) and it went on top of the mustang I was driving at that time. To this day, it is my husband's favorite piece of furniture.
Take care, Linda
Allyson says
I know, pallets in good condition are so hard to find. That is so funny about the desk...that's always how it goes, right? Thanks for stopping by, Linda!
Roeshel S (@DIYShowOff) says
Wow! You did an awesome job! It's gorgeous!
Allyson says
Thanks so much for stopping by!
Abby @ Just a Girl and Her Blog says
Wow! This is so amazing! Great, great, GREAT job! I found you at the Sundae Scoop Link Party--thanks for sharing!
~Abby =)
Allyson says
Thanks Abby!
Sara@MilwaukeeKitchen says
Great project! So glad you shared it with us! I am not sure I have the confidence to try this myself, but yours looks awesome! Sara
Allyson says
Thanks, Sara!!
Carol ( Answer Is Chocolate) says
Amazing product Allyson. I wanted to let you know I'm featuring it as part of my link party wrap up tomorrow.
Allyson says
Thank you, Carol!!! I will be sure to grab a button! Thanks so much!!
amie @ Pinkapotamus says
This looks A-mazing.. and I featured you on this week's Pink Hippo Party! http://pinkapotamus.blogspot.com/2013/03/pink-hippo-party-116.html
Allyson says
Thank you!!!
Kara says
This is wonderful! It's so beautiful. Love it, and had to pin it because we need one so badly, lol. Thanks so much!
ericax235 says
OMG! I love this! Thanks so much for linking up at Pinterest Tuesday.
Erica
We Three Crabs
Emily from Nap Time Is My Time says
This is gorgeous! I love it, and it's more affordable than buying one. I'm so happy you linked it up at last week's Whip It Up Wednesday party!
Hope you'll join the party again this week!
Allyson says
Thank you so much! I will definitely be back! I am going to start up a party tomorrow, so I hope you stop by and link up, too!
Amy says
Love Love Love! So beautiful!
Where did you get your couch?
Allyson says
Thanks, Amy! The couch is from Ikea-the Ektorp sectional with the grey cover! We LOVE it!
Julia Forshee says
This looks soooo good. I am impressed and inspired!!
Allyson says
Thanks, I appreciate you stopping by my blog!
Linda says
Hi, Allyson, I featured your amazing project. You inspired me to do something more than simple crafts! Linda
This week's party is now open!
http://www.craftsalamode.com/2013/03/what-to-do-weekends-9.html
Allyson says
Thank you so much, Linda! I hope you get to link up at my party, too!
Sarah 'Terhune' Lemp says
Love this! Thanks for joining our link-up party! We featured you in our All Things Thursday Link-Up Favorites. Find it here: All Things Thursday Favorites!
Stephanie says
Thanks so much for linking up at my link party. You really did a great job on your ottoman, I would never know it was made out of a pallet! I will be featuring you tomorrow at this weeks link party!
Stephanie
http://www.simplydreamandcreate.com/
Shauna {The Best Blog Recipes} says
Thanks for linking up to The Best Blog Recipe’s Weekend re-Treat #6!
Wanted to stop by and pin your image to My Link Parties Craft/DIY & Recipe Boards while I was here.
Hope you have a great rest of your week 🙂
Shauna
http://thebestblogrecipes.blogspot.com/
http://ready2loseweight.blogspot.com/
Allyson says
Thanks, Shauna!!
jocieopc says
Hey Allyson, I LOVE LOVE LOVE this! pallet projects are the best! You will be featured tonight at The Humble Brag, plus, you along with all our other features will receive The Better Half tshirts. Email me with your shirt size and address so I can send it straight away! 🙂 Thanks so much for linking up!
JESS44903 says
This is gorgeous! Oh my! 🙂 Thanks for linking up at the Link Up!
Georgann McNabb says
You did a great job (coming from an upholsterer's point of view)!
Allyson says
Thank you!
erica armenta says
Wonderful job!
Steph @ Crafting in the Rain says
What a fun project--and it's so pretty!
Mel {MamaBuzz} says
Love this, and love even more that you made it out of a pallet! My husband used pallets to make our boys a playhouse/treehouse. Your ottoman is so beautiful; I love the color. Thanks so much for linking up to Inspire Me Wednesday! Featuring you in this week's issue.:)
Allyson says
Thank you so much!! I am going to check it out! I also love pallets, clearly 🙂
Sabrina says
I LOVE, LOVE, LOVE this!!! I want the exact same fabric!! I also love your couch and am trying to find one like it. Where did you purchase yours??
Christina @ I Gotta Create! says
It's Fabulous! You really did an amazing job.
Thanks so much for linking up at I Gotta Create!
<3 Christina
Allyson says
Thanks Christina, and thanks for stopping by!
Anne @ Domesblissity says
Hi Allyson, what a clever girl you are. An excellent tutorial. I might even give this one a go myself. Thanks so much for linking up at Thriving on Thursdays. I'm featuring this at tomorrow's party. Anne xx
Allyson says
Yay! Thanks so much! I am going to give you a big shout out on Facebook!
Marilyn says
What a great project...I LOVE it!
Judy says
Hi Allyson,
Thank you so much for joining Pin It Monday Hop#2 Where you pin and get pinned (LINK). Please come back on Sunday at 5pm (CST)for our Pin It Monday Hop#3. Watch out for my 10 features soon. Pinned this to our Pin Board for re-pinning.
Judy
http://www.pursuitoffunctionalhome.com/
http://www.kusinaniinday.blogspot.com/
Judy says
Hi Allyson,
You have been featured! Check it out http://www.pursuitoffunctionalhome.com/2013/04/10-features-from-pin-it-monday-hop2.html
Judy
http://www.pursuitoffunctionalhome.com/
http://www.kusinaniinday.blogspot.com/
The Style Sisters says
Oh hello this is awesome!!!!! Come link up to centerpiece Wednesday and share this post with us http://thestylesisters.blogspot.com/2013/04/centerpiece-wednesday-and-wrap-up.html
Allyson says
Thank you! I will!
Mallory says
I am doing sorta the same thing but outside furniture, but we don't know where to get cheapER outside material other then our expensive fabric store around town, do you know of a good site or somewhere to buy not so expensive weather proof material, or am I just out a pretty penny?:) I love the finished product, looks pretty perfect to me! And what a good inspiration! Thanks for the idea&tips
Allyson says
I know there are several online retailers that sell low price fabric. I used Denver Fabrics online and they had a large variety. You should check them out!
Mallory says
Thanks, I definitely will!
Alaina says
Love this idea what type of fabric did u use??? Or what kind of fabric can be used to make this!!??
Allyson says
You want to use upholstery fabric for this. Most other fabrics will not work well!
Christine says
This looks wonderful. You did an excellent job and whart a great idea! Love the fabric color and print.....Christine
Allyson says
Thanks Christine!
Judy says
You did an amazing job. I created an ottoman about a year ago and tried to do the button tufting and I was one of those people who, while we stopped for a dinner break, heard the buttons popping one by one. It was a terrible, yet somehow hilarious, thing. I wish I had known about the liquid nails idea. I just have an ottoman without tufting now. Love your fabric choice as well!
Allyson says
omg, I would have died! I did so much research and it seemed like everyone said that the buttons come off so I decided I needed to fix it before it even happened! Thanks for stopping by!
Karen says
Amazing! Love the fabric you picked too! Kudos!
Karen
Lizzie says
Gorgeous project!! Thanks for shopping Home Depot!!
Allyson says
Thanks! Love HD!
Brandie says
I am tackling this project now and am looking back over your foam choice....after purchasing 3 inch foam, based on your "thick foam". I should have looked at your pictures better, it looks like you actually used egg crate foam??
Allyson says
The foam you bought should be perfect for this project. I used egg crate foam, which I put on top of one another (so the eg crate part would not be sticking out, but make into more like the solide foam), because it was on clearance...which I think I also mentioned in the post. The foam you are using will be perfect and better than what I used! Please share some pictures on my facebook page after you are finished! I Would love to see the final product!
mariebamer says
Do you know the exact name of the fabric that you ordered from Denver Fabrics? I am looking for the yellow base color and am only finding fabrics available in the grey base. Yellow would work best with my existing furniture but cant find it anywhere online! Help!
Allyson says
It's called Java Umber Ikat Drapery Fabric. You can find it here: http://www.denverfabrics.com/p/SW27787/Java-Umber-Ikat-Drapery-Fabric hope that helps!
Katie says
I also made a pallet ottoman but I added wheels to the bottom and used 2 full size pallets for mine! 🙂 I LOVE your fabric. I just started blogging this week, I am now following your blog! 🙂
http://www.katiescrochetgoodies.com/2013/08/diy-pallet-ottoman-tutorial.html
Shannon says
How funny! We just bought the same couch (same color) and 2 of the pillows I made for it were using the same fabric you have right in the corner. We clearly have good taste. 😉 I've been telling my husband that our rectangular coffee table does not work anymore, so this ottoman may be a good compromise to buying a new table.
Allyson says
What a coincidence! We do have good taste! The ottoman is a perfect solution for the sectional and it's held up incredibly well! If you make one, please visit the Domestic Superhero Facebook Page and share some pictures! I would love to see it! Good luck!
Clare Harper says
Saw pallets at my neighbor's house....it's vacant and there are guys working over there....well, I went over and asked if I could have a pallet if they weren't keeping it! They gladly gave me one which is in decent condition and the guy carried it over to my house for me! I plan on carrying bungee cords in my car if I ever spy another one! Thanks for the great tutorial!
Allyson says
SCORE! What a nice guy to do that for you! I HIGHLY recommend having bungee cords in your car at all times, just in case the perfect pallet (or something else) comes along!
Amélie says
I really love that! it's beautiful
and thanks for your brilliant ideas
Wendy says
You did an amazing job! Thanks for sharing your creativity and inspiring others to create! 🙂
Allyson says
Thanks, Wendy!
Ellie says
This is so cute!!!! How tall are the legs you used?
Allyson says
They are 12 inches! Thank you!
AmieJo says
It turned out great. Well worth the wait to find the perfect fabric!
Kathy Masini says
Love this idea. I might try it with a waterproof fabric for the front porch. JUST A SMALL SUGGESTION to make the buttons and tufting easier to measure…I used a peg board for this when I made my headboard. Make this one step faster and easier. Thanks for this great idea..
Allyson says
Wow, that is a GREAT idea! Thanks for sharing!
christina says
coolest. thing. ever.
Nora says
WOOWWWWW!!! YOU ARE AWESOME...A REAL DOMESTIC SUPERHERO!!! I'm so happy to have discovered your website!!
Allyson says
I am happy you did too! Thanks for the sweet comment!
SammiJo@JUSTAIRCOMPRESSOR says
Oh wow, what a neat thing to do with the pallets. I'm amazed at just how creative people have been in using pallets instead of throwing them out. It seems like pallets can be reused for other things instead of just staking things on them
Robert Smith says
Love the project! It turned out so good. I really love your ideas and all the project!
Allyson says
Thanks so much!